Big Blue

Open stitches can be wildly interesting patterns on their own. But their ability to integrate the beautiful shading of a painted canvas is what keeps me drawn to them. Today’s stitch is case in point.

Click on image to see on whimsicalstitch.com's Pinterest account. Visit pinterest.com/whimsicalstitch/whimsicalwednesday for a library of all #whimsicalwednesday and #smallspacesunday stitch diagrams.

Click on image to see on whimsicalstitch.com's Pinterest account. Visit pinterest.com/whimsicalstitch/whimsicalwednesday for a library of all #whimsicalwednesday and #smallspacesunday stitch diagrams.

Click on image to see on whimsicalstitch.com's Instagram account. Visit instagram.com/whimsicalstitch to see a library of stitched samples for select #whimsicalwednesday and #smallspacesunday stitch diagrams.

Click on image to see on whimsicalstitch.com's Instagram account. Visit instagram.com/whimsicalstitch to see a library of stitched samples for select #whimsicalwednesday and #smallspacesunday stitch diagrams.

The stitched sample uses 6 plies of Splendor on 18-mesh and is the tabletop from my Lemons project. I love this stitch because it was large enough to make the table stand out and still integrate the beautiful blue shading of the same table.

This stitch would make a wonderful field of…whatever. Grass. Wheat. Snow. You get the idea. For grass or wheat, I would use an overdyed silk floss such as Silk ‘N Colors or Gloriana. I love Flair for snow. Hear me out. I know Flair can be a challenge to stitch with. However, Flair is so good at absorbing the color it is covering, especially white Flair. I navigate Flair’s fragility by snipping the end of the thread the moment the thread starts to fray. This stitch would also make a gorgeous roof.

Flip this stitch 90° and it will make a gorgeous wallpaper, background, or clothing stitch. For wallpaper or background, my go-to threads are Elegance, silk floss (with a lighter ply count), DMC Floche, or Soie Perlee. For clothing, I would alternate a matte and a metallic thread every other column. For the matte, I would use a single strand silk such as Vineyard Silk or Pepper Pot. I would use Silk Lame or Fyre Werks for the metallic (depending on how bright you want the contrast to be).

This stitch diagram, along with all other #whimsicalwednesday and #smallspacesunday stitch diagrams, can also be found on a Pinterest board here.

Be sure to follow whimsicalstitch.com on FacebookPinterestInstagram, and Twitter.

If you like what you see on this blog, want to learn some very creative decorative stitches, and how to put them all together, whimsicalstitch.com sells Stitch Guides and Stitch Concepts for Melissa Shirley Designs, Zecca DesignsSandra Gilmore, Purple Palm, Maggie, and Patience Brewster, and many more. Click here to see the newest guides and click here to see the entire collection.

I hope you have the perfect spot for this stitch!  Please enjoy!  

A Note about Diagrams
I use color in diagrams to make them as clear as possible.  The primary function of different colored lines is to illustrate a stitch sequence.  For example, layering of colors demonstrates you add them in that order.  They can also provide ideas on how to integrate additional threads (one line for each color).  Or, you can use the same thread for all color lines.  That's where I encourage you to use your imagination for the space you are stitching!

Challenging Myself

I love any and all tramme stitches, sometimes referred to as layered stitches. I can whip out a straight tramme stitch as a solution for almost anything. I’m not so good at diagonal tramme, so I love sharing this one with you.

Click on image to see on whimsicalstitch.com's Pinterest account. Visit pinterest.com/whimsicalstitch/whimsicalwednesday for a library of all #whimsicalwednesday and #smallspacesunday stitch diagrams.

Click on image to see on whimsicalstitch.com's Pinterest account. Visit pinterest.com/whimsicalstitch/whimsicalwednesday for a library of all #whimsicalwednesday and #smallspacesunday stitch diagrams.

Click on image to see on whimsicalstitch.com's Instagram account. Visit instagram.com/whimsicalstitch to see a library of stitched samples for select #whimsicalwednesday and #smallspacesunday stitch diagrams.

Click on image to see on whimsicalstitch.com's Instagram account. Visit instagram.com/whimsicalstitch to see a library of stitched samples for select #whimsicalwednesday and #smallspacesunday stitch diagrams.

Today’s inspiration comes from Ruth Schmuff at Bedecked and Beadazzled. It uses two plies of silk floss on 18-mesh.

A quick distinction between layered and tramme. For me, base threads from edge to edge (gray lines) distinguish tramme stitches from layered stitches. (Visit this blog post I wrote about tramme for insight on the history of tramme.)

This stitch would make a great architectural stitch, such as a roof or floor. Thought starters for threads for a roof are overdyed wool (ThreadWorx, Lorikeet) for the base threads (gray lines) covered with a solid Rainbow Linen (turquoise lines). Petite Silk Lame (gray lines) and Elegance or Subtlety (turquoise lines) would make a great combo for a floor or wallpaper. For a dramatic look on clothing, consider a single strand silk such as Vineyard Silk or Pepper Pot Silk (gray lines) covered with a heavier metallic such as Kreinik size 12 or 16.

If you want to go really crazy, consider making the center diagonal stitch (in the groups of three) a string of 4-5 beads. Just a fun thought that I WILL be trying someday.

This stitch diagram, along with all other #whimsicalwednesday and #smallspacesunday stitch diagrams, can also be found on a Pinterest board here.

Be sure to follow whimsicalstitch.com on FacebookPinterestInstagram, and Twitter.

If you like what you see on this blog, want to learn some very creative decorative stitches, and how to put them all together, whimsicalstitch.com sells Stitch Guides and Stitch Concepts for Melissa Shirley Designs, Zecca DesignsSandra Gilmore, Purple Palm, Maggie, and Patience Brewster, and many more. Click here to see the newest guides and click here to see the entire collection.

I hope you have the perfect spot for this stitch!  Please enjoy!  

A Note about Diagrams
I use color in diagrams to make them as clear as possible.  The primary function of different colored lines is to illustrate a stitch sequence.  For example, layering of colors demonstrates you add them in that order.  They can also provide ideas on how to integrate additional threads (one line for each color).  Or, you can use the same thread for all color lines.  That's where I encourage you to use your imagination for the space you are stitching!

Procrastination Squared

I need to rip out a section on a current needlepoint project. Naturally, the solution is to post the blog I intended to post last Sunday. I am confident my kitchen cabinet will be reorganized before I finish ripping out the stitching. Okay, before I even start.

Click on image to see on whimsicalstitch.com's Pinterest account. Visit pinterest.com/whimsicalstitch/whimsicalwednesday for a library of all #whimsicalwednesday and #smallspacesunday stitch diagrams.

Click on image to see on whimsicalstitch.com's Pinterest account. Visit pinterest.com/whimsicalstitch/whimsicalwednesday for a library of all #whimsicalwednesday and #smallspacesunday stitch diagrams.

Click on image to see on whimsicalstitch.com's Instagram account. Visit instagram.com/whimsicalstitch to see a library of stitched samples for select #whimsicalwednesday and #smallspacesunday stitch diagrams.

Click on image to see on whimsicalstitch.com's Instagram account. Visit instagram.com/whimsicalstitch to see a library of stitched samples for select #whimsicalwednesday and #smallspacesunday stitch diagrams.

A stitching friend shared this stitch (without the beads) with me a while ago. I immediately forgot about it (#middleagedbrain) and went on my merry way. While looking for a small stitch for a wing, I stumbled across it in my photo stream, added some beads, and voila!

The stitched sample comes from Joanna at the Plum Stitchery. It’s from 4 Colly Birds, part of the Twelvetide Club hosted by the Wool & the Willow in Cleveland Heights. It uses two plies of Needlepoint Inc. silk floss and a size 14 Sundance Bead (on 18-mesh).

This stitch would be perfect for water with a lightweight metallic (Kreinik size 4 or size 8, ThreadWorx size 4 or size 8, Petite Silk Lame, or Flair) and a seed bead. (Great seed bead resources include Bead Dazzle, Caravan Beads, Sundance Designs, or S&J Designs.) This stitch will make an adorable jacket for an elf or a doll dress with Petite Very Velvet and a size 11 seed bead. Consider alternating matte and metallic threads by horizontal row. A suggested thread combo is 4 plies of silk floss for the matte with Silk Lame (18-count) for the metallic with a seed bead or a Swarovski round crystal for the bead accent.

Why 4-ply when you used 2-ply in the stitched sample? It’s all a matter of taste, the thread combos, and what your are trying to accomplish. I used two plies for the birds because I wanted the shading on the chest to show through. I recommended four plies for the alternating example because I needed the weight of the matte thread to be similar to the weight of the metallic thread. Otherwise, the metallic thread would overpower the area.

Technically, today is a two-fer as you can eliminate the beads for a more straightforward small space stitch. You could also add two small beads in each intersection for a truly glamorous stitch. (Stitch diagrams are never truly to scale, so please trust me that this will work.) You could also add the beads over three holes, instead of two as illustrated, for even more possibilities.

This stitch diagram, along with all other #whimsicalwednesday and #smallspacesunday stitch diagrams, can also be found on a Pinterest board here.

Be sure to follow whimsicalstitch.com on FacebookPinterestInstagram, and Twitter.

If you like what you see on this blog, want to learn some very creative decorative stitches, and how to put them all together, whimsicalstitch.com sells Stitch Guides and Stitch Concepts for Melissa Shirley Designs, Zecca DesignsSandra Gilmore, Purple Palm, Maggie, and Patience Brewster, and many more. Click here to see the newest guides and click here to see the entire collection.

hope you have the perfect spot for this stitch! Enjoy!  Happy #smallspacesunday!

A Note about Diagrams
I use color in diagrams to make them as clear as possible. The primary function of different colored lines is to illustrate a stitch sequence. For example, layering of colors demonstrates you add them in that order. They can also provide ideas on how to integrate additional threads (one line for each color). Or, you can use the same thread for all color lines. That's where I encourage you to use your imagination for the space you are stitching!

But is it Small?

When I assembled today’s stitch, it was going to be a #smallspacesunday. The reality is its size belies its impact. There is a lot of eye candy in this stitch, so #whimsicalwednesday it is.

Click on image to see on whimsicalstitch.com's Pinterest account. Visit pinterest.com/whimsicalstitch/whimsicalwednesday for a library of all #whimsicalwednesday and #smallspacesunday stitch diagrams.

Click on image to see on whimsicalstitch.com's Pinterest account. Visit pinterest.com/whimsicalstitch/whimsicalwednesday for a library of all #whimsicalwednesday and #smallspacesunday stitch diagrams.

Click on image to see on whimsicalstitch.com's Instagram account. Visit instagram.com/whimsicalstitch to see a library of stitched samples for select #whimsicalwednesday and #smallspacesunday stitch diagrams.

Click on image to see on whimsicalstitch.com's Instagram account. Visit instagram.com/whimsicalstitch to see a library of stitched samples for select #whimsicalwednesday and #smallspacesunday stitch diagrams.

The stitched sample is me playing on plain 18-mesh canvas with blue Elegance (black lines) and red Petite Silk Lame (turquoise lines). Stitch all of the black lines before you add the second group of stitches (turquoise lines). I used what I call a modified back stitch to create the tiny octagons. The sequence followed the shape of any given single octagon. Your first stitch may go right to left; your next stitch will go from left to right. And repeat to create an octagon. That said, I obsessed less about dragging threads on this because the layer of octagons on top was very forgiving.

This stitch is perfect for areas where you want to add interest but not so much that it obliterates everything around it. I’m considering using it for the chest of a bird as it will add said interest without overwhelming where I want the real attention to go…the wings. It will make beautiful wallpaper or floor covering. I think it is important to use two lighter weight threads (both in literal size and relative to the canvas mesh) so the stitches on top do not create the effect of burying the first layer of octagons. The two threads can be different colors, different finishes, or both (as the stitched sample illustrates).

This stitch diagram, along with all other #whimsicalwednesday and #smallspacesunday stitch diagrams, can also be found on a Pinterest board here.

Be sure to follow whimsicalstitch.com on FacebookPinterestInstagram, and Twitter.

If you like what you see on this blog, want to learn some very creative decorative stitches, and how to put them all together, whimsicalstitch.com sells Stitch Guides and Stitch Concepts for Melissa Shirley Designs, Zecca DesignsSandra Gilmore, Purple Palm, Maggie, and Patience Brewster, and many more. Click here to see the newest guides and click here to see the entire collection.

I hope you have the perfect spot for this stitch!  Please enjoy!  

A Note about Diagrams
I use color in diagrams to make them as clear as possible.  The primary function of different colored lines is to illustrate a stitch sequence.  For example, layering of colors demonstrates you add them in that order.  They can also provide ideas on how to integrate additional threads (one line for each color).  Or, you can use the same thread for all color lines.  That's where I encourage you to use your imagination for the space you are stitching!

It's Hard to Not Smile

Today’s stitch makes me smile. It’s light, airy, and oh so pretty.

Click on image to see on whimsicalstitch.com's Pinterest account. Visit pinterest.com/whimsicalstitch/whimsicalwednesday for a library of all #whimsicalwednesday and #smallspacesunday stitch diagrams.

Click on image to see on whimsicalstitch.com's Pinterest account. Visit pinterest.com/whimsicalstitch/whimsicalwednesday for a library of all #whimsicalwednesday and #smallspacesunday stitch diagrams.

Click on image to see on whimsicalstitch.com's Instagram account. Visit instagram.com/whimsicalstitch to see a library of stitched samples for select #whimsicalwednesday and #smallspacesunday stitch diagrams.

Click on image to see on whimsicalstitch.com's Instagram account. Visit instagram.com/whimsicalstitch to see a library of stitched samples for select #whimsicalwednesday and #smallspacesunday stitch diagrams.

Ruth Schmuff, an FOW (friend of whimsicalstitch.com), integrated this stitch for a background in her guide for Sudden Realization by David Galchutt. It uses Gloriana Silk Floss (black lines) and Petite Silk Lame (gray lines) (on 18-mesh).

The intriguing pattern belies its delicateness. I’m integrating it into teapot that has beautiful shading for an upcoming Stitch Concept, using a solid color silk floss (black lines) and a ThreadWorx overdyed metallic (gray lines). I’m also adding a bead in the center of the smaller flowers. Using clear beading thread for the beads provides the ability to drag the beading thread across the canvas. If you are using solid beading thread, add the beads up and down vertical columns or from right to left and back in the horizontal columns.

I would love to see it for a solid background with a Silk Perle (black lines) and a bright Kreinik Metallic or Fyre Werks (gray lines). It could make a very pretty sky with overdyed pearl cotton or solid silk floss (black lines) and light metallic (gray lines).

This stitch diagram, along with all other #whimsicalwednesday and #smallspacesunday stitch diagrams, can also be found on a Pinterest board here.

Be sure to follow whimsicalstitch.com on FacebookPinterestInstagram, and Twitter.

If you like what you see on this blog, want to learn some very creative decorative stitches, and how to put them all together, whimsicalstitch.com sells Stitch Guides and Stitch Concepts for Melissa Shirley Designs, Zecca DesignsSandra Gilmore, Purple Palm, Maggie, and Patience Brewster, and many more. Click here to see the newest guides and click here to see the entire collection.

I hope you have the perfect spot for this stitch!  Please enjoy!  

A Note about Diagrams
I use color in diagrams to make them as clear as possible.  The primary function of different colored lines is to illustrate a stitch sequence.  For example, layering of colors demonstrates you add them in that order.  They can also provide ideas on how to integrate additional threads (one line for each color).  Or, you can use the same thread for all color lines.  That's where I encourage you to use your imagination for the space you are stitching!

Excuse Me

I made the mistake of thinking pulling together today’s stitched sample was going to be easy. Au contraire. I kept getting distracted by variations that kept popping up in my head as I stitched it for you.

Click on image to see on whimsicalstitch.com's Pinterest account. Visit pinterest.com/whimsicalstitch/whimsicalwednesday for a library of all #whimsicalwednesday and #smallspacesunday stitch diagrams.

Click on image to see on whimsicalstitch.com's Pinterest account. Visit pinterest.com/whimsicalstitch/whimsicalwednesday for a library of all #whimsicalwednesday and #smallspacesunday stitch diagrams.

Click on image to see on whimsicalstitch.com's Instagram account. Visit instagram.com/whimsicalstitch to see a library of stitched samples for select #whimsicalwednesday and #smallspacesunday stitch diagrams.

Click on image to see on whimsicalstitch.com's Instagram account. Visit instagram.com/whimsicalstitch to see a library of stitched samples for select #whimsicalwednesday and #smallspacesunday stitch diagrams.

Click on image to see on whimsicalstitch.com's Instagram account. Visit instagram.com/whimsicalstitch to see a library of stitched samples for select #whimsicalwednesday and #smallspacesunday stitch diagrams.

Click on image to see on whimsicalstitch.com's Instagram account. Visit instagram.com/whimsicalstitch to see a library of stitched samples for select #whimsicalwednesday and #smallspacesunday stitch diagrams.

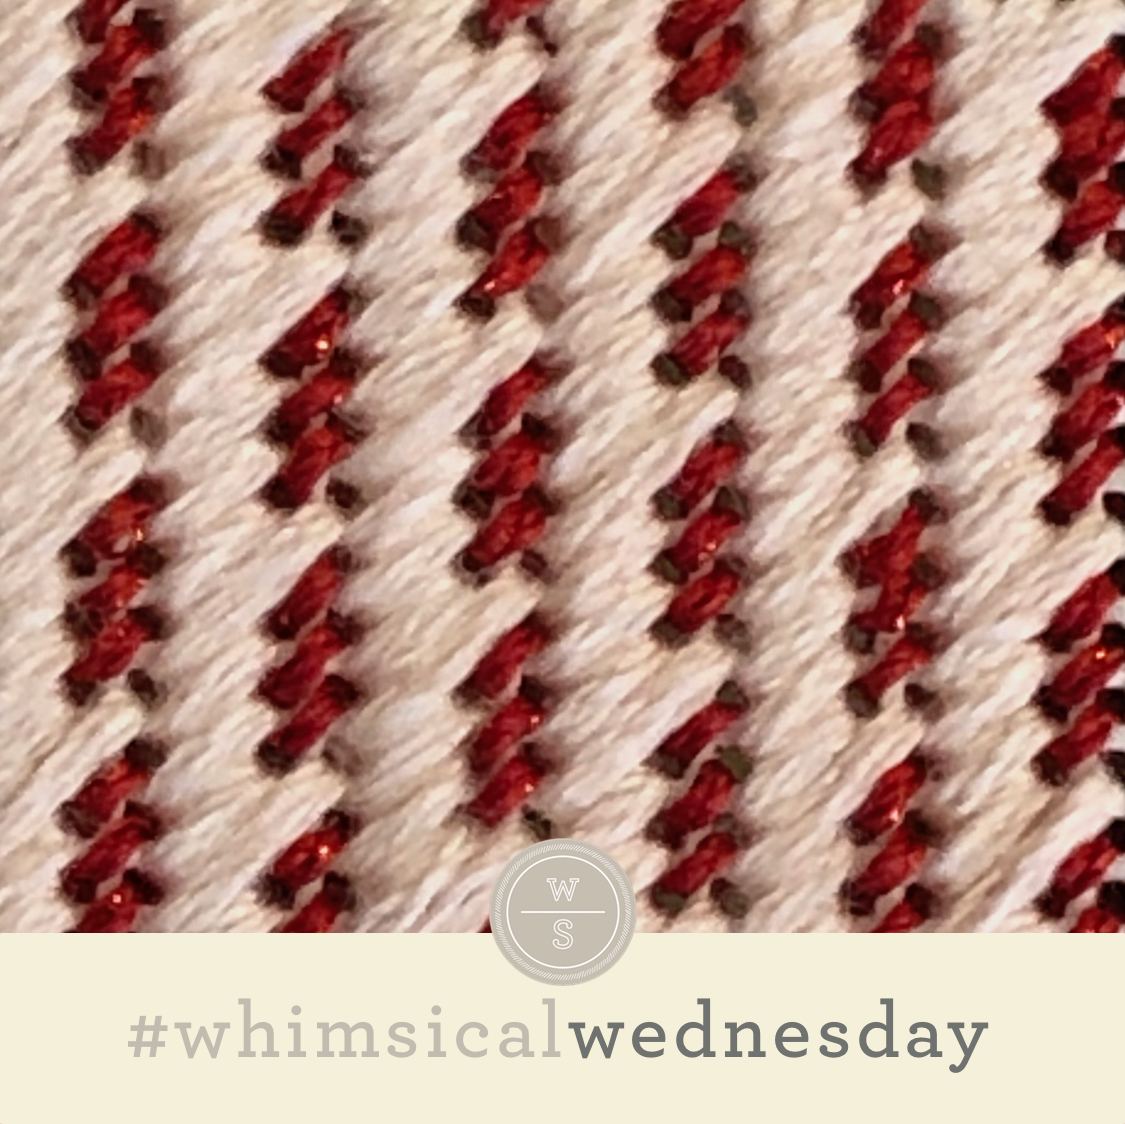
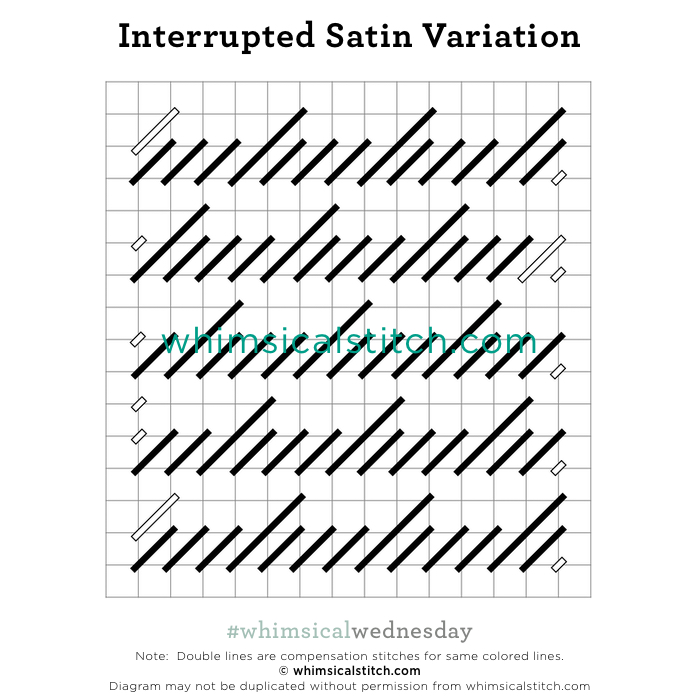
I named it Interrupted Satin Stitch because every fourth stitch is an interruption of sorts. You think you know where it’s going (over two rows) and…bam!…nope (over three rows). The stitched sample is me playing with Splendor (black lines) and Petite Silk Lame (turquoise lines) on 18-mesh.

This full coverage diagonal stitch (above center) is perfect for areas you want to add some direction, such as a roof or walkway. I love the idea of flipping it 90° and using it for pants or wall covering (above right).

I love uneven matte threads for roofs, such as Rainbow Linen or Rainbow Tweed. Glisten is a good alternative because the metallic filament adds a subtle unevenness. Partner any of those with a lightweight soft metallic, such as Trebizond Silk, for the tent stitches. I would use a single strand silk with a favorite metallic for pants and Soie D’Alger with Petite Silk Lame for a wall covering. Consider swapping the tent stitches for seed beads if you want to make it even more glamorous.

Click on image to see on whimsicalstitch.com's Pinterest account. Visit pinterest.com/whimsicalstitch/whimsicalwednesday for a library of all #whimsicalwednesday and #smallspacesunday stitch diagrams.

Click on image to see on whimsicalstitch.com's Pinterest account. Visit pinterest.com/whimsicalstitch/whimsicalwednesday for a library of all #whimsicalwednesday and #smallspacesunday stitch diagrams.

Another use popped into my head while stitching it. Leave out the tent stitches, use a lightweight metallic, and use it for a water stitch. The stitch over three adds an interesting choppy wave affect. While stitching, I also realized how scalable this stitch is. Consider changing the over 2 and over 3 rows to over 3 and 4, respectively for a slightly larger stitch.

These stitch diagrams, along with all other #whimsicalwednesday and #smallspacesunday stitch diagrams, can also be found on a Pinterest board here.

Be sure to follow whimsicalstitch.com on FacebookPinterestInstagram, and Twitter.

If you like what you see on this blog, want to learn some very creative decorative stitches, and how to put them all together, whimsicalstitch.com sells Stitch Guides and Stitch Concepts for Melissa Shirley Designs, Zecca DesignsSandra Gilmore, Purple Palm, Maggie, and Patience Brewster, and many more. Click here to see the newest guides and click here to see the entire collection.

I hope you have the perfect spot for this stitch!  Please enjoy! 

A Note about Diagrams
I use color in diagrams to make them as clear as possible.  The primary function of different colored lines is to illustrate a stitch sequence.  For example, layering of colors demonstrates you add them in that order.  They can also provide ideas on how to integrate additional threads (one line for each color).  Or, you can use the same thread for all color lines.  That's where I encourage you to use your imagination for the space you are stitching!

Ruff Ruff!

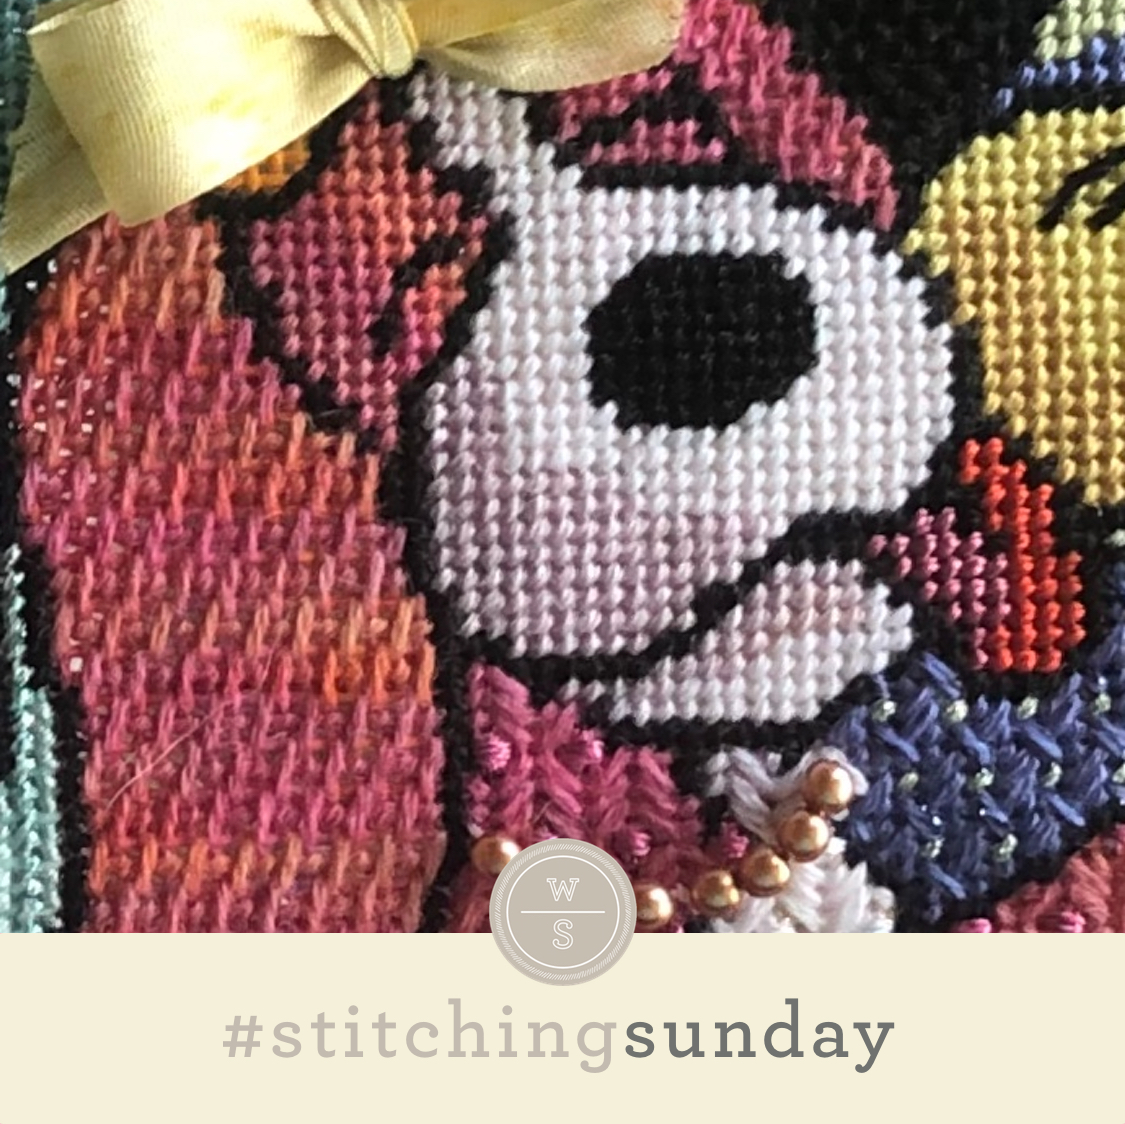
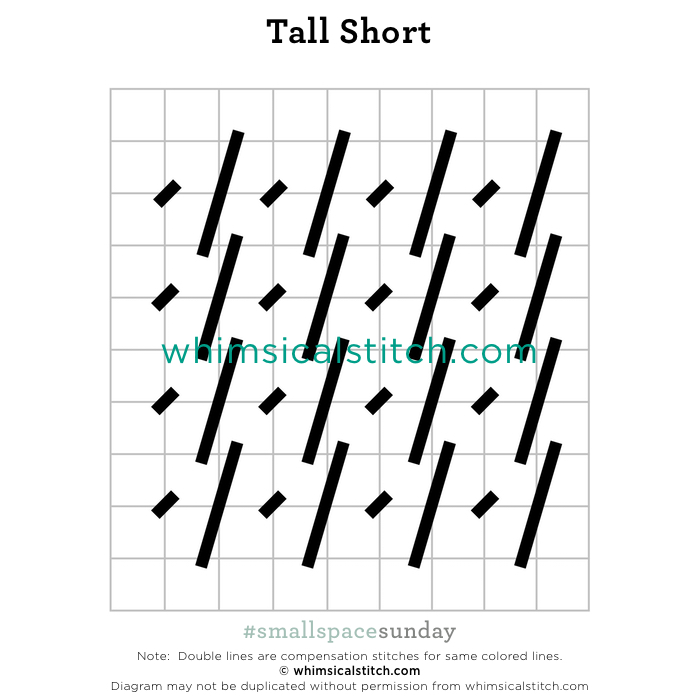
Today’s #stitchingsunday is one of the darling pooches from Ruff Life in the Wine Country featuring Tall Short from a #smallspacesunday in 2017.

Click on image to see on whimsicalstitch.com's Instagram account. Visit instagram.com/whimsicalstitch to see a library of stitched samples for select #whimsicalwednesday and #smallspacesunday stitch diagrams.

Click on image to see on whimsicalstitch.com's Instagram account. Visit instagram.com/whimsicalstitch to see a library of stitched samples for select #whimsicalwednesday and #smallspacesunday stitch diagrams.

Click on image to see on whimsicalstitch.com's Pinterest account. Visit pinterest.com/whimsicalstitch/whimsicalwednesday for a library of all #whimsicalwednesday and #smallspacesunday stitch diagrams.

Click on image to see on whimsicalstitch.com's Pinterest account. Visit pinterest.com/whimsicalstitch/whimsicalwednesday for a library of all #whimsicalwednesday and #smallspacesunday stitch diagrams.

Today’s Tall Short stitch uses Gloriana Lorikeet (on 18-mesh) for a dog’s ear. It will also make great tree trunk, small sweater or socks, or a window.

This stitch diagram, along with all other #whimsicalwednesday and #smallspacesunday stitch diagrams, can also be found on a Pinterest board here.

Be sure to follow whimsicalstitch.com on FacebookPinterestInstagram, and Twitter.

If you like what you see on this blog, want to learn some very creative decorative stitches, and how to put them all together, whimsicalstitch.com sells Stitch Guides and Stitch Concepts for Melissa Shirley Designs, Zecca DesignsSandra Gilmore, Purple Palm, Maggie, and Patience Brewster, and many more. Click here to see the newest guides and click here to see the entire collection.

I hope you have the perfect spot for this stitch! Happy #stitchingsunday!

A Note about Diagrams
I use color in diagrams to make them as clear as possible. The primary function of different colored lines is to illustrate a stitch sequence. For example, layering of colors demonstrates you add them in that order. They can also provide ideas on how to integrate additional threads (one line for each color). Or, you can use the same thread for all color lines. That's where I encourage you to use your imagination for the space you are stitching!

Ruth 1; Me, 1/2

Today’s stitch is a case study in how teachers learn from teaching.

Click on image to see on whimsicalstitch.com's Pinterest account. Visit pinterest.com/whimsicalstitch/whimsicalwednesday for a library of all #whimsicalwednesday and #smallspacesunday stitch diagrams.

Click on image to see on whimsicalstitch.com's Pinterest account. Visit pinterest.com/whimsicalstitch/whimsicalwednesday for a library of all #whimsicalwednesday and #smallspacesunday stitch diagrams.

Click on image to see on whimsicalstitch.com's Instagram account. Visit instagram.com/whimsicalstitch to see a library of stitched samples for select #whimsicalwednesday and #smallspacesunday stitch diagrams.

Click on image to see on whimsicalstitch.com's Instagram account. Visit instagram.com/whimsicalstitch to see a library of stitched samples for select #whimsicalwednesday and #smallspacesunday stitch diagrams.

The stitch and stitched sample are from our friend, Ruth Schmuff, at Bedecked and Bedazzled. The stitch uses Gloriana Silk Floss on 18-mesh for a background on an elegant geisha.

So, those of you who I’ve worked with in class have heard me say, “For any layered stitch, such as a cross stitch or an Upright Tied Cross, it doesn’t matter what direction you do it. Just be consistent.” And, of course, Ruth does it differently, yet is smart about it. Take a close look at the diagram and note the top stitches are in opposite directions. The top stitch on the vertical version goes from lower right to upper left while the horizontal version goes from lower left to upper right. It’s not the way I would have diagrammed it BUT it is consistent and that is what is important. Ruth, 1. Me, 1/2.

This stitch would be great for a basket with Lorikeet or ThreadWorx wool There are many outdoor applications, such as a tree or mountainside. It will make a wonderful rustic roof with Rainbow Linen or Caron Collection Watercolours.

If you want to glam it up, consider adding a bead in the open intersection where the top stitches meet. Since the stitch is rather large and it’s a single intersection, I recommend a slightly larger bead (or crystal) to make sure it doesn’t get lost in the rest of the stitch. For example, consider a size 8 bead for 13-mesh and a size 11 bead for 18-mesh. This glam version would be fantastic for a Santa coat or an elegant dress with silk floss and an appropriate bead. There is something exquisite about red silk floss and gold beads.

This stitch diagram, along with all other #whimsicalwednesday and #smallspacesunday stitch diagrams, can also be found on a Pinterest board here.

Be sure to follow whimsicalstitch.com on FacebookPinterestInstagram, and Twitter.

If you like what you see on this blog, want to learn some very creative decorative stitches, and how to put them all together, whimsicalstitch.com sells Stitch Guides and Stitch Concepts for Melissa Shirley Designs, Zecca DesignsSandra Gilmore, Purple Palm, Maggie, and Patience Brewster, and many more. Click here to see the newest guides and click here to see the entire collection.

I hope you have the perfect spot for this stitch!  Please enjoy!  

A Note about Diagrams
I use color in diagrams to make them as clear as possible.  The primary function of different colored lines is to illustrate a stitch sequence.  For example, layering of colors demonstrates you add them in that order.  They can also provide ideas on how to integrate additional threads (one line for each color).  Or, you can use the same thread for all color lines.  That's where I encourage you to use your imagination for the space you are stitching!

Decisions, Decisions

A club I’m stitching up was a great chance to experiment with new stitches. As it played out, I realized it was an opportunity to illustrate how I land on a stitch, which isn’t always what the diagram shows you. All are great stitches but it’s all about finding the right one for the spot and for you.

My objective was to find a medium-sized stitch (3-5 rows tall or wide) that integrated the exquisite shading of the canvas, so it needed to be an open stitch. And it needed to complement an adjacent stitch that included diamonds.

Click on image to see on whimsicalstitch.com's Pinterest account. Visit pinterest.com/whimsicalstitch/whimsicalwednesday for a library of all #whimsicalwednesday and #smallspacesunday stitch diagrams.

Click on image to see on whimsicalstitch.com's Pinterest account. Visit pinterest.com/whimsicalstitch/whimsicalwednesday for a library of all #whimsicalwednesday and #smallspacesunday stitch diagrams.

Click on image to see on whimsicalstitch.com's Pinterest account. Visit pinterest.com/whimsicalstitch/whimsicalwednesday for a library of all #whimsicalwednesday and #smallspacesunday stitch diagrams.

Click on image to see on whimsicalstitch.com's Pinterest account. Visit pinterest.com/whimsicalstitch/whimsicalwednesday for a library of all #whimsicalwednesday and #smallspacesunday stitch diagrams.

Click on image to see on whimsicalstitch.com's Pinterest account. Visit pinterest.com/whimsicalstitch/whimsicalwednesday for a library of all #whimsicalwednesday and #smallspacesunday stitch diagrams.

Click on image to see on whimsicalstitch.com's Pinterest account. Visit pinterest.com/whimsicalstitch/whimsicalwednesday for a library of all #whimsicalwednesday and #smallspacesunday stitch diagrams.

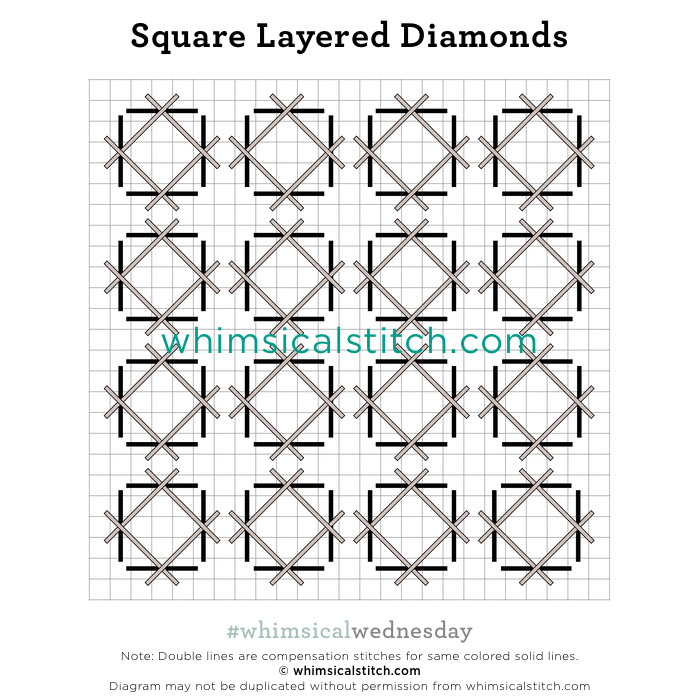
I found the original inspiration, the Square Diamond Scotch (diagram on far left), in Ruth Schmuff’s latest book Stitches Volume 5. The squares and diamonds were a great partner with the adjacent diamond stitch. But five rows was too tall for the area and the Scotch squares in the center were too much. I removed the squares and made the sides of the squares four rows wide/tall and created the Square Diamonds (center diagram).

This stitch was too open for the area and it was tough to distinguish the squares versus the diamonds, so I altered the diamonds to be overlapping, hence the Square Layered Diamonds (diagram on far right). This added unnecessary texture and height to the area, so it went bye bye.

Click on image to see on whimsicalstitch.com's Pinterest account. Visit pinterest.com/whimsicalstitch/whimsicalwednesday for a library of all #whimsicalwednesday and #smallspacesunday stitch diagrams.

Click on image to see on whimsicalstitch.com's Pinterest account. Visit pinterest.com/whimsicalstitch/whimsicalwednesday for a library of all #whimsicalwednesday and #smallspacesunday stitch diagrams.

Click on image to see on whimsicalstitch.com's Instagram account. Visit instagram.com/whimsicalstitch to see a library of stitched samples for select #whimsicalwednesday and #smallspacesunday stitch diagrams.

Click on image to see on whimsicalstitch.com's Instagram account. Visit instagram.com/whimsicalstitch to see a library of stitched samples for select #whimsicalwednesday and #smallspacesunday stitch diagrams.

My obsession with diamonds covering the corners wasn’t helping. Walking away really helped. When I returned to the piece, I took the diagonal stitches and moved them to cover the open area where the corners meet. Voila! This is what worked for me for the area. The stitched sample uses Elegance (black lines) and Petite Silk Lame (gray lines) on 18-mesh.

I feel the need to reiterate that I liked every single one of the stitches I discarded. It’s all about what works for the unique space you are stitching. All four stitches would make excellent architectural stitches for floors, walls, or roofs. I would love to see the Square Diamond Scotch for a dramatic coat or dress with Petite Very Velvet (black lines) and a size 12 or size 16 Kreinik Metallic. The Square Diamonds will make a beautiful water stitch with Petite Silk Lame (black lines) and Kreinik Metallic (gray lines). Consider the Square Layered Diamonds for a tree with Elegance (black lines) and Silk ‘N Colors (gray lines). You could also glam up any of those stitches by adding a single in the center hole of the intersection where the four corners meet.

This stitch diagram, along with all other #whimsicalwednesday and #smallspacesunday stitch diagrams, can also be found on a Pinterest board here.

Be sure to follow whimsicalstitch.com on FacebookPinterestInstagram, and Twitter.

If you like what you see on this blog, want to learn some very creative decorative stitches, and how to put them all together, whimsicalstitch.com sells Stitch Guides and Stitch Concepts for Melissa Shirley Designs, Zecca DesignsSandra Gilmore, Purple Palm, Maggie, and Patience Brewster, and many more. Click here to see the newest guides and click here to see the entire collection.

I hope you have the perfect spot for this stitch!  Please enjoy!  

A Note about Diagrams
I use color in diagrams to make them as clear as possible.  The primary function of different colored lines is to illustrate a stitch sequence.  For example, layering of colors demonstrates you add them in that order.  They can also provide ideas on how to integrate additional threads (one line for each color).  Or, you can use the same thread for all color lines.  That's where I encourage you to use your imagination for the space you are stitching!
Fly Away!

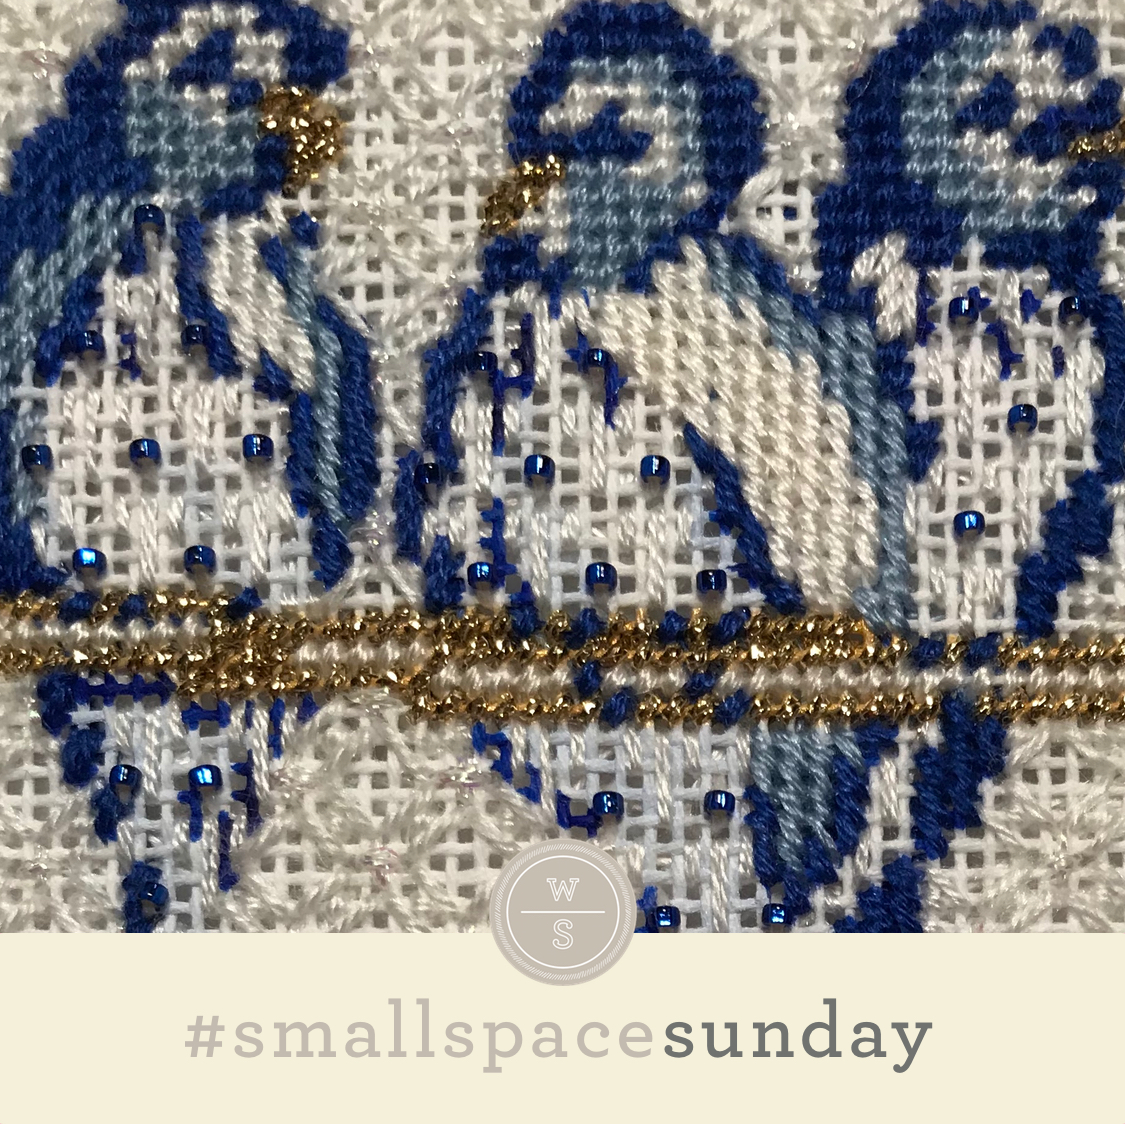
I’ve got birds on the brain right now due to a flock of new Stitch Concepts and Guides I’m working on. This is a good challenge for me because I’m on the hunt for small diagonal stitches to add direction to the birds.

Click on image to see on whimsicalstitch.com's Pinterest account. Visit pinterest.com/whimsicalstitch/whimsicalwednesday for a library of all #whimsicalwednesday and #smallspacesunday stitch diagrams.

Click on image to see on whimsicalstitch.com's Pinterest account. Visit pinterest.com/whimsicalstitch/whimsicalwednesday for a library of all #whimsicalwednesday and #smallspacesunday stitch diagrams.

Click on image to see on whimsicalstitch.com's Instagram account. Visit instagram.com/whimsicalstitch to see a library of stitched samples for select #whimsicalwednesday and #smallspacesunday stitch diagrams.

Click on image to see on whimsicalstitch.com's Instagram account. Visit instagram.com/whimsicalstitch to see a library of stitched samples for select #whimsicalwednesday and #smallspacesunday stitch diagrams.

The stitched sample is from one of the upcoming guides. It uses Soie D’Alger (black lines) and Petite Silk Lame (gray lines).

Using two threads in pairs of stitches adds a small bit of texture and interest to the area without overwhelming it. You could accomplish the same thing by alternating oblique columns by thread.

This would make a great stitch for an open field with Silk ‘N Colors (black lines) and a solid silk floss. For a small body of water, I would use two related colors of a lightweight Kreinik Metallic, such as a turquoise and a blue. For a roof, I would use a strand of Impressions mated with Rainbow Linen or Lorikeet.

This stitch diagram, along with all other #whimsicalwednesday and #smallspacesunday stitch diagrams, can also be found on a Pinterest board here.

Be sure to follow whimsicalstitch.com on FacebookPinterestInstagram, and Twitter.

If you like what you see on this blog, want to learn some very creative decorative stitches, and how to put them all together, whimsicalstitch.com sells Stitch Guides and Stitch Concepts for Melissa Shirley Designs, Zecca DesignsSandra Gilmore, Purple Palm, Maggie, and Patience Brewster, and many more. Click here to see the newest guides and click here to see the entire collection.

hope you have the perfect spot for this stitch! Enjoy!  Happy #smallspacesunday!

A Note about Diagrams
I use color in diagrams to make them as clear as possible. The primary function of different colored lines is to illustrate a stitch sequence. For example, layering of colors demonstrates you add them in that order. They can also provide ideas on how to integrate additional threads (one line for each color). Or, you can use the same thread for all color lines. That's where I encourage you to use your imagination for the space you are stitching!