Such a Lovely Mistake

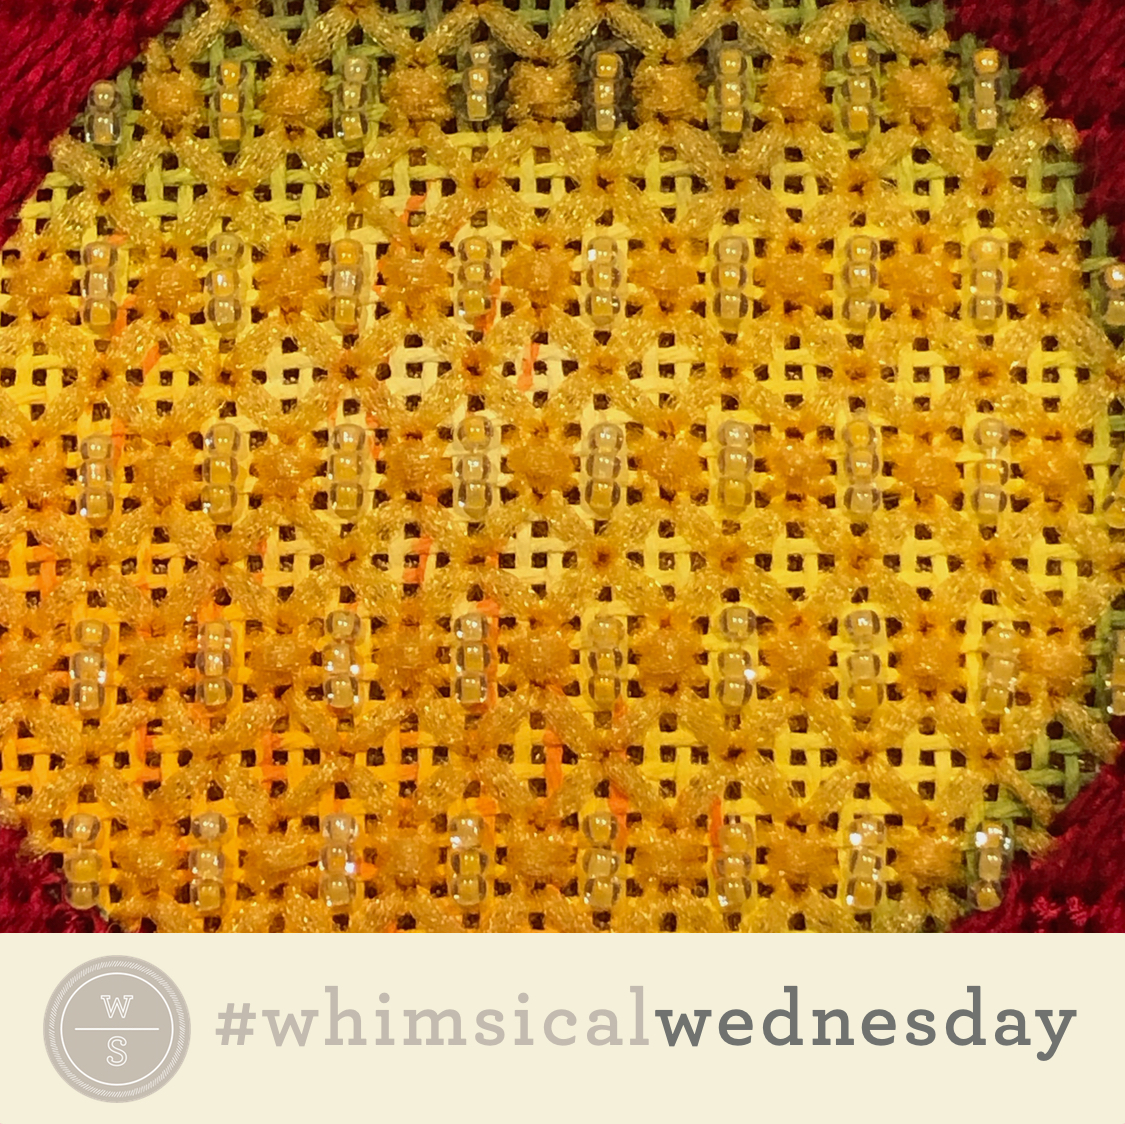
This week’s stitch is a lovely mistake. I mapped out one of my traditional “double” diamonds. The customer added an extra row between what was supposed to be a pair of stitches, I added a bead and an X, and here we are. Teamwork!

Click image to see the whimsicalstitch Stitch Library on pinterest.com. Includes all #whimsicalwednesday and #smallspacesunday stitch diagrams.

Click image to see #whimsicalwednesday and #smallspacesunday Stitched Sample Gallery on Instagram.

For the stitched sample, I played with two plies of Soie (black lines), Petite Silk Lame (aqua lines), and a Sundance size 11 bead on a Zecca backgammon board (18M). (Full disclosure: this is me playing. If I go with this stitch for the backgammon board, I will eliminate the bead.)

The accent can be the X, the bead, or both. It really depends on how much attention you want to draw to the area. The original version of this used only a bead with a single ply of Gloriana for the diamonds for a sky (on 18M). Using this for clothing with Vineyard Silk (black lines) and Silk lame (aqua lines) would be a dramatic example of the other end of the spectrum. I’m looking forward to using this for an dress on an upcoming project with three plies of silk floss (black lines), Fyre Werks, and a bead.

These stitch diagrams, along with all other #whimsicalwednesday and #smallspacesunday stitch diagrams, can also be found on a Pinterest board here. Be sure to follow whimsicalstitch.com on FacebookPinterestInstagram, and Twitter.

If you like what you see on this blog, there's more: Mary’s Whimsical Stitches Volume 1 is a contemporary how-to collection of more than 250 stitches for stitchers regardless of skill level. The book includes updated and sequenced diagrams from this blog, all-new stitches, and a chapter on the basics of needlepoint; Mary’s Whimsical Stitches Volume 2 features chapters on Balanced, Beading, Diagonal, Layered, Oblique, Small, and Straight stitches.

Also, you can download for free the first chapter from my first book which covers basic needlepoint stitches and stitch compensation techniques along with new top-line information on needlepoint materials and tools, how to handle threads, and other helpful needlepoint resources.

whimsicalstitch.com also sells Stitch Guides and Stitch Concepts for Melissa Shirley Designs, Zecca DesignsSandra Gilmore, Purple Palm, Maggie, and Penny MacLeod, and many more. Click here to see the newest guides and click here to see the entire collection.

I hope you have the perfect spot for this stitch! Please enjoy! Have a wonderful #whimsicalwednesday!

A Note about Diagrams
I use color in diagrams to make them as clear as possible.  The primary function of different colored lines is to illustrate a stitch sequence.  For example, layering of colors demonstrates you add them in that order.  They can also provide ideas on how to integrate additional threads (one line for each color).  Or, you can use the same thread for all color lines.  That's where I encourage you to use your imagination for the space you are stitching!

Ruth 1; Me, 1/2

Today’s stitch is a case study in how teachers learn from teaching.

Click on image to see on whimsicalstitch.com's Pinterest account. Visit pinterest.com/whimsicalstitch/whimsicalwednesday for a library of all #whimsicalwednesday and #smallspacesunday stitch diagrams.

Click on image to see on whimsicalstitch.com's Pinterest account. Visit pinterest.com/whimsicalstitch/whimsicalwednesday for a library of all #whimsicalwednesday and #smallspacesunday stitch diagrams.

Click on image to see on whimsicalstitch.com's Instagram account. Visit instagram.com/whimsicalstitch to see a library of stitched samples for select #whimsicalwednesday and #smallspacesunday stitch diagrams.

Click on image to see on whimsicalstitch.com's Instagram account. Visit instagram.com/whimsicalstitch to see a library of stitched samples for select #whimsicalwednesday and #smallspacesunday stitch diagrams.

The stitch and stitched sample are from our friend, Ruth Schmuff, at Bedecked and Bedazzled. The stitch uses Gloriana Silk Floss on 18-mesh for a background on an elegant geisha.

So, those of you who I’ve worked with in class have heard me say, “For any layered stitch, such as a cross stitch or an Upright Tied Cross, it doesn’t matter what direction you do it. Just be consistent.” And, of course, Ruth does it differently, yet is smart about it. Take a close look at the diagram and note the top stitches are in opposite directions. The top stitch on the vertical version goes from lower right to upper left while the horizontal version goes from lower left to upper right. It’s not the way I would have diagrammed it BUT it is consistent and that is what is important. Ruth, 1. Me, 1/2.

This stitch would be great for a basket with Lorikeet or ThreadWorx wool There are many outdoor applications, such as a tree or mountainside. It will make a wonderful rustic roof with Rainbow Linen or Caron Collection Watercolours.

If you want to glam it up, consider adding a bead in the open intersection where the top stitches meet. Since the stitch is rather large and it’s a single intersection, I recommend a slightly larger bead (or crystal) to make sure it doesn’t get lost in the rest of the stitch. For example, consider a size 8 bead for 13-mesh and a size 11 bead for 18-mesh. This glam version would be fantastic for a Santa coat or an elegant dress with silk floss and an appropriate bead. There is something exquisite about red silk floss and gold beads.

This stitch diagram, along with all other #whimsicalwednesday and #smallspacesunday stitch diagrams, can also be found on a Pinterest board here.

Be sure to follow whimsicalstitch.com on FacebookPinterestInstagram, and Twitter.

If you like what you see on this blog, want to learn some very creative decorative stitches, and how to put them all together, whimsicalstitch.com sells Stitch Guides and Stitch Concepts for Melissa Shirley Designs, Zecca DesignsSandra Gilmore, Purple Palm, Maggie, and Patience Brewster, and many more. Click here to see the newest guides and click here to see the entire collection.

I hope you have the perfect spot for this stitch!  Please enjoy!  

A Note about Diagrams
I use color in diagrams to make them as clear as possible.  The primary function of different colored lines is to illustrate a stitch sequence.  For example, layering of colors demonstrates you add them in that order.  They can also provide ideas on how to integrate additional threads (one line for each color).  Or, you can use the same thread for all color lines.  That's where I encourage you to use your imagination for the space you are stitching!

Who Knew Bricks Could Be Glamorous?

Today’s stitch is an elegant interpretation of a classic Brick Stitch.

Click on image to see on whimsicalstitch.com's Pinterest account. Visit pinterest.com/whimsicalstitch/whimsicalwednesday for a library of all #whimsicalwednesday and #smallspacesunday stitch diagrams.

Click on image to see on whimsicalstitch.com's Pinterest account. Visit pinterest.com/whimsicalstitch/whimsicalwednesday for a library of all #whimsicalwednesday and #smallspacesunday stitch diagrams.

Click on image to see on whimsicalstitch.com's Instagram account. Visit instagram.com/whimsicalstitch to see a library of stitched samples for select #whimsicalwednesday and #smallspacesunday stitch diagrams.

Click on image to see on whimsicalstitch.com's Instagram account. Visit instagram.com/whimsicalstitch to see a library of stitched samples for select #whimsicalwednesday and #smallspacesunday stitch diagrams.

The stitched sample uses Crystal Braid and Sundance Beads (on 13-mesh). Crystal Braid’s color palette is on the lighter side. I love that because Crystal Braid absorbs and reflects the painted color of the canvas.

This simple stitch is made elegant by the addition of the beads. It would be great for clothing, water that you want to draw attention to, a rooftop, or a bedspread. I would love to see it as a christening gown with Soie D’Alger and pearls. Consider using ThreadWorx overdyed metallic and clear beads for water.

If you want to dress it up even more, consider adding three beads in between the rows of stitches (instead of the one as diagrammed). Another interesting variation would be to alternate colors in the horizontal columns. Combine that with a matte bead and I think you might have a very interesting roof.

This stitch diagram, along with all other #whimsicalwednesday and #smallspacesunday stitch diagrams, can also be found on a Pinterest board here.

Be sure to follow whimsicalstitch.com on FacebookPinterestInstagram, and Twitter.

If you like what you see on this blog, want to learn some very creative decorative stitches, and how to put them all together, whimsicalstitch.com sells Stitch Guides and Stitch Concepts for Melissa Shirley Designs, Zecca DesignsSandra Gilmore, Purple Palm, Maggie, and Patience Brewster, and many more. Click here to see the newest guides and click here to see the entire collection.

I hope you have the perfect spot for this stitch!  Please enjoy!  

A Note about Diagrams
I use color in diagrams to make them as clear as possible.  The primary function of different colored lines is to illustrate a stitch sequence.  For example, layering of colors demonstrates you add them in that order.  They can also provide ideas on how to integrate additional threads (one line for each color).  Or, you can use the same thread for all color lines.  That's where I encourage you to use your imagination for the space you are stitching!

Diamonds Galore

Social media algorithms are scary until they deliver something perfect like they did for me last week.

Click on image to see on whimsicalstitch.com's Pinterest account. Visit pinterest.com/whimsicalstitch/whimsicalwednesday for a library of all #whimsicalwednesday and #smallspacesunday stitch diagrams.

Click on image to see on whimsicalstitch.com's Pinterest account. Visit pinterest.com/whimsicalstitch/whimsicalwednesday for a library of all #whimsicalwednesday and #smallspacesunday stitch diagrams.

Click on image to see on whimsicalstitch.com's Instagram account. Visit instagram.com/whimsicalstitch to see a library of stitched samples for select #whimsicalwednesday and #smallspacesunday stitch diagrams.

Click on image to see on whimsicalstitch.com's Instagram account. Visit instagram.com/whimsicalstitch to see a library of stitched samples for select #whimsicalwednesday and #smallspacesunday stitch diagrams.

The inspiration for today’s stitch was an embroidery diagram Pinterest served up to me after last week’s post. I considered replicating the connected squares by using Smryna Crosses but chose to minimize it via single stitches. I love the precise elegance of it.

As with last week’s stitch, this stitch would be a beautiful floor, sky, wall, plain background, or roof. Notice how the 3X3 diamonds are tent stitches skipping a row in between. You could add small seed beads in those intersections for an even more elegant stitch that would be gorgeous on clothing.

The stitched sample is me playing on 18-mesh canvas with Pepper Pot Silk. I like single strand threads for stitches like this. I like the added height that single strand threads, such as perle cotton, silk perle, single strand silk, and metallic braids add to an area.

This stitch diagram, along with all other #whimsicalwednesday and #smallspacesunday stitch diagrams, can also be found on a Pinterest board here.

Be sure to follow whimsicalstitch.com on FacebookPinterestInstagram, and Twitter.

If you like what you see on this blog, want to learn some very creative decorative stitches, and how to put them all together, whimsicalstitch.com sells Stitch Guides and Stitch Concepts for Melissa Shirley Designs, Zecca DesignsSandra Gilmore, Purple Palm, Maggie, and Patience Brewster, and many more. Click here to see the newest guides and click here to see the entire collection.

I hope you have the perfect spot for this stitch!  Please enjoy!  

A Note about Diagrams
I use color in diagrams to make them as clear as possible.  The primary function of different colored lines is to illustrate a stitch sequence.  For example, layering of colors demonstrates you add them in that order.  They can also provide ideas on how to integrate additional threads (one line for each color).  Or, you can use the same thread for all color lines.  That's where I encourage you to use your imagination for the space you are stitching!
Spark Joy

I’m fascinated with the Marie Kondo tidying routine. Things in my home that spark joy for me are my cookbooks, the four poster bed (from my great grandparents home), and my Melissa Shirley fruit needlepoint projects. Case in point is today’s stitch and stitch sample.

Click on image to see on whimsicalstitch.com's Pinterest account. Visit pinterest.com/whimsicalstitch/whimsicalwednesday for a library of all #whimsicalwednesday and #smallspacesunday stitch diagrams.

Click on image to see on whimsicalstitch.com's Pinterest account. Visit pinterest.com/whimsicalstitch/whimsicalwednesday for a library of all #whimsicalwednesday and #smallspacesunday stitch diagrams.

Click on image to see on whimsicalstitch.com's Instagram account. Visit instagram.com/whimsicalstitch to see a library of stitched samples for select #whimsicalwednesday and #smallspacesunday stitch diagrams.

Click on image to see on whimsicalstitch.com's Instagram account. Visit instagram.com/whimsicalstitch to see a library of stitched samples for select #whimsicalwednesday and #smallspacesunday stitch diagrams.

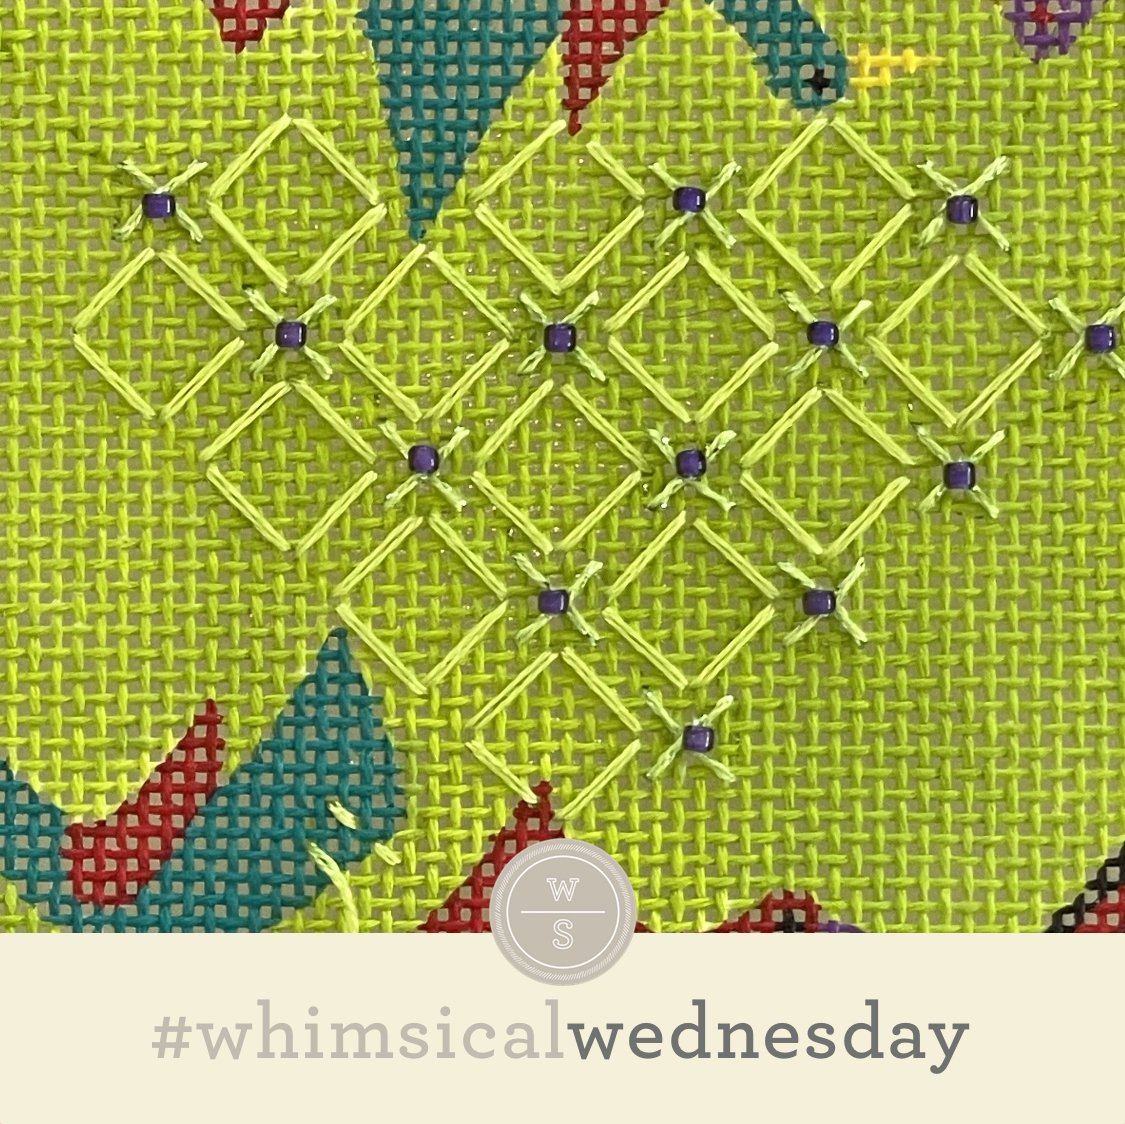
Today's stitch comes from a Melissa Shirley fruit purse I did eons ago. (Note: the stitched purse in the link is not mine.) Yes, I love the diamonds but I love the multiple bead accents more. The stitched sample uses yellow Flair (black and aqua lines) and Sundance Beads for, well, the beads. :)

It would be a great stitch for a body of water that you want to draw attention to. I would use a lightweight Kreinik metallic (size 8 for 13-mesh and size 4 for 18-mesh) for the black and gray lines and seed beads. It would be beautiful for a glamorous dress, especially a tall narrow one. I recommend a rich Silk Floss (Soie D’Alger or Soie Cristale come to mind) for the black lines, combined with Silk Lame for the aqua lines, and seed beads. Consider a bugle bead in lieu of the seed beads for an even more dramatic look.

This stitch diagram, along with all other #whimsicalwednesday and #smallspacesunday stitch diagrams, can also be found on a Pinterest board here.

Be sure to follow whimsicalstitch.com on FacebookPinterestInstagram, and Twitter.

If you like what you see on this blog, want to learn some very creative decorative stitches, and how to put them all together, whimsicalstitch.com sells Stitch Guides and Stitch Concepts for Melissa Shirley Designs, Zecca DesignsSandra Gilmore, and Patience Brewster, and many more. Click here to see the newest guides and click here to see the entire collection.

I disagree with Marie on one topic. The books stay. And, the fruit needlepoint pillows stay.

I hope you have the perfect spot for this stitch!  Please enjoy!  

A Note about Diagrams
I use color in diagrams to make them as clear as possible.  The primary function of different colored lines is to illustrate a stitch sequence.  For example, layering of colors demonstrates you add them in that order.  They can also provide ideas on how to integrate additional threads (one line for each color).  Or, you can use the same thread for all color lines.  That's where I encourage you to use your imagination for the space you are stitching!

Sweet Surprise

One reason I am drawn to seasonal needlepoint is it gets put away, forgotten about, and brought out a year later. It’s an early Christmas for me every year because there is always (at least) one pillow I completely forgot I had. Today’s stitch comes from this year’s version of just that pillow. Merry Christmas to me!

Click on image to see on whimsicalstitch.com's Pinterest account. Visit pinterest.com/whimsicalstitch/whimsicalwednesday for a library of all #whimsicalwednesday and #smallspacesunday stitch diagrams.

Click on image to see on whimsicalstitch.com's Pinterest account. Visit pinterest.com/whimsicalstitch/whimsicalwednesday for a library of all #whimsicalwednesday and #smallspacesunday stitch diagrams.

Click on image to see on whimsicalstitch.com's Instagram account. Visit instagram.com/whimsicalstitch to see a library of stitched samples for select #whimsicalwednesday and #smallspacesunday stitch diagrams.

Click on image to see on whimsicalstitch.com's Instagram account. Visit instagram.com/whimsicalstitch to see a library of stitched samples for select #whimsicalwednesday and #smallspacesunday stitch diagrams.

The stitched sample uses Splendor (gray lines) and Shimmer Ribbon (black and aqua lines). I recommend stitching the 2X4 rectangles first, as they are all connected so it will be easy to navigate. Follow up with the center square and finish with the Smyrna Crosses in the 2X2 squares. To dress it up, consider replacing the Smyrna Crosses with beads or a single larger bead, such as a 3-4mm pearl.

This is an elegant, full-coverage stitch that will work well for clothing and bags. If you want to dress up the clothing, consider replacing the Smyrna Crosses with four beads or a single larger bead, such as a 3-4 mm pearl. It would work well for many architectural elements, such as a roof, wallpaper, or flooring. To add richness to any architectural element, consider adding a third thread in a darker color for the Smyrna Crosses.

This stitch diagram, along with all other #whimsicalwednesday and #smallspacesunday stitch diagrams, can also be found on a Pinterest board here.

Be sure to follow whimsicalstitch.com on FacebookPinterestInstagram, and Twitter.

If you like what you see on this blog, want to learn some very creative decorative stitches, and how to put them all together, whimsicalstitch.com sells Stitch Guides and Stitch Concepts for Melissa Shirley Designs, Zecca DesignsSandra Gilmore, and Patience Brewster, and many more. Click here to see the newest guides and click here to see the entire collection.

I hope you have the perfect spot for this stitch!  Please enjoy!  

A Note about Diagrams
I use color in diagrams to make them as clear as possible.  The primary function of different colored lines is to illustrate a stitch sequence.  For example, layering of colors demonstrates you add them in that order.  They can also provide ideas on how to integrate additional threads (one line for each color).  Or, you can use the same thread for all color lines.  That's where I encourage you to use your imagination for the space you are stitching!