A club I’m stitching up was a great chance to experiment with new stitches. As it played out, I realized it was an opportunity to illustrate how I land on a stitch, which isn’t always what the diagram shows you. All are great stitches but it’s all about finding the right one for the spot and for you.
My objective was to find a medium-sized stitch (3-5 rows tall or wide) that integrated the exquisite shading of the canvas, so it needed to be an open stitch. And it needed to complement an adjacent stitch that included diamonds.
I found the original inspiration, the Square Diamond Scotch (diagram on far left), in Ruth Schmuff’s latest book Stitches Volume 5. The squares and diamonds were a great partner with the adjacent diamond stitch. But five rows was too tall for the area and the Scotch squares in the center were too much. I removed the squares and made the sides of the squares four rows wide/tall and created the Square Diamonds (center diagram).
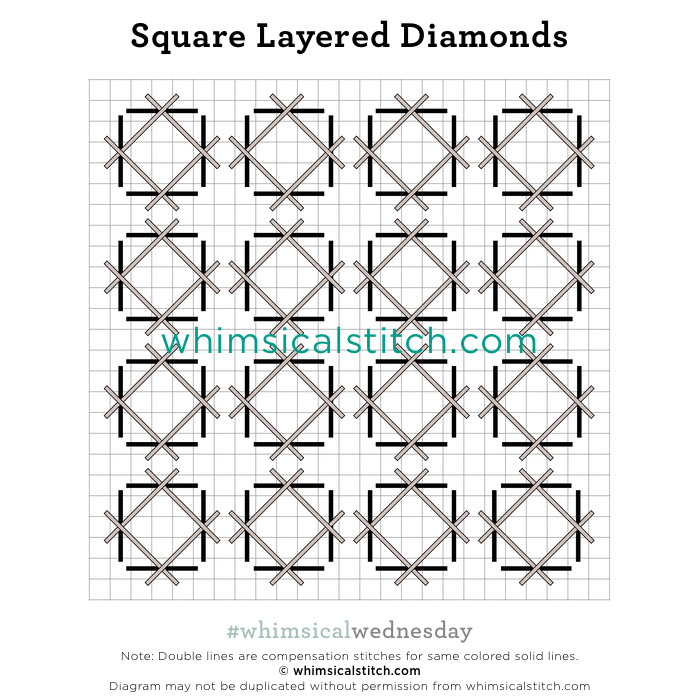
This stitch was too open for the area and it was tough to distinguish the squares versus the diamonds, so I altered the diamonds to be overlapping, hence the Square Layered Diamonds (diagram on far right). This added unnecessary texture and height to the area, so it went bye bye.
My obsession with diamonds covering the corners wasn’t helping. Walking away really helped. When I returned to the piece, I took the diagonal stitches and moved them to cover the open area where the corners meet. Voila! This is what worked for me for the area. The stitched sample uses Elegance (black lines) and Petite Silk Lame (gray lines) on 18-mesh.
I feel the need to reiterate that I liked every single one of the stitches I discarded. It’s all about what works for the unique space you are stitching. All four stitches would make excellent architectural stitches for floors, walls, or roofs. I would love to see the Square Diamond Scotch for a dramatic coat or dress with Petite Very Velvet (black lines) and a size 12 or size 16 Kreinik Metallic. The Square Diamonds will make a beautiful water stitch with Petite Silk Lame (black lines) and Kreinik Metallic (gray lines). Consider the Square Layered Diamonds for a tree with Elegance (black lines) and Silk ‘N Colors (gray lines). You could also glam up any of those stitches by adding a single in the center hole of the intersection where the four corners meet.
This stitch diagram, along with all other #whimsicalwednesday and #smallspacesunday stitch diagrams, can also be found on a Pinterest board here.
Be sure to follow whimsicalstitch.com on Facebook, Pinterest, Instagram, and Twitter.
If you like what you see on this blog, want to learn some very creative decorative stitches, and how to put them all together, whimsicalstitch.com sells Stitch Guides and Stitch Concepts for Melissa Shirley Designs, Zecca Designs, Sandra Gilmore, Purple Palm, Maggie, and Patience Brewster, and many more. Click here to see the newest guides and click here to see the entire collection.
I hope you have the perfect spot for this stitch! Please enjoy!
A Note about Diagrams
I use color in diagrams to make them as clear as possible. The primary function of different colored lines is to illustrate a stitch sequence. For example, layering of colors demonstrates you add them in that order. They can also provide ideas on how to integrate additional threads (one line for each color). Or, you can use the same thread for all color lines. That's where I encourage you to use your imagination for the space you are stitching!


