No Plan? No Worries.

What does one do when they don’t have an inkling of what they want to share on their Wednesday blog on Tuesday afternoon? Asking for a friend.

Click the image to see the whimsicalstitch.com Stitch Library on pinterest.com. Includes all #whimsicalwednesday and #smallspacesunday stitch diagrams.

Click the image to see #whimsicalwednesday and #smallspacesunday Stitched Sample Gallery on Instagram.

My secret is I have a photo album on my phone with random photos of stitches/stitch inspiration I come across in my travels, or from stitching friends’ projects, or pinterest. (Stitch inspiration is often tile work or leaded windows from, say, Downton Abbey). And that is exactly where today’s stitch came from. Truth be told, I selected it because it was different than my usual thing and I wasn’t 100% sure I liked it, but that didn’t mean that someone else wouldn’t like it.

Turns out I love it and am seriously considering making it the background on the border I shared with you last week. The stitched sample uses four plies of green Soie D'Alger (gray lines) and two strands of green Petite Silk Lame (yellow lines). Fun fact. I often use two strands of Petite Silk Lame instead of Silk Lame 18 because it’s a slightly smoother finish.

The one thing to note with this stitch is the layering. I recommend starting every row at the top of your stitching area so each “column” has identical layering.

As illustrated above, this stitch makes a fun background and will also serve well for architectural areas such as floors or roofs. I love the idea of it as a roof on a Victorian House, alternating the threads between a black and a dark gray Silk Lame 18. It will make a lovely path with overdyed silk or floss from ThreadWorx.

I hope you have the perfect spot for it. Have fun playing with it. I hope you enjoy it!

Click on image to see the whimsicalstitch.com Stitch Library on pinterest.com. Includes all #whimsicalwednesday and #smallspacesunday stitch diagrams.

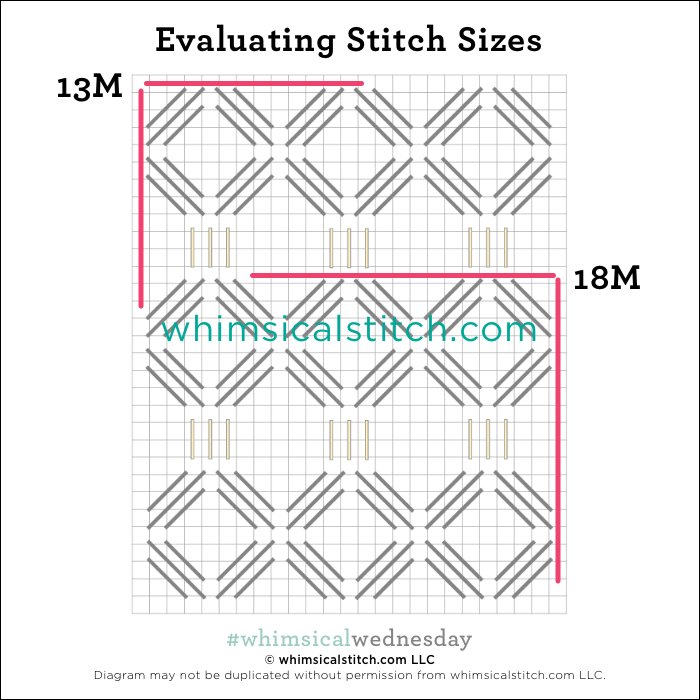
As you are auditioning stitches (from any stitch source), count the number of canvas threads on the diagram that match your mesh size. And there you have what an inch of the stitch will look like. Evaluate that against the area where you plan to use the stitch and make your final decision. If you start integrating this step into your stitch selection process, you may be surprised at how many stitches you think are large are much smaller than you realize.

By (sometimes) including this step in my own process, I find I am now integrating much longer stitches than I ever thought I would. I used to think a stitch six rows long was super big. I have very much changed my tune, which has helped me expand my creativity, especially for large-space stitches.

Today’s stitch diagram, along with all other #whimsicalwednesday and #smallspacesunday stitch diagrams, can also be found on a Pinterest board here. Be sure to follow whimsicalstitch.com on FacebookPinterestInstagram, and Twitter.

If you like what you see on this blog, there's more. Mary’s Whimsical Stitches is a series of four books offering contemporary how-to collections of more than 200 stitches (in each volume) for all stitchers, regardless of skill level. All books include updated and sequenced diagrams from this blog, plus a collection of all-new stitches from private lessons and other class projects. Visit here to find a needlepoint retailer that carries my books.

New to needlepoint or looking for a refresher? Please download a handy how-to guide covering basic needlepoint stitches and stitch compensation techniques along with new top-line information on needlepoint materials and tools, how to handle threads, and other helpful needlepoint resources.

whimsicalstitch.com also sells Stitch Guides and Stitch Concepts for Melissa Shirley Designs, Zecca DesignsSandra Gilmore, Purple Palm, Maggie, and Penny MacLeod, and many more. Click here to see the newest guides and click here to see the entire collection.

I hope you have the perfect spot for this stitch! Please enjoy! Have a wonderful #whimsicalwednesday!

A Note about Diagrams
I use color in diagrams to make them as clear as possible.  The primary function of different colored lines is to illustrate a stitch sequence.  For example, the layering of colors demonstrates you add them in that order.  They can also provide ideas on integrating additional threads (one line for each color).  Or, you can use the same thread for all color lines.  That's where I encourage you to use your imagination for the space you are stitching!

The Odd Things That Make Me Happy

I love alternating cashmere of almost any size for backgrounds and walls. It’s one of the most flexible stitches in terms of size, as illustrated here, here, and here. (Who knew alternating rectangles would make me so happy?)

Today’s 8X2 cashmere shape left an open 3X3 square. I needed a smooth stitch to go there, but I was not interested in using basketweave or continental stitches. So…

Click the image to see the whimsicalstitch.com Stitch Library on pinterest.com. Includes all #whimsicalwednesday and #smallspacesunday stitch diagrams.

Click the image to see #whimsicalwednesday and #smallspacesunday Stitched Sample Gallery on Instagram.

Click the image to see #whimsicalwednesday and #smallspacesunday Stitched Sample Gallery on Instagram.

Reverse Basketweave to the rescue! The two stitched samples illustrate the stitch on 18M and 13M. The pink house uses two plies of pink Splendor (black lines) and a size 8 Kreinik (turquoise lines) on 18M. The green border uses three plies of green Soie (black lines) and Petite Silk Lame (turquoise lines) on 13M. (Petite is not a typo…I wanted the accents to be delicate and I wanted the stitch pattern to be distinct. A heavier Silk Lame would have been just that…too heavy.)

This stitch will also work well for clothing with a Vineyard Silk for the black lines and Petite Silk Lame for the turquoise lines. It will also work well for a tile floor with two shades of your desired effect, say two gray Soie d’Alger for a low key floor or a size 8 black Kreinik for the black lines and a size 4 Kreinik or even a Petite Entice for the turquoise lines. Have fun with it!

I hope you have the perfect spot for it. Have fun playing with it. I hope you enjoy it!

Click on image to see the whimsicalstitch.com Stitch Library on pinterest.com. Includes all #whimsicalwednesday and #smallspacesunday stitch diagrams.

As you are auditioning stitches (from any stitch source), count the number of canvas threads on the diagram that match your mesh size. And there you have what an inch of the stitch will look like. Evaluate that against the area where you plan to use the stitch and make your final decision. If you start integrating this step into your stitch selection process, you may be surprised at how many stitches you think are large are much smaller than you realize.

By (sometimes) including this step in my own process, I find I am now integrating much longer stitches than I ever thought I would. I used to think a stitch six rows long was super big. I have very much changed my tune, which has helped me expand my creativity, especially for large-space stitches.

Today’s stitch diagram, along with all other #whimsicalwednesday and #smallspacesunday stitch diagrams, can also be found on a Pinterest board here. Be sure to follow whimsicalstitch.com on FacebookPinterestInstagram, and Twitter.

If you like what you see on this blog, there's more. Mary’s Whimsical Stitches is a series of four books offering contemporary how-to collections of more than 200 stitches (in each volume) for all stitchers, regardless of skill level. All books include updated and sequenced diagrams from this blog, plus a collection of all-new stitches from private lessons and other class projects. Visit here to find a needlepoint retailer that carries my books.

New to needlepoint or looking for a refresher? Please download a handy how-to guide covering basic needlepoint stitches and stitch compensation techniques along with new top-line information on needlepoint materials and tools, how to handle threads, and other helpful needlepoint resources.

whimsicalstitch.com also sells Stitch Guides and Stitch Concepts for Melissa Shirley Designs, Zecca DesignsSandra Gilmore, Purple Palm, Maggie, and Penny MacLeod, and many more. Click here to see the newest guides and click here to see the entire collection.

I hope you have the perfect spot for this stitch! Please enjoy! Have a wonderful #whimsicalwednesday!

A Note about Diagrams
I use color in diagrams to make them as clear as possible.  The primary function of different colored lines is to illustrate a stitch sequence.  For example, the layering of colors demonstrates you add them in that order.  They can also provide ideas on integrating additional threads (one line for each color).  Or, you can use the same thread for all color lines.  That's where I encourage you to use your imagination for the space you are stitching!

More Row Skipping

Today’s stitch is a hodgepodge of stitches that I’ve stumbled across lately. The original inspiration comes from a Patricia Sone background. It’s also a great example of why combining threads of different colors or finishes is a good choice.

Click the image to see the whimsicalstitch.com Stitch Library on pinterest.com. Includes all #whimsicalwednesday and #smallspacesunday stitch diagrams.

Click the image to see #whimsicalwednesday and #smallspacesunday Stitched Sample Gallery on Instagram.

The stitched sample uses white Grandeur (black lines) and blue Silk Lame 18 (yellow. lines) on the background behind some butterflies (on 13M). The contrast of the blue adds a nice pop.

This stitch makes a great background. I’m also considering using it for a border with Soie D'Alger (black lines) and Neon Rays (yellow lines). It will work well for most architectural elements, such as floors, interior or exterior walls, and pathways. The best thing about this stitch is that it is scalable. Depending on the space, you could do as few as two rows of black lines and as many as you would like. I also want to play with it on a large window with a lightweight Kreinik. I think that might be interesting.

I hope you have the perfect spot for it. Have fun playing with it. I hope you enjoy it!

Click on image to see the whimsicalstitch.com Stitch Library on pinterest.com. Includes all #whimsicalwednesday and #smallspacesunday stitch diagrams.

As you are auditioning stitches (from any stitch source), count the number of canvas threads on the diagram that match your mesh size. And there you have what an inch of the stitch will look like. Evaluate that against the area where you plan to use the stitch and make your final decision. If you start integrating this step into your stitch selection process, you may be surprised at how many stitches you think are large are much smaller than you realize.

By (sometimes) including this step in my own process, I find I am now integrating much longer stitches than I ever thought I would. I used to think a stitch six rows long was super big. I have very much changed my tune, which has helped me expand my creativity, especially for large-space stitches.

Today’s stitch diagram, along with all other #whimsicalwednesday and #smallspacesunday stitch diagrams, can also be found on a Pinterest board here. Be sure to follow whimsicalstitch.com on FacebookPinterestInstagram, and Twitter.

If you like what you see on this blog, there's more. Mary’s Whimsical Stitches is a series of four books offering contemporary how-to collections of more than 200 stitches (in each volume) for all stitchers, regardless of skill level. All books include updated and sequenced diagrams from this blog, plus a collection of all-new stitches from private lessons and other class projects. Visit here to find a needlepoint retailer that carries my books.

New to needlepoint or looking for a refresher? Please download a handy how-to guide covering basic needlepoint stitches and stitch compensation techniques along with new top-line information on needlepoint materials and tools, how to handle threads, and other helpful needlepoint resources.

whimsicalstitch.com also sells Stitch Guides and Stitch Concepts for Melissa Shirley Designs, Zecca DesignsSandra Gilmore, Purple Palm, Maggie, and Penny MacLeod, and many more. Click here to see the newest guides and click here to see the entire collection.

I hope you have the perfect spot for this stitch! Please enjoy! Have a wonderful #whimsicalwednesday!

A Note about Diagrams
I use color in diagrams to make them as clear as possible.  The primary function of different colored lines is to illustrate a stitch sequence.  For example, the layering of colors demonstrates you add them in that order.  They can also provide ideas on integrating additional threads (one line for each color).  Or, you can use the same thread for all color lines.  That's where I encourage you to use your imagination for the space you are stitching!

Back to Wednesday

Today’s stitch was a journey. I loved where it landed but it is possible a few expletives crossed my lips while figuring it out, changing it, and doing it again.

Click the image to see the whimsicalstitch.com Stitch Library on pinterest.com. Includes all #whimsicalwednesday and #smallspacesunday stitch diagrams.

Click the image to see the whimsicalstitch.com Stitch Library on pinterest.com. Includes all #whimsicalwednesday and #smallspacesunday stitch diagrams.

Click the image to see #whimsicalwednesday and #smallspacesunday Stitched Sample Gallery on Instagram.

The stitched sample uses Petite Silk Lame (black lines in the diagram) and one ply of Soie D'Alger (yellow lines) on an 18M canvas from my stash.

I realize stitchers see patterns differently, and I hope the following breakdown will help you. Yes, this stitch requires concentration and counting throughout. The middle diagram above illustrates the repeated element I focused on to navigate the stitch. I started with the center diamond with sides three rows tall and wide. I then added oblique stitches one row wide (or tall) and four rows tall (or wide) to create the triangles from the diamond shape. To be honest, I thought that was where this stitch would end, but I decided to add the upright tied cross (yellow lines) to add more definition.

This stitch is dainty and dramatic at the same time, so it’s made for an area where you want to have fun. A Halloween moon is the first thing that popped into my head with two shades of Petite Silk Lame or Petite Entice. It will make a wonderful vase stitch with a lightweight Kreinik and one ply of silk floss (for 18M) and two plies of silk floss (for 13M). In my world, size 8 Kreinik is a lightweight metallic for 13M and 18M. I also like size 4 Kreinik for 18M.

I hope you have the perfect spot for it. Have fun playing with it. I hope you enjoy it!

Click on image to see the whimsicalstitch.com Stitch Library on pinterest.com. Includes all #whimsicalwednesday and #smallspacesunday stitch diagrams.

As you are auditioning stitches (from any stitch source), count the number of canvas threads on the diagram that match your mesh size. And there you have what an inch of the stitch will look like. Evaluate that against the area where you plan to use the stitch and make your final decision. If you start integrating this step into your stitch selection process, you may be surprised at how many stitches you think are large are much smaller than you realize.

By (sometimes) including this step in my own process, I find I am now integrating much longer stitches than I ever thought I would. I used to think a stitch six rows long was super big. I have very much changed my tune, which has helped me expand my creativity, especially for large-space stitches.

Today’s stitch diagram, along with all other #whimsicalwednesday and #smallspacesunday stitch diagrams, can also be found on a Pinterest board here. Be sure to follow whimsicalstitch.com on FacebookPinterestInstagram, and Twitter.

If you like what you see on this blog, there's more. Mary’s Whimsical Stitches is a series of four books offering contemporary how-to collections of more than 200 stitches (in each volume) for all stitchers, regardless of skill level. All books include updated and sequenced diagrams from this blog, plus a collection of all-new stitches from private lessons and other class projects. Visit here to find a needlepoint retailer that carries my books.

New to needlepoint or looking for a refresher? Please download a handy how-to guide covering basic needlepoint stitches and stitch compensation techniques along with new top-line information on needlepoint materials and tools, how to handle threads, and other helpful needlepoint resources.

whimsicalstitch.com also sells Stitch Guides and Stitch Concepts for Melissa Shirley Designs, Zecca DesignsSandra Gilmore, Purple Palm, Maggie, and Penny MacLeod, and many more. Click here to see the newest guides and click here to see the entire collection.

I hope you have the perfect spot for this stitch! Please enjoy! Have a wonderful #whimsicalwednesday!

A Note about Diagrams
I use color in diagrams to make them as clear as possible.  The primary function of different colored lines is to illustrate a stitch sequence.  For example, the layering of colors demonstrates you add them in that order.  They can also provide ideas on integrating additional threads (one line for each color).  Or, you can use the same thread for all color lines.  That's where I encourage you to use your imagination for the space you are stitching!

I Know It’s Wednesday, But…

…I’m offering up a belated #smallspacesunday.

Click the image to see the whimsicalstitch.com Stitch Library on pinterest.com. Includes all #whimsicalwednesday and #smallspacesunday stitch diagrams.

Click the image to see #whimsicalwednesday and #smallspacesunday Stitched Sample Gallery on Instagram.

The stitched sample is me playing with seven plies of Splendor (aqua lines) and Trebizond Silk (yellow lines). I know samples of “me playing” aren’t always ideal but I’m glad this is a work in progress because it illustrates the sequencing.

I highly recommend threading two separate needles. Using the horizontal stitches in the top right as an example, stitch the first row of the pattern (yellow lines/red thread) following a mildly diagonal path. Park the needle near the end of the path. Add the first row of the pattern (aqua lines/yellow threads), parking the needle at the end of that path. Alternate needles as you proceed through the stitch area. As you are adding the aqua lines, always ensure you start from the unobscured edge and end by sliding your needle under the existing threads above.

I love this stitch for architectural elements, such as a roof with two shades of Vineyard Silk or a rug with silk floss (aqua lines) and Glisten (yellow lines). A student recently used it on a small fig on a Melissa Shirley piece with two shades of Kreinik.

I hope you have the perfect spot for it. Have fun playing with it. I hope you enjoy it!

Click on image to see the whimsicalstitch.com Stitch Library on pinterest.com. Includes all #whimsicalwednesday and #smallspacesunday stitch diagrams.

As you are auditioning stitches (from any stitch source), count the number of canvas threads on the diagram that match your mesh size. And there you have what an inch of the stitch will look like. Evaluate that against the area where you plan to use the stitch and make your final decision. If you start integrating this step into your stitch selection process, you may be surprised at how many stitches you think are large are much smaller than you realize.

By (sometimes) including this step in my own process, I find I am now integrating much longer stitches than I ever thought I would. I used to think a stitch six rows long was super big. I have very much changed my tune, which has helped me expand my creativity, especially for large-space stitches.

Today’s stitch diagram, along with all other #whimsicalwednesday and #smallspacesunday stitch diagrams, can also be found on a Pinterest board here. Be sure to follow whimsicalstitch.com on FacebookPinterestInstagram, and Twitter.

If you like what you see on this blog, there's more. Mary’s Whimsical Stitches is a series of four books offering contemporary how-to collections of more than 200 stitches (in each volume) for all stitchers, regardless of skill level. All books include updated and sequenced diagrams from this blog, plus a collection of all-new stitches from private lessons and other class projects. Visit here to find a needlepoint retailer that carries my books.

New to needlepoint or looking for a refresher? Please download a handy how-to guide covering basic needlepoint stitches and stitch compensation techniques along with new top-line information on needlepoint materials and tools, how to handle threads, and other helpful needlepoint resources.

whimsicalstitch.com also sells Stitch Guides and Stitch Concepts for Melissa Shirley Designs, Zecca DesignsSandra Gilmore, Purple Palm, Maggie, and Penny MacLeod, and many more. Click here to see the newest guides and click here to see the entire collection.

I hope you have the perfect spot for this stitch! Please enjoy! Have a wonderful #whimsicalwednesday!

A Note about Diagrams
I use color in diagrams to make them as clear as possible.  The primary function of different colored lines is to illustrate a stitch sequence.  For example, the layering of colors demonstrates you add them in that order.  They can also provide ideas on integrating additional threads (one line for each color).  Or, you can use the same thread for all color lines.  That's where I encourage you to use your imagination for the space you are stitching!
About That Stitch

Sometimes, a little something is missing. The good news is that little something is nothing more than a dash of Alternating Skip Tent.

Click the image to see the whimsicalstitch.com Stitch Library on pinterest.com. Includes all #whimsicalwednesday and #smallspacesunday stitch diagrams.

Click the image to see #whimsicalwednesday and #smallspacesunday Stitched Sample Gallery on Instagram.

Something was missing as I stitched more of the original plan for the background. I also felt the pink, while the right choice, didn’t pop enough. Alternating Skip Tent to the rescue! was simply too much white. Filling every diamond was too much, but every other diamond was just right. The stitched sample uses Treenway Shinju (black lines), pink Silk Lame 18 (yellow lines), and white size 8 Kreinik (turquoise lines).

Other ideas for the diamond filling are horizontal or vertical rows of tent stitches with an empty row in between. I also suspect if I used a different color thread for the black lines, there may have been no need to add the filler. Clearly, there is a surprising amount of room to play with this stitch.

I hope you have the perfect spot for it. Have fun playing with it. I hope you enjoy it!

Click on image to see the whimsicalstitch.com Stitch Library on pinterest.com. Includes all #whimsicalwednesday and #smallspacesunday stitch diagrams.

As you are auditioning stitches (from any stitch source), count the number of canvas threads on the diagram that match your mesh size. And there you have what an inch of the stitch will look like. Evaluate that against the area where you plan to use the stitch and make your final decision. If you start integrating this step into your stitch selection process, you may be surprised at how many stitches you think are large are much smaller than you realize.

By (sometimes) including this step in my own process, I find I am now integrating much longer stitches than I ever thought I would. I used to think a stitch six rows long was super big. I have very much changed my tune, which has helped me expand my creativity, especially for large-space stitches.

Today’s stitch diagram, along with all other #whimsicalwednesday and #smallspacesunday stitch diagrams, can also be found on a Pinterest board here. Be sure to follow whimsicalstitch.com on FacebookPinterestInstagram, and Twitter.

If you like what you see on this blog, there's more. Mary’s Whimsical Stitches is a series of four books offering contemporary how-to collections of more than 200 stitches (in each volume) for all stitchers, regardless of skill level. All books include updated and sequenced diagrams from this blog, plus a collection of all-new stitches from private lessons and other class projects. Visit here to find a needlepoint retailer that carries my books.

New to needlepoint or looking for a refresher? Please download a handy how-to guide covering basic needlepoint stitches and stitch compensation techniques along with new top-line information on needlepoint materials and tools, how to handle threads, and other helpful needlepoint resources.

whimsicalstitch.com also sells Stitch Guides and Stitch Concepts for Melissa Shirley Designs, Zecca DesignsSandra Gilmore, Purple Palm, Maggie, and Penny MacLeod, and many more. Click here to see the newest guides and click here to see the entire collection.

I hope you have the perfect spot for this stitch! Please enjoy! Have a wonderful #whimsicalwednesday!

A Note about Diagrams
I use color in diagrams to make them as clear as possible.  The primary function of different colored lines is to illustrate a stitch sequence.  For example, the layering of colors demonstrates you add them in that order.  They can also provide ideas on integrating additional threads (one line for each color).  Or, you can use the same thread for all color lines.  That's where I encourage you to use your imagination for the space you are stitching!

Skipping Rows...Again

My current Instagram obsession is Zentangle videos. They are mesmerizing yet surprising, and the end results are beautiful. Today’s stitch inspiration came from one such video.

Click the image to see the whimsicalstitch.com Stitch Library on pinterest.com. Includes all #whimsicalwednesday and #smallspacesunday stitch diagrams.

Click the image to see #whimsicalwednesday and #smallspacesunday Stitched Sample Gallery on Instagram.

The stitched sample is me playing with Vineyard Silk on 13M. It didn’t exactly come out to the pattern's scale in the original video, as I chose to max out at a stitch length of eight rows because I was stitching on 13M.

I’m looking forward to this stitch for a background or architectural elements, such as a floor or a roof. The Vineyard Silk offered a surprising amount of texture, in my opinion. So, I decided to jump down that rabbit hole by adding a little bit more texture with the Shinju thread from last week. I love the added weight even more than I anticipated I would.

Click the image to see the whimsicalstitch.com Stitch Library on pinterest.com. Includes all #whimsicalwednesday and #smallspacesunday stitch diagrams.

Click the image to see #whimsicalwednesday and #smallspacesunday Stitched Sample Gallery on Instagram.

This variation will make a fantastic Santa bag or coat with Vineyard Silk or Pepper Pot Silk for the black lines and a bright metallic, such as Fyre Werks or Kreinik, for the yellow lines.

This stitch is scalable, so you can easily add open space. Blowing it up to rows that are ten or 12 rows wide will be a whole different ballgame, and one I would try on 18M.

I hope you have the perfect spot for it. Have fun playing with it. I hope you enjoy it!

Click on image to see the whimsicalstitch.com Stitch Library on pinterest.com. Includes all #whimsicalwednesday and #smallspacesunday stitch diagrams.

As you are auditioning stitches (from any stitch source), count the number of canvas threads on the diagram that match your mesh size. And there you have what an inch of the stitch will look like. Evaluate that against the area where you plan to use the stitch and make your final decision. If you start integrating this step into your stitch selection process, you may be surprised at how many stitches you think are large are much smaller than you realize.

By (sometimes) including this step in my own process, I find I am now integrating much longer stitches than I ever thought I would. I used to think a stitch six rows long was super big. I have very much changed my tune, which has helped me expand my creativity, especially for large-space stitches.

Today’s stitch diagram, along with all other #whimsicalwednesday and #smallspacesunday stitch diagrams, can also be found on a Pinterest board here. Be sure to follow whimsicalstitch.com on FacebookPinterestInstagram, and Twitter.

If you like what you see on this blog, there's more. Mary’s Whimsical Stitches is a series of four books offering contemporary how-to collections of more than 200 stitches (in each volume) for all stitchers, regardless of skill level. All books include updated and sequenced diagrams from this blog, plus a collection of all-new stitches from private lessons and other class projects. Visit here to find a needlepoint retailer that carries my books.

New to needlepoint or looking for a refresher? Please download a handy how-to guide covering basic needlepoint stitches and stitch compensation techniques along with new top-line information on needlepoint materials and tools, how to handle threads, and other helpful needlepoint resources.

whimsicalstitch.com also sells Stitch Guides and Stitch Concepts for Melissa Shirley Designs, Zecca DesignsSandra Gilmore, Purple Palm, Maggie, and Penny MacLeod, and many more. Click here to see the newest guides and click here to see the entire collection.

I hope you have the perfect spot for this stitch! Please enjoy! Have a wonderful #whimsicalwednesday!

A Note about Diagrams
I use color in diagrams to make them as clear as possible.  The primary function of different colored lines is to illustrate a stitch sequence.  For example, the layering of colors demonstrates you add them in that order.  They can also provide ideas on integrating additional threads (one line for each color).  Or, you can use the same thread for all color lines.  That's where I encourage you to use your imagination for the space you are stitching!

Two Birds. One Stone.

I had a stitch in mind for this week but I also needed a background for a piece I’m working on. I focused on the latter and am very pleased.

Click the image to see the whimsicalstitch.com Stitch Library on pinterest.com. Includes all #whimsicalwednesday and #smallspacesunday stitch diagrams.

Click the image to see #whimsicalwednesday and #smallspacesunday Stitched Sample Gallery on Instagram.

The stitched sample is the background for the Pineapple Wreath canvas by KCN. The entire canvas is a work in progress, with a huge dish of spaghetti threads on it. (I’ll post a cleaned-up version later.) I used Treenway Shinju for the black lines and a pink Silk Lame 18 for the yellow lines.

I stitched the wreath and bow in basketweave, using Silk Lame 18 for the bow with a light green Pepper Pot Silk and a darker green Vineyard Silk for the pineapples. I must admit, being a lifelong California girl, I mistook the greenery for artichokes, but thanks to the internet, I now know better.

This stitch is scalable, so you can easily adjust the amount of open space. A slightly smaller version with the same-size pink diamonds and three stitches between the diamonds will be darling as a background for an ornament. You can also make the single white stitch in the center of each diamond a third color or a bead for a stitch that will pop a little more.

I hope you have the perfect spot for it. Have fun playing with it. I hope you enjoy it!

Click on image to see the whimsicalstitch.com Stitch Library on pinterest.com. Includes all #whimsicalwednesday and #smallspacesunday stitch diagrams.

As you are auditioning stitches (from any stitch source), count the number of canvas threads on the diagram that match your mesh size. And there you have what an inch of the stitch will look like. Evaluate that against the area where you plan to use the stitch and make your final decision. If you start integrating this step into your stitch selection process, you may be surprised at how many stitches you think are large are much smaller than you realize.

By (sometimes) including this step in my own process, I find I am now integrating much longer stitches than I ever thought I would. I used to think a stitch six rows long was super big. I have very much changed my tune, which has helped me expand my creativity, especially for large-space stitches.

Today’s stitch diagram, along with all other #whimsicalwednesday and #smallspacesunday stitch diagrams, can also be found on a Pinterest board here. Be sure to follow whimsicalstitch.com on FacebookPinterestInstagram, and Twitter.

If you like what you see on this blog, there's more. Mary’s Whimsical Stitches is a series of four books offering contemporary how-to collections of more than 200 stitches (in each volume) for all stitchers, regardless of skill level. All books include updated and sequenced diagrams from this blog, plus a collection of all-new stitches from private lessons and other class projects. Visit here to find a needlepoint retailer that carries my books.

New to needlepoint or looking for a refresher? Please download a handy how-to guide covering basic needlepoint stitches and stitch compensation techniques along with new top-line information on needlepoint materials and tools, how to handle threads, and other helpful needlepoint resources.

whimsicalstitch.com also sells Stitch Guides and Stitch Concepts for Melissa Shirley Designs, Zecca DesignsSandra Gilmore, Purple Palm, Maggie, and Penny MacLeod, and many more. Click here to see the newest guides and click here to see the entire collection.

I hope you have the perfect spot for this stitch! Please enjoy! Have a wonderful #whimsicalwednesday!

A Note about Diagrams
I use color in diagrams to make them as clear as possible.  The primary function of different colored lines is to illustrate a stitch sequence.  For example, the layering of colors demonstrates you add them in that order.  They can also provide ideas on integrating additional threads (one line for each color).  Or, you can use the same thread for all color lines.  That's where I encourage you to use your imagination for the space you are stitching!

Stitches & Laughter

There are two things I can count on when I visit the Nimble Needle in Atlanta…a lot of laughs and the sharing of cute stitches. Today’s stitch is one such stitch. (Thanks, Marci!)

Click the image to see the whimsicalstitch.com Stitch Library on pinterest.com. Includes all #whimsicalwednesday and #smallspacesunday stitch diagrams.

Click the image to see #whimsicalwednesday and #smallspacesunday Stitched Sample Gallery on Instagram.

I love the stitch for a shirt, as illustrated, but I may love the thread choice of variegated Treenway Silk Perle on 18M even more. I’m looking forward to using this stitch for greenery with more overdyed silk or cotton floss. I love the idea of adding a bead to the center of the double diamonds for a medium-sized purse, while using a metallic thread for the black lines. I love the idea of this for a roof or outdoor tile with Burmilana or Bella Lusso wools. And, finally, I can not wait to add more pairs of diamonds to make each alternating element taller or wider. I’ll keep you posted.

I hope you find the perfect spot for it. It is such a happy, fun stitch!

Click on image to see the whimsicalstitch.com Stitch Library on pinterest.com. Includes all #whimsicalwednesday and #smallspacesunday stitch diagrams.

As you are auditioning stitches (from any stitch source), count the number of canvas threads on the diagram that match your mesh size. And there you have what an inch of the stitch will look like. Evaluate that against the area where you plan to use the stitch and make your final decision. If you start integrating this step into your stitch selection process, you may be surprised at how many stitches you think are large are much smaller than you realize.

By (sometimes) including this step in my own process, I find I am now integrating much longer stitches than I ever thought I would. I used to think a stitch six rows long was super big. I have very much changed my tune, which has helped me expand my creativity, especially for large-space stitches.

Today’s stitch diagram, along with all other #whimsicalwednesday and #smallspacesunday stitch diagrams, can also be found on a Pinterest board here. Be sure to follow whimsicalstitch.com on FacebookPinterestInstagram, and Twitter.

If you like what you see on this blog, there's more. Mary’s Whimsical Stitches is a series of four books offering contemporary how-to collections of more than 200 stitches (in each volume) for all stitchers, regardless of skill level. All books include updated and sequenced diagrams from this blog, plus a collection of all-new stitches from private lessons and other class projects. Visit here to find a needlepoint retailer that carries my books.

New to needlepoint or looking for a refresher? Please download a handy how-to guide covering basic needlepoint stitches and stitch compensation techniques along with new top-line information on needlepoint materials and tools, how to handle threads, and other helpful needlepoint resources.

whimsicalstitch.com also sells Stitch Guides and Stitch Concepts for Melissa Shirley Designs, Zecca DesignsSandra Gilmore, Purple Palm, Maggie, and Penny MacLeod, and many more. Click here to see the newest guides and click here to see the entire collection.

I hope you have the perfect spot for this stitch! Please enjoy! Have a wonderful #whimsicalwednesday!

A Note about Diagrams
I use color in diagrams to make them as clear as possible.  The primary function of different colored lines is to illustrate a stitch sequence.  For example, the layering of colors demonstrates you add them in that order.  They can also provide ideas on integrating additional threads (one line for each color).  Or, you can use the same thread for all color lines.  That's where I encourage you to use your imagination for the space you are stitching!