

What does one do when they don’t have an inkling of what they want to share on their Wednesday blog on Tuesday afternoon? Asking for a friend.

Click the image to see the whimsicalstitch.com Stitch Library on pinterest.com. Includes all #whimsicalwednesday and #smallspacesunday stitch diagrams.

Click the image to see #whimsicalwednesday and #smallspacesunday Stitched Sample Gallery on Instagram.
My secret is I have a photo album on my phone with random photos of stitches/stitch inspiration I come across in my travels, or from stitching friends’ projects, or pinterest. (Stitch inspiration is often tile work or leaded windows from, say, Downton Abbey). And that is exactly where today’s stitch came from. Truth be told, I selected it because it was different than my usual thing and I wasn’t 100% sure I liked it, but that didn’t mean that someone else wouldn’t like it.
Turns out I love it and am seriously considering making it the background on the border I shared with you last week. The stitched sample uses four plies of green Soie D'Alger (gray lines) and two strands of green Petite Silk Lame (yellow lines). Fun fact. I often use two strands of Petite Silk Lame instead of Silk Lame 18 because it’s a slightly smoother finish.
The one thing to note with this stitch is the layering. I recommend starting every row at the top of your stitching area so each “column” has identical layering.
As illustrated above, this stitch makes a fun background and will also serve well for architectural areas such as floors or roofs. I love the idea of it as a roof on a Victorian House, alternating the threads between a black and a dark gray Silk Lame 18. It will make a lovely path with overdyed silk or floss from ThreadWorx.
I hope you have the perfect spot for it. Have fun playing with it. I hope you enjoy it!
Click on image to see the whimsicalstitch.com Stitch Library on pinterest.com. Includes all #whimsicalwednesday and #smallspacesunday stitch diagrams.
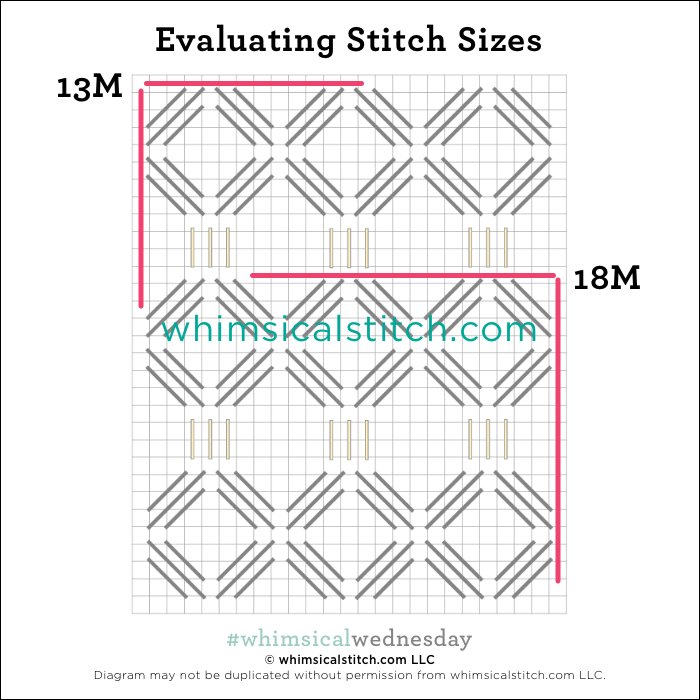
As you are auditioning stitches (from any stitch source), count the number of canvas threads on the diagram that match your mesh size. And there you have what an inch of the stitch will look like. Evaluate that against the area where you plan to use the stitch and make your final decision. If you start integrating this step into your stitch selection process, you may be surprised at how many stitches you think are large are much smaller than you realize.
By (sometimes) including this step in my own process, I find I am now integrating much longer stitches than I ever thought I would. I used to think a stitch six rows long was super big. I have very much changed my tune, which has helped me expand my creativity, especially for large-space stitches.
Today’s stitch diagram, along with all other #whimsicalwednesday and #smallspacesunday stitch diagrams, can also be found on a Pinterest board here. Be sure to follow whimsicalstitch.com on Facebook, Pinterest, Instagram, and Twitter.
If you like what you see on this blog, there's more. Mary’s Whimsical Stitches is a series of four books offering contemporary how-to collections of more than 200 stitches (in each volume) for all stitchers, regardless of skill level. All books include updated and sequenced diagrams from this blog, plus a collection of all-new stitches from private lessons and other class projects. Visit here to find a needlepoint retailer that carries my books.
New to needlepoint or looking for a refresher? Please download a handy how-to guide covering basic needlepoint stitches and stitch compensation techniques along with new top-line information on needlepoint materials and tools, how to handle threads, and other helpful needlepoint resources.
whimsicalstitch.com also sells Stitch Guides and Stitch Concepts for Melissa Shirley Designs, Zecca Designs, Sandra Gilmore, Purple Palm, Maggie, and Penny MacLeod, and many more. Click here to see the newest guides and click here to see the entire collection.
I hope you have the perfect spot for this stitch! Please enjoy! Have a wonderful #whimsicalwednesday!
A Note about Diagrams
I use color in diagrams to make them as clear as possible. The primary function of different colored lines is to illustrate a stitch sequence. For example, the layering of colors demonstrates you add them in that order. They can also provide ideas on integrating additional threads (one line for each color). Or, you can use the same thread for all color lines. That's where I encourage you to use your imagination for the space you are stitching!