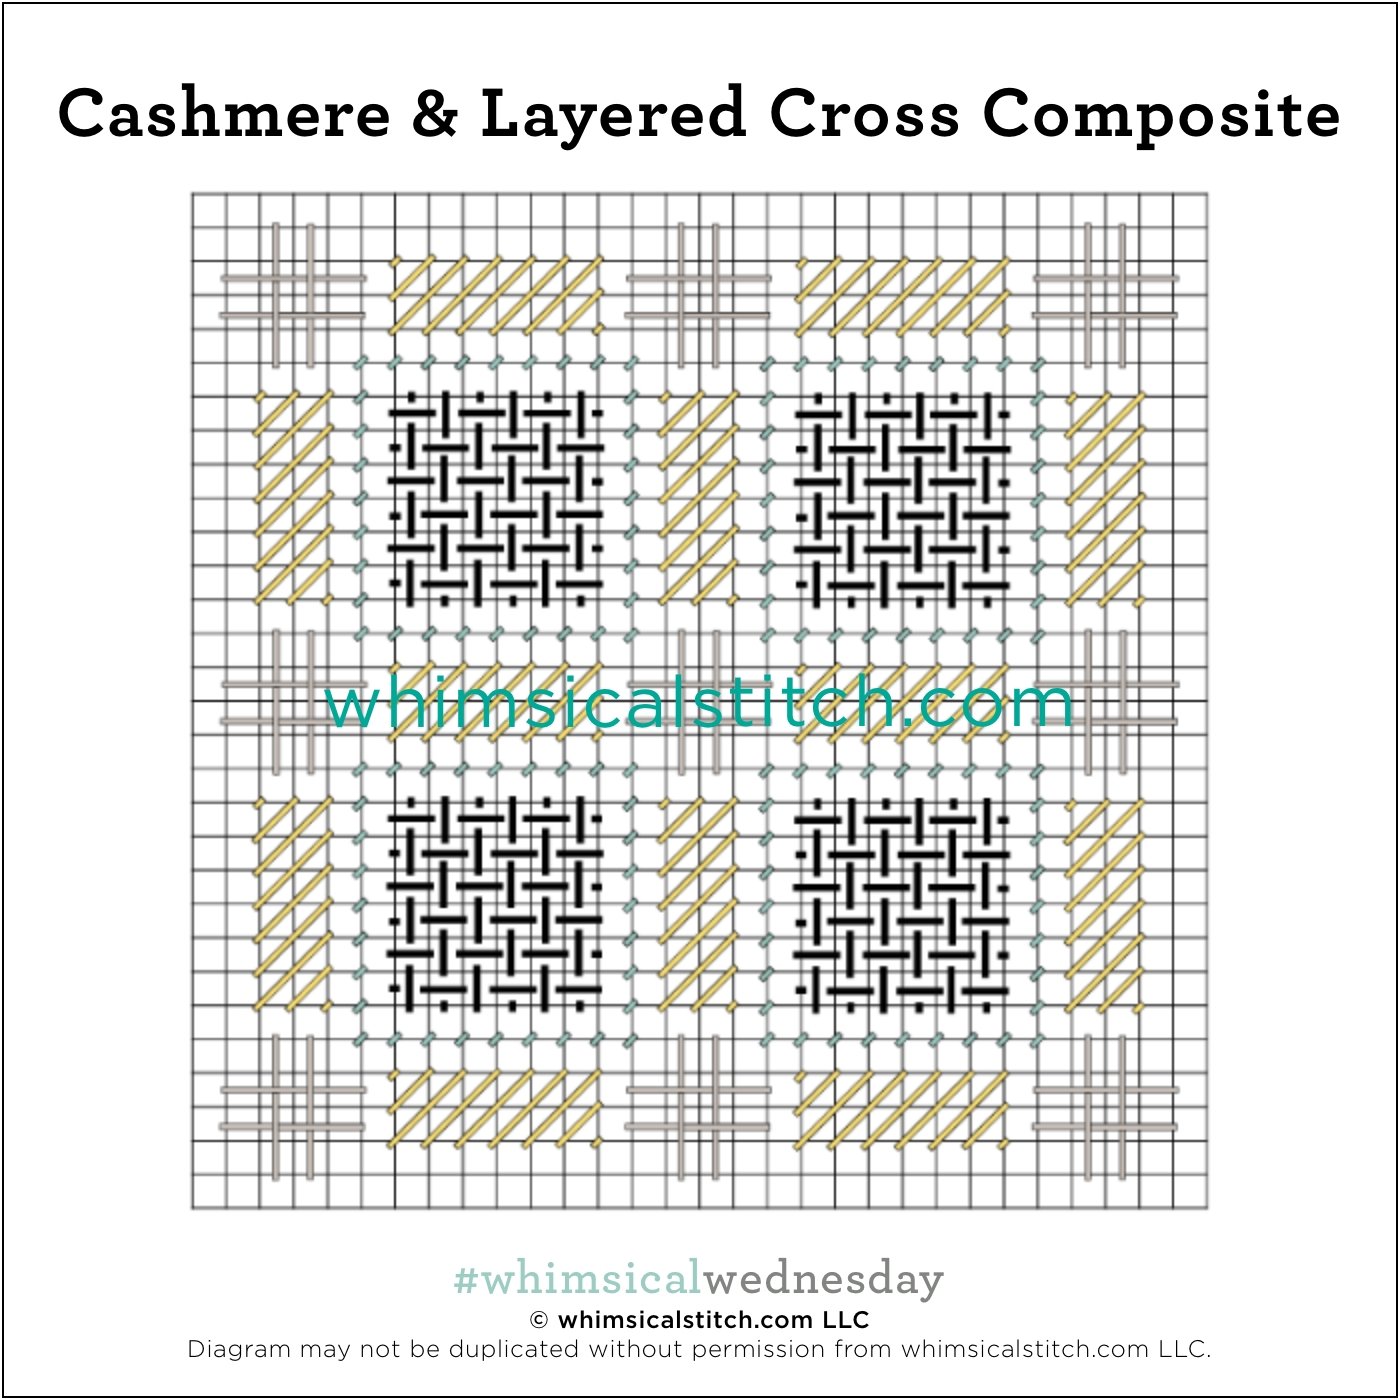
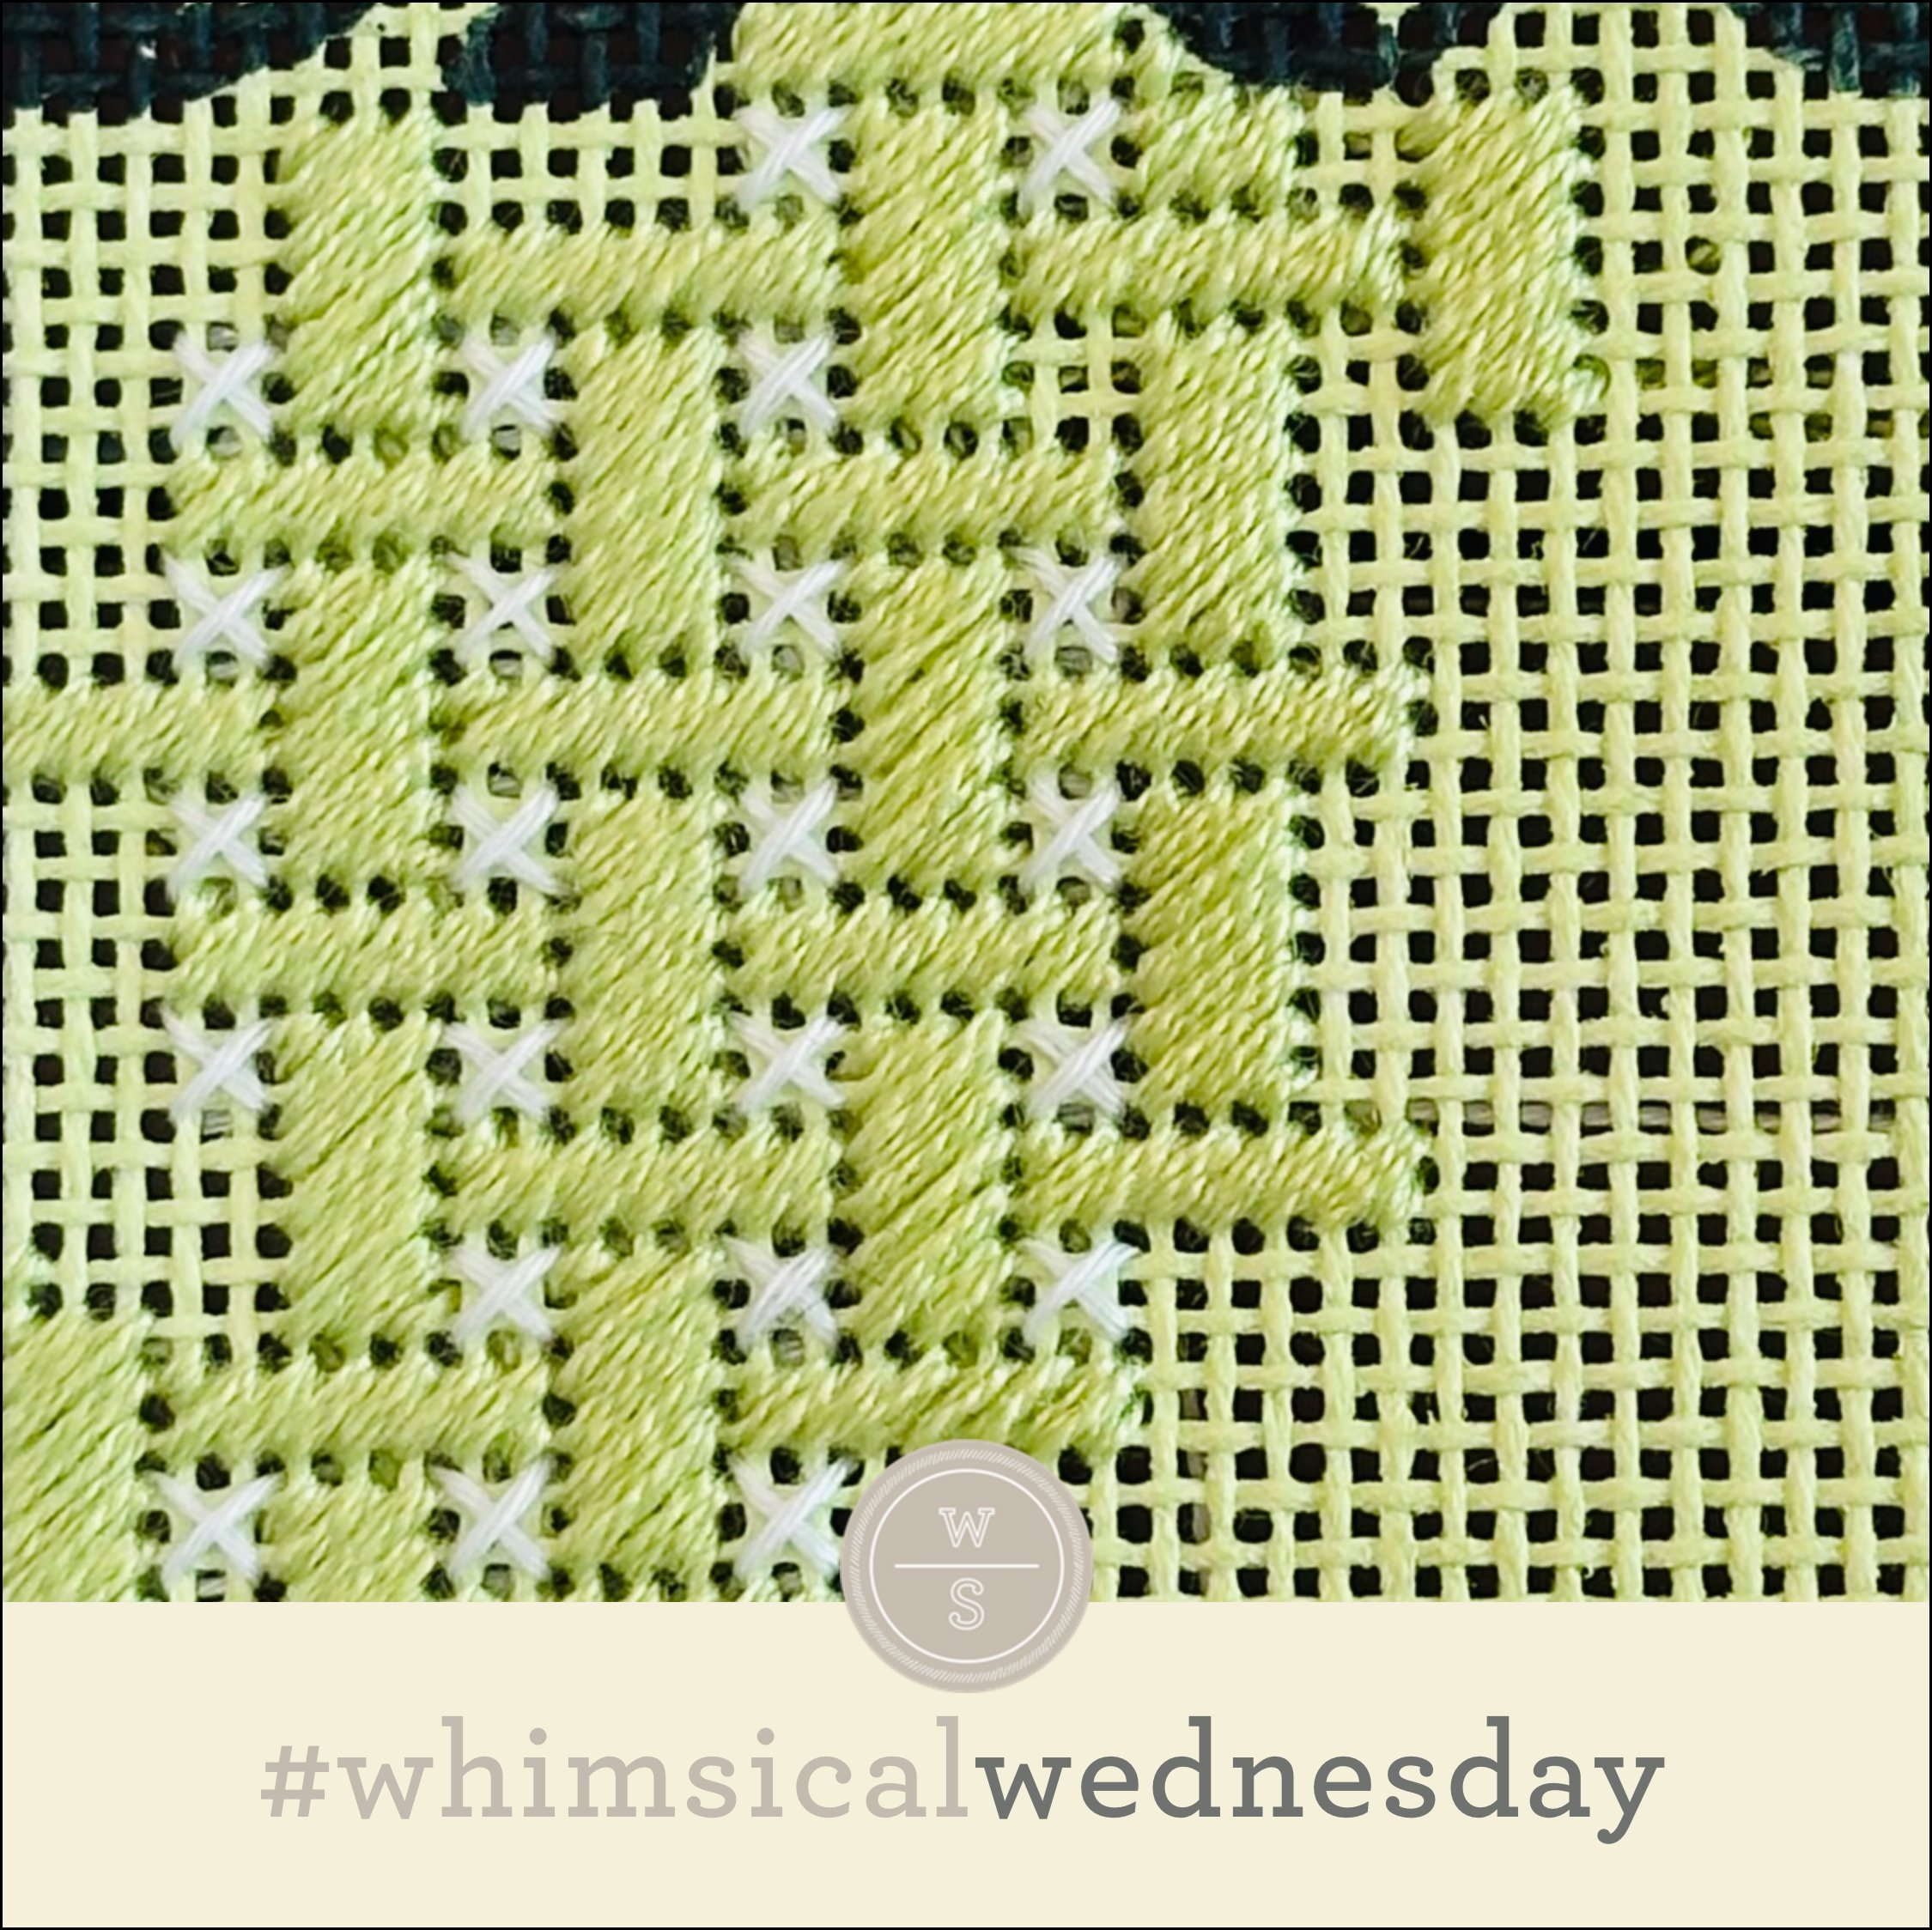
Why?

I rarely adhere to my Instagram time limits. That worked well for me as the early morning scrolling inspired today’s stitch.

Click the image to see the whimsicalstitch.com Stitch Library on pinterest.com. Includes all #whimsicalwednesday and #smallspacesunday stitch diagrams.

Click the image to see #whimsicalwednesday and #smallspacesunday Stitched Sample Gallery on Instagram

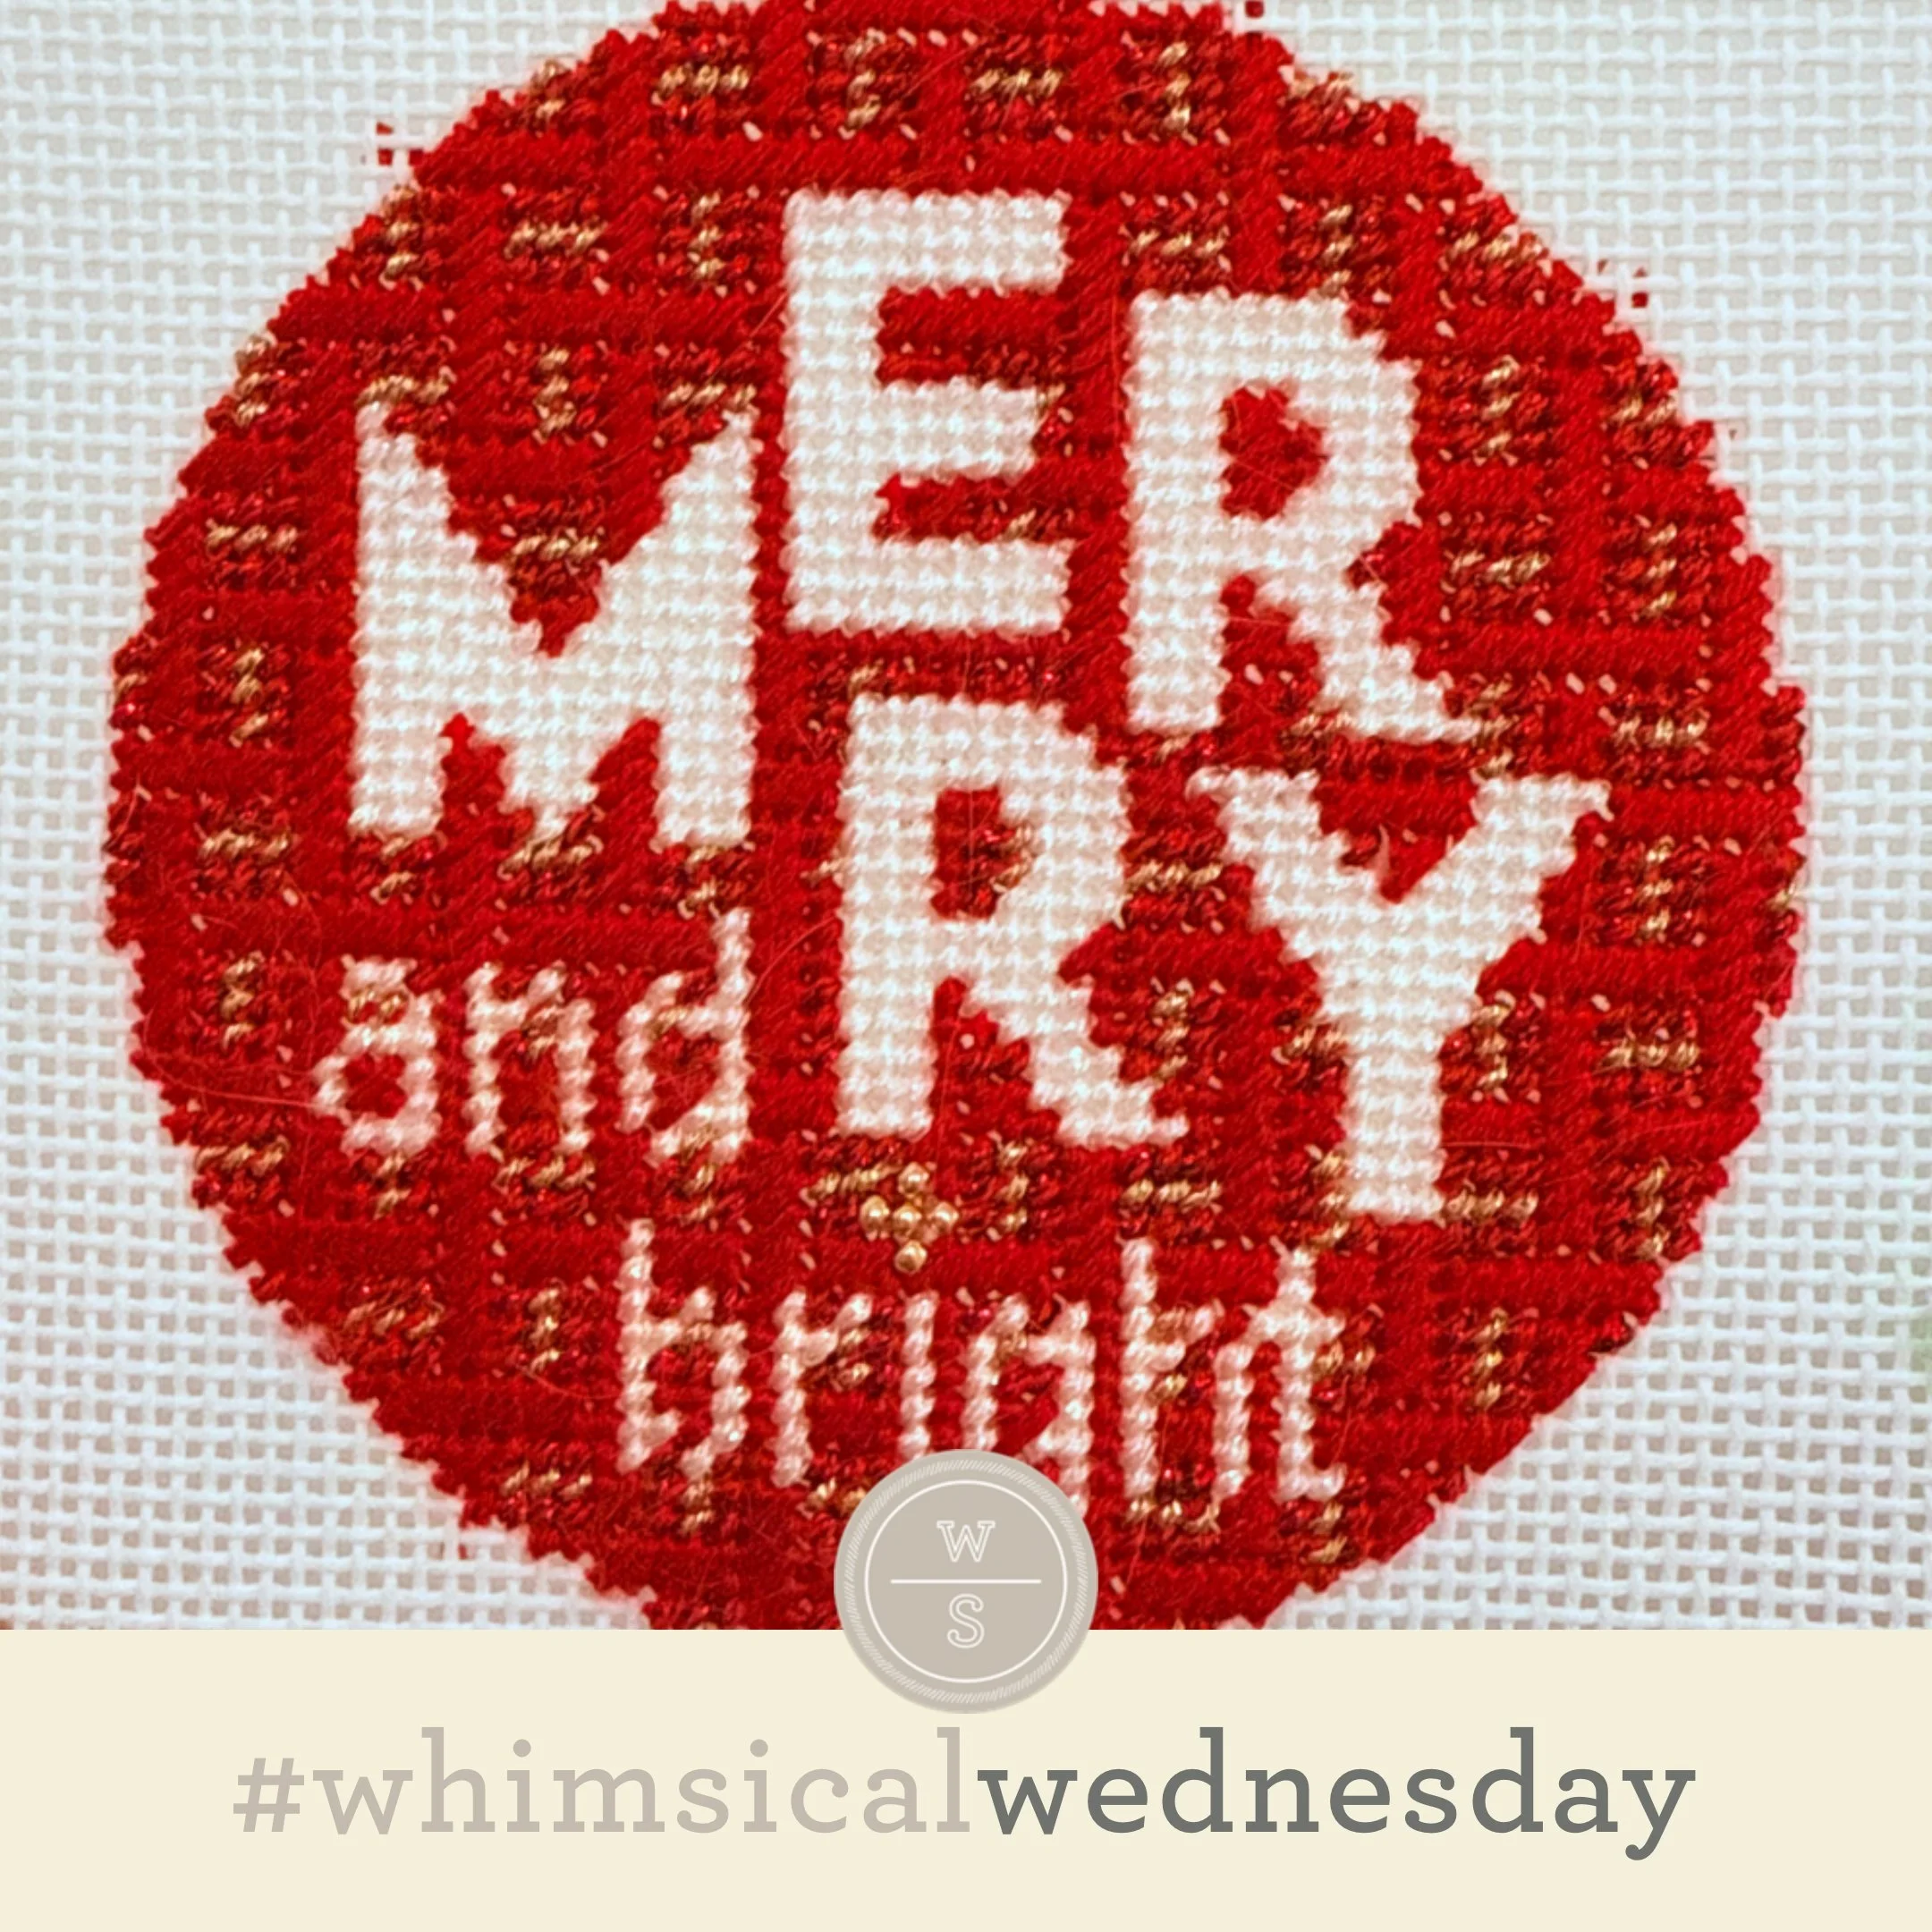
The stitched sample uses Silk Lame 18 (on 13M) for all lines on the diagram to create a background for a cute Christmas pillow. I look forward to using two different threads, as diagrammed, for this stitch on a pretty sundress, with Elegance for the back lines and Soie D'Alger for the turquoise lines. All of the stitches are three rows tall or wide. I want to play with scale a little bit and try a larger version to see how the open space plays out for a larger background space.

I hope you have the perfect spot for today’s stitch. Have fun playing with it!

Click on image to see the whimsicalstitch.com Stitch Library on pinterest.com. Includes all #whimsicalwednesday and #smallspacesunday stitch diagrams.

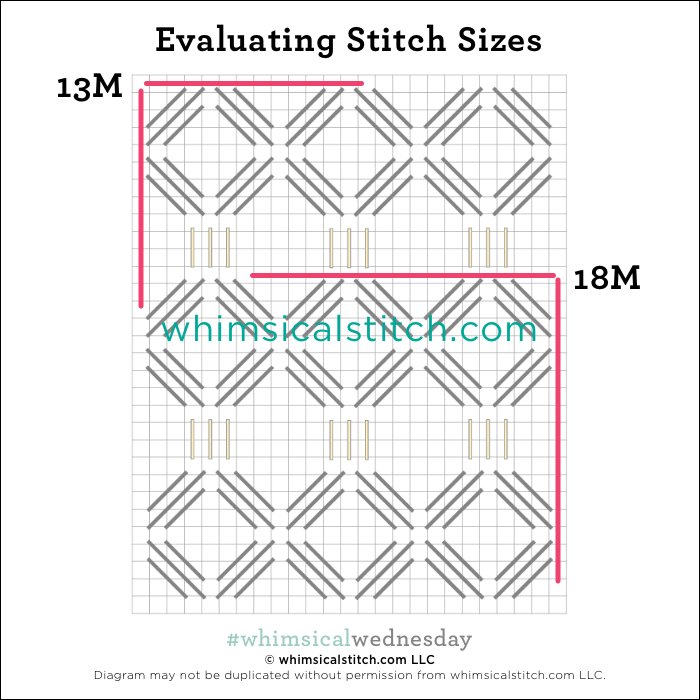
As you are auditioning stitches (from any stitch source), count the number of canvas threads on the diagram that match your mesh size. And there you have what an inch of the stitch will look like. Evaluate that against the area where you plan to use the stitch and make your final decision. If you start integrating this step into your stitch selection process, you may be surprised at how many stitches you think are large are much smaller than you realize.

By (sometimes) including this step in my own process, I find I am now integrating much longer stitches than I ever thought I would. I used to think a stitch six rows long was super big. I have very much changed my tune, which has helped me expand my creativity, especially for large-space stitches.

Today’s stitch diagram, along with all other #whimsicalwednesday and #smallspacesunday stitch diagrams, can also be found on a Pinterest board here. Be sure to follow whimsicalstitch.com on FacebookPinterestInstagram, and Twitter.

If you like what you see on this blog, there's more. Mary’s Whimsical Stitches is a series of four books offering contemporary how-to collections of more than 200 stitches (in each volume) for all stitchers, regardless of skill level. All books include updated and sequenced diagrams from this blog, plus a collection of all-new stitches from private lessons and other class projects. Visit here to find a needlepoint retailer that carries my books.

New to needlepoint or looking for a refresher? Please download a handy how-to guide covering basic needlepoint stitches and stitch compensation techniques along with new top-line information on needlepoint materials and tools, how to handle threads, and other helpful needlepoint resources.

whimsicalstitch.com also sells Stitch Guides and Stitch Concepts for Melissa Shirley Designs, Zecca DesignsSandra Gilmore, Purple Palm, Maggie, and Penny MacLeod, and many more. Click here to see the newest guides and click here to see the entire collection.

I hope you have the perfect spot for this stitch! Please enjoy! Have a wonderful #whimsicalwednesday!

A Note about Diagrams
I use color in diagrams to make them as clear as possible.  The primary function of different colored lines is to illustrate a stitch sequence.  For example, the layering of colors demonstrates you add them in that order.  They can also provide ideas on integrating additional threads (one line for each color).  Or, you can use the same thread for all color lines.  That's where I encourage you to use your imagination for the space you are stitching!

I Can Count on Her

It’s always fun to run into a stitching friend. Good to catch up on all kinds of news, especially what they are working on. All of the above just happened a couple days ago and she generously teed up an adorable variation of one of my favorite stitches!

Click the image to see the whimsicalstitch.com Stitch Library on pinterest.com. Includes all #whimsicalwednesday and #smallspacesunday stitch diagrams.

Click the image to see #whimsicalwednesday and #smallspacesunday Stitched Sample Gallery on Instagram

We chatted so much I forgot to ask what threads she used. My best guess is two, possibly three, shades of either Impressions (most likely one strand) strand most likely) or DMC size 8 on a 13M Charley Harper canvas.

I doubt I would have come up with this stitch independently as I am typically not a fan of straight stitches over one row. Virtually all of my beetle stitches have rows with an even number of stitches. But that straight stitch over one row is what makes this work. The stitched sample is a lawn/green space on the background of a sweet Charlie Harper animal canvas. I really want to play with it for a tree that has little to nothing on it, not even branches with similar threads as this background. I also look forward to a student using it as background for a simple initial ornament with three different white threads. I would use a white metallic for the black lines, a white metallic for the tent stitches splitting the beetles, and a white silk floss for the remaining yellow lines.

I hope you have the perfect spot for today’s stitch. Have fun playing with it!

Click on image to see the whimsicalstitch.com Stitch Library on pinterest.com. Includes all #whimsicalwednesday and #smallspacesunday stitch diagrams.

As you are auditioning stitches (from any stitch source), count the number of canvas threads on the diagram that match your mesh size. And there you have what an inch of the stitch will look like. Evaluate that against the area where you plan to use the stitch and make your final decision. If you start integrating this step into your stitch selection process, you may be surprised at how many stitches you think are large are much smaller than you realize.

By (sometimes) including this step in my own process, I find I am now integrating much longer stitches than I ever thought I would. I used to think a stitch six rows long was super big. I have very much changed my tune, which has helped me expand my creativity, especially for large-space stitches.

Today’s stitch diagram, along with all other #whimsicalwednesday and #smallspacesunday stitch diagrams, can also be found on a Pinterest board here. Be sure to follow whimsicalstitch.com on FacebookPinterestInstagram, and Twitter.

If you like what you see on this blog, there's more. Mary’s Whimsical Stitches is a series of four books offering contemporary how-to collections of more than 200 stitches (in each volume) for all stitchers, regardless of skill level. All books include updated and sequenced diagrams from this blog, plus a collection of all-new stitches from private lessons and other class projects. Visit here to find a needlepoint retailer that carries my books.

New to needlepoint or looking for a refresher? Please download a handy how-to guide covering basic needlepoint stitches and stitch compensation techniques along with new top-line information on needlepoint materials and tools, how to handle threads, and other helpful needlepoint resources.

whimsicalstitch.com also sells Stitch Guides and Stitch Concepts for Melissa Shirley Designs, Zecca DesignsSandra Gilmore, Purple Palm, Maggie, and Penny MacLeod, and many more. Click here to see the newest guides and click here to see the entire collection.

I hope you have the perfect spot for this stitch! Please enjoy! Have a wonderful #whimsicalwednesday!

A Note about Diagrams
I use color in diagrams to make them as clear as possible.  The primary function of different colored lines is to illustrate a stitch sequence.  For example, the layering of colors demonstrates you add them in that order.  They can also provide ideas on integrating additional threads (one line for each color).  Or, you can use the same thread for all color lines.  That's where I encourage you to use your imagination for the space you are stitching!

Hello Again!

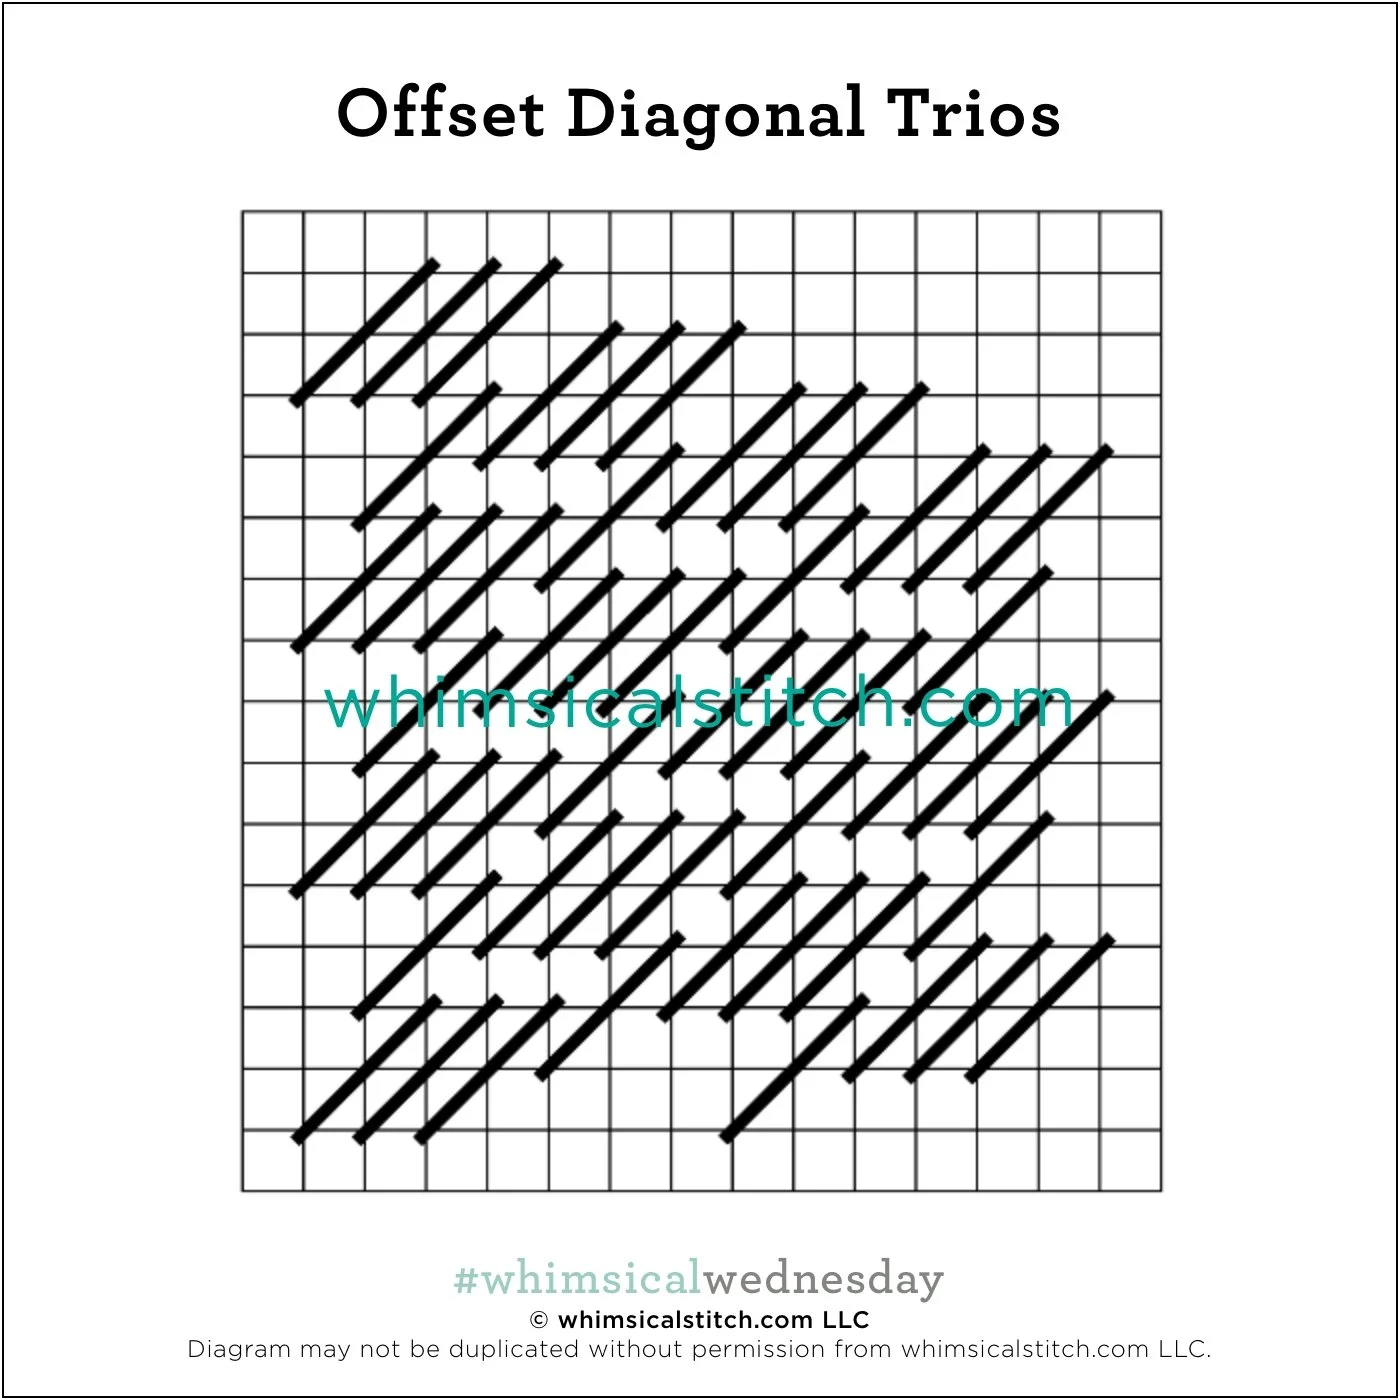
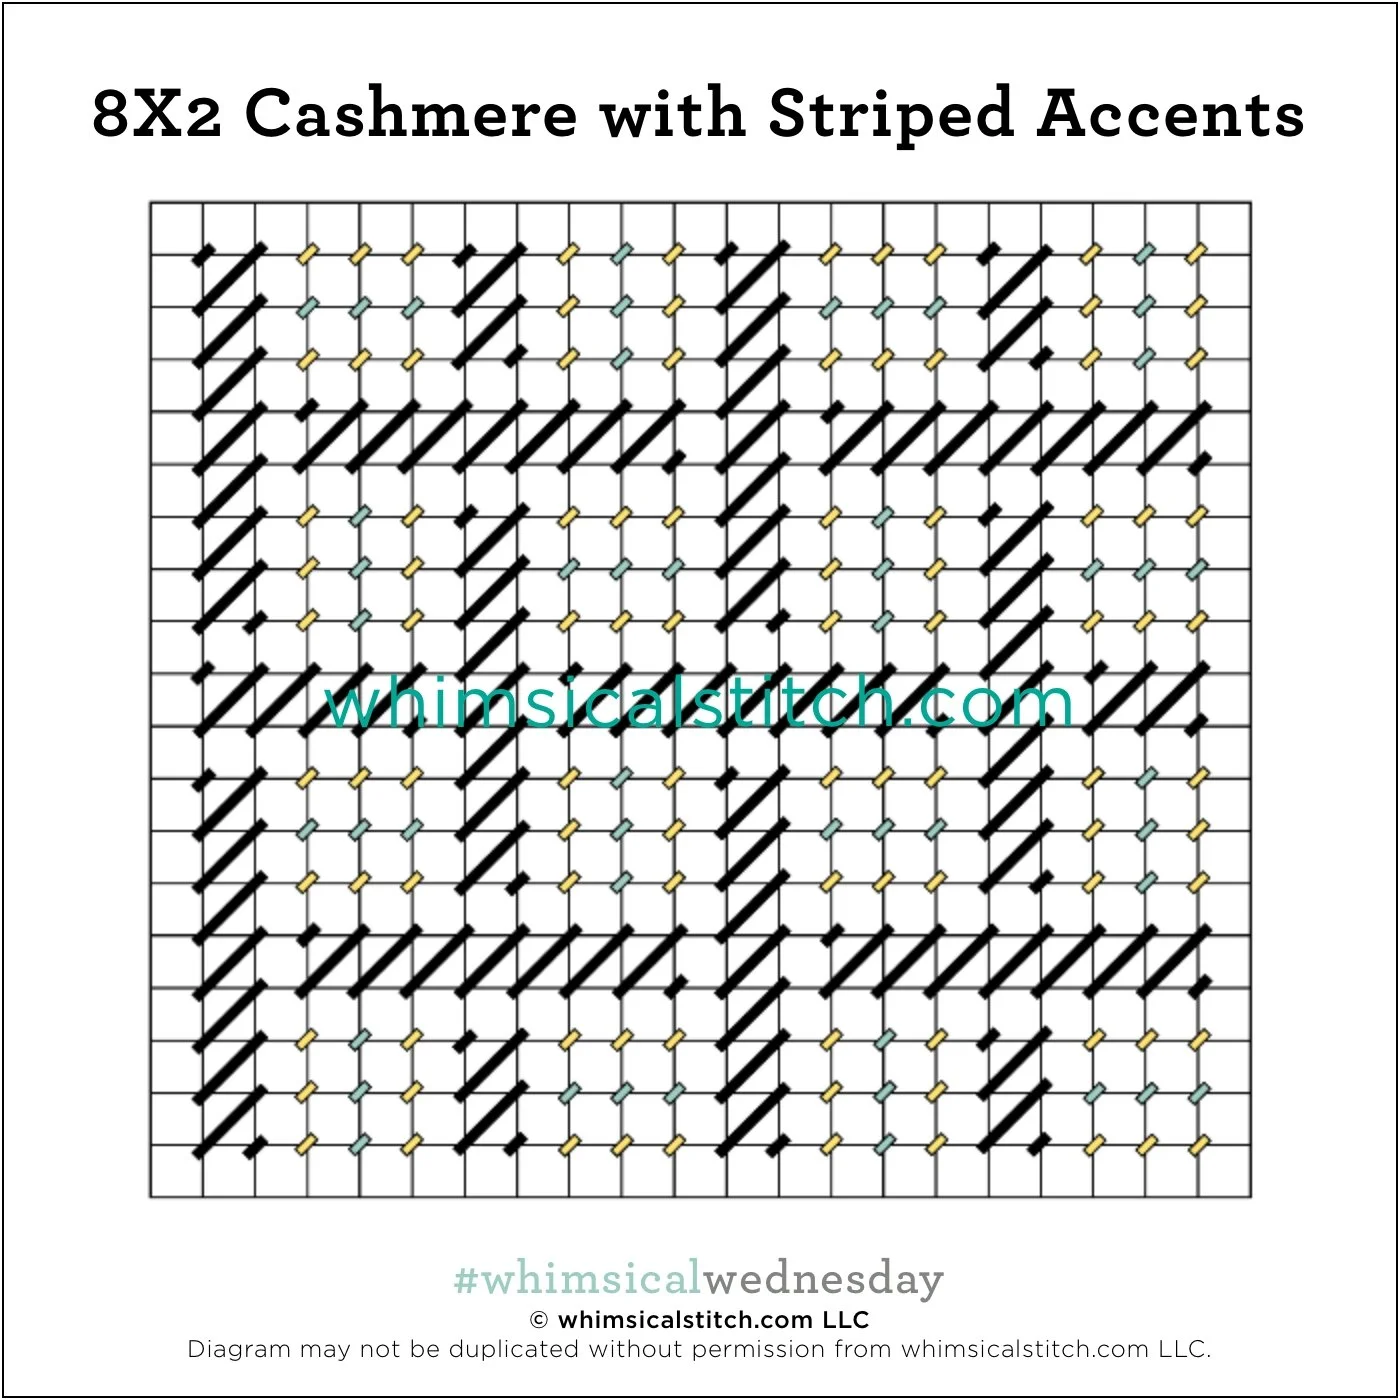
And we are back! Today’s stitch is a fun combo of diagonal and oblique stitches that brings out the beautiful painting underneath.

Click the image to see the whimsicalstitch.com Stitch Library on pinterest.com. Includes all #whimsicalwednesday and #smallspacesunday stitch diagrams.

Click the image to see #whimsicalwednesday and #smallspacesunday Stitched Sample Gallery on Instagram

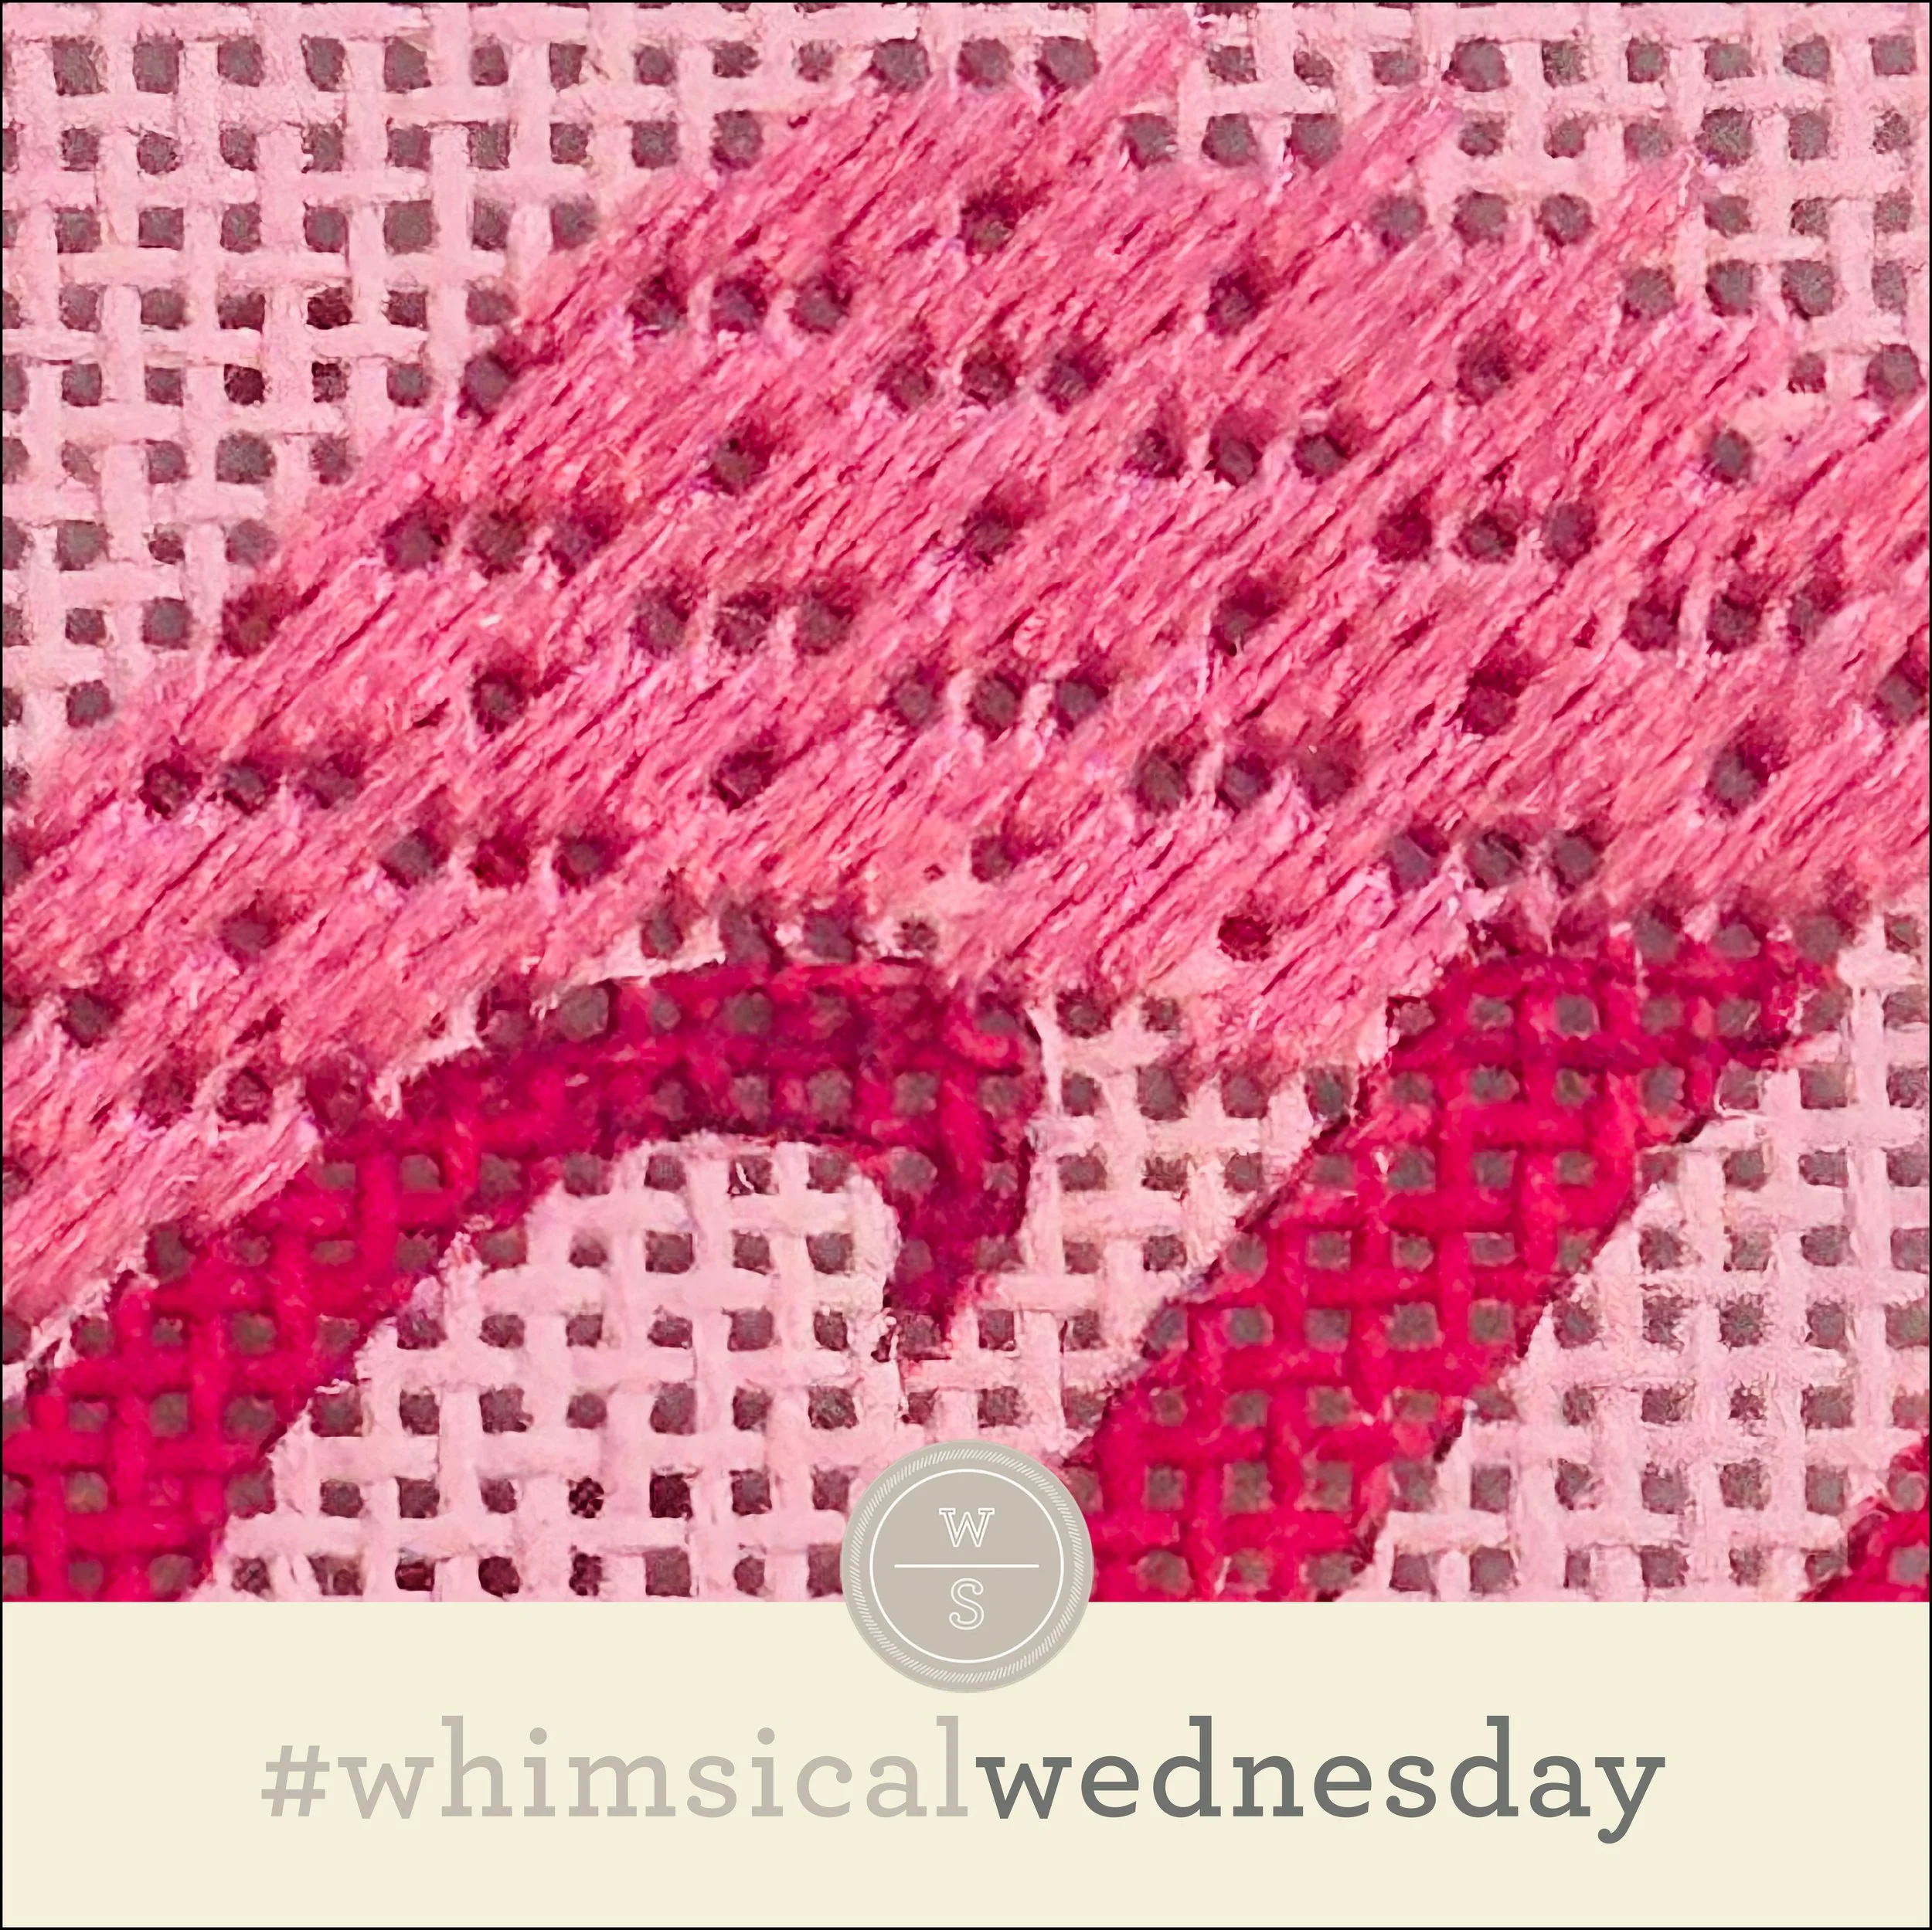
The stitched sample is a pair of oranges from a new Melissa Shirley piece. I used two plies of Soie D'Alger (black lines) and size 4 ThreadWorx Metallic for the aqua lines on 18M. Melissa Shirley canvases are why I love open stitches. Basketweave and continental belong on every canvas, in my opinion, but finding threads that replicate all the delicate hues in shading is virtually impossible. Well-painted shading has an almost watercolor-like effect…and open stitches help bring that out spectacularly.

Today’s stitch is filed under “general all-purpose wonderfulness.” It will make lovely clothing, especially a summer dress for a young girl with Elegance (black lines) and Trebizond Silk for the aqua lines. It will also create fun greenery for trees with overdyed silk floss (black lines) and Silk Lame (aqua lines). To help keep the open spaces clear of dragged threads, I recommend adding the two stitches following diagonal paths.

I hope you have the perfect spot for today’s stitch. Have fun playing with it!

Click on image to see the whimsicalstitch.com Stitch Library on pinterest.com. Includes all #whimsicalwednesday and #smallspacesunday stitch diagrams.

As you are auditioning stitches (from any stitch source), count the number of canvas threads on the diagram that match your mesh size. And there you have what an inch of the stitch will look like. Evaluate that against the area where you plan to use the stitch and make your final decision. If you start integrating this step into your stitch selection process, you may be surprised at how many stitches you think are large are much smaller than you realize.

By (sometimes) including this step in my own process, I find I am now integrating much longer stitches than I ever thought I would. I used to think a stitch six rows long was super big. I have very much changed my tune, which has helped me expand my creativity, especially for large-space stitches.

Today’s stitch diagram, along with all other #whimsicalwednesday and #smallspacesunday stitch diagrams, can also be found on a Pinterest board here. Be sure to follow whimsicalstitch.com on FacebookPinterestInstagram, and Twitter.

If you like what you see on this blog, there's more. Mary’s Whimsical Stitches is a series of four books offering contemporary how-to collections of more than 200 stitches (in each volume) for all stitchers, regardless of skill level. All books include updated and sequenced diagrams from this blog, plus a collection of all-new stitches from private lessons and other class projects. Visit here to find a needlepoint retailer that carries my books.

New to needlepoint or looking for a refresher? Please download a handy how-to guide covering basic needlepoint stitches and stitch compensation techniques along with new top-line information on needlepoint materials and tools, how to handle threads, and other helpful needlepoint resources.

whimsicalstitch.com also sells Stitch Guides and Stitch Concepts for Melissa Shirley Designs, Zecca DesignsSandra Gilmore, Purple Palm, Maggie, and Penny MacLeod, and many more. Click here to see the newest guides and click here to see the entire collection.

I hope you have the perfect spot for this stitch! Please enjoy! Have a wonderful #whimsicalwednesday!

A Note about Diagrams
I use color in diagrams to make them as clear as possible.  The primary function of different colored lines is to illustrate a stitch sequence.  For example, the layering of colors demonstrates you add them in that order.  They can also provide ideas on integrating additional threads (one line for each color).  Or, you can use the same thread for all color lines.  That's where I encourage you to use your imagination for the space you are stitching!
Navigating Diamonds

Today’s stitched sample may look incomplete. It is, but it also illustrates two versions of the stitch. And, best of all, the stitched sample shows how to navigate compensation through large areas.

Click the image to see the whimsicalstitch.com Stitch Library on pinterest.com. Includes all #whimsicalwednesday and #smallspacesunday stitch diagrams.

Click the image to see #whimsicalwednesday and #smallspacesunday Stitched Sample Gallery on Instagram

The idea for this stitch started when I was working on a different diamond stitch a couple of weeks ago. The stitched sample uses the identical three plies of Soie Cristale (black lines) and two strands of Petite Silk Lame (aqua lines). This stitch has the perfect amount of openness for a background. The top of the canvas includes the Upright Crosses in the center of the diamonds, and the bottom eliminates them to give it a lighter look. (I will add the Upright Crosses in the open diamonds for the final background.)

Navigating the compensation through the flowers wasn’t fun in the beginning. Looking closely at the stitched sample, you’ll see yellow stitches at the top and bottom of the pink flower. Those are what I call fake stitching. I took a piece of random thread on my desk and stitched the bare minimum of the stitch through an area to get to the next patch of background.

I typically stitch from the center of a piece and out to the edges, meaning I do the background last most of the time. I am aware I am an outlier here, but it’s what works for me. I don’t love the idea of my arms or hands on top of existing stitching, especially on larger canvases. If a background requires delicate compensation around branches or other fiddly areas, I’ll stitch the background in the center and leave the remaining for later. Today’s example is a perfect case of when to do the background first. Compensation through stitched areas is not my favorite thing to do.

I hope you have the perfect spot for today’s stitch. Have fun playing with it!

Click on image to see the whimsicalstitch.com Stitch Library on pinterest.com. Includes all #whimsicalwednesday and #smallspacesunday stitch diagrams.

As you are auditioning stitches (from any stitch source), count the number of canvas threads on the diagram that match your mesh size. And there you have what an inch of the stitch will look like. Evaluate that against the area where you plan to use the stitch and make your final decision. If you start integrating this step into your stitch selection process, you may be surprised at how many stitches you think are large are much smaller than you realize.

By (sometimes) including this step in my own process, I find I am now integrating much longer stitches than I ever thought I would. I used to think a stitch six rows long was super big. I have very much changed my tune, which has helped me expand my creativity, especially for large-space stitches.

Today’s stitch diagram, along with all other #whimsicalwednesday and #smallspacesunday stitch diagrams, can also be found on a Pinterest board here. Be sure to follow whimsicalstitch.com on FacebookPinterestInstagram, and Twitter.

If you like what you see on this blog, there's more. Mary’s Whimsical Stitches is a series of four books offering contemporary how-to collections of more than 200 stitches (in each volume) for all stitchers, regardless of skill level. All books include updated and sequenced diagrams from this blog, plus a collection of all-new stitches from private lessons and other class projects. Visit here to find a needlepoint retailer that carries my books.

New to needlepoint or looking for a refresher? Please download a handy how-to guide covering basic needlepoint stitches and stitch compensation techniques along with new top-line information on needlepoint materials and tools, how to handle threads, and other helpful needlepoint resources.

whimsicalstitch.com also sells Stitch Guides and Stitch Concepts for Melissa Shirley Designs, Zecca DesignsSandra Gilmore, Purple Palm, Maggie, and Penny MacLeod, and many more. Click here to see the newest guides and click here to see the entire collection.

I hope you have the perfect spot for this stitch! Please enjoy! Have a wonderful #whimsicalwednesday!

A Note about Diagrams
I use color in diagrams to make them as clear as possible.  The primary function of different colored lines is to illustrate a stitch sequence.  For example, the layering of colors demonstrates you add them in that order.  They can also provide ideas on integrating additional threads (one line for each color).  Or, you can use the same thread for all color lines.  That's where I encourage you to use your imagination for the space you are stitching!
Cheat Day

Cheat days should not be just for diets. I say this because I feel a tiny bit guilty in sharing a variation of a recent stitch. But it’s really cute, I promise.

Click the image to see the whimsicalstitch.com Stitch Library on pinterest.com. Includes all #whimsicalwednesday and #smallspacesunday stitch diagrams.

Click the image to see #whimsicalwednesday and #smallspacesunday Stitched Sample Gallery on Instagram

The stitch is a variation of a stitch I shared a few weeks ago. The customer kept the spirit of the stitch intact but chose a rectangular shape. I really like both, but this one is a centimeter ahead in my heart because I don’t know when I would have thought of a rectangle for this effect. I am speaking of using a single stitch and thread combination for an entire multi-colored area. My student, Lynn, hit this out of the park with a size 8 Kreinik (for all lines) on an 18M canvas.

Using one stitch for a multi-colored area such as this background defines the background and clearly distinguishes it from the subject of the piece. I’m not sure where this idea originated, but I have seen several beautiful examples of it out in the wild. I was thrilled to have a piece where it was the perfect solution, finally!

It is also fair of me to warn you there will be rectangle columns somewhere in the future.

I hope you have the perfect spot for today’s stitch. Have fun playing with it!

Click on image to see the whimsicalstitch.com Stitch Library on pinterest.com. Includes all #whimsicalwednesday and #smallspacesunday stitch diagrams.

As you are auditioning stitches (from any stitch source), count the number of canvas threads on the diagram that match your mesh size. And there you have what an inch of the stitch will look like. Evaluate that against the area where you plan to use the stitch and make your final decision. If you start integrating this step into your stitch selection process, you may be surprised at how many stitches you think are large are much smaller than you realize.

By (sometimes) including this step in my own process, I find I am now integrating much longer stitches than I ever thought I would. I used to think a stitch six rows long was super big. I have very much changed my tune, which has helped me expand my creativity, especially for large-space stitches.

Today’s stitch diagram, along with all other #whimsicalwednesday and #smallspacesunday stitch diagrams, can also be found on a Pinterest board here. Be sure to follow whimsicalstitch.com on FacebookPinterestInstagram, and Twitter.

If you like what you see on this blog, there's more. Mary’s Whimsical Stitches is a series of four books offering contemporary how-to collections of more than 200 stitches (in each volume) for all stitchers, regardless of skill level. All books include updated and sequenced diagrams from this blog, plus a collection of all-new stitches from private lessons and other class projects. Visit here to find a needlepoint retailer that carries my books.

New to needlepoint or looking for a refresher? Please download a handy how-to guide covering basic needlepoint stitches and stitch compensation techniques along with new top-line information on needlepoint materials and tools, how to handle threads, and other helpful needlepoint resources.

whimsicalstitch.com also sells Stitch Guides and Stitch Concepts for Melissa Shirley Designs, Zecca DesignsSandra Gilmore, Purple Palm, Maggie, and Penny MacLeod, and many more. Click here to see the newest guides and click here to see the entire collection.

I hope you have the perfect spot for this stitch! Please enjoy! Have a wonderful #whimsicalwednesday!

A Note about Diagrams
I use color in diagrams to make them as clear as possible.  The primary function of different colored lines is to illustrate a stitch sequence.  For example, the layering of colors demonstrates you add them in that order.  They can also provide ideas on integrating additional threads (one line for each color).  Or, you can use the same thread for all color lines.  That's where I encourage you to use your imagination for the space you are stitching!
Such a Pleasant Surprise

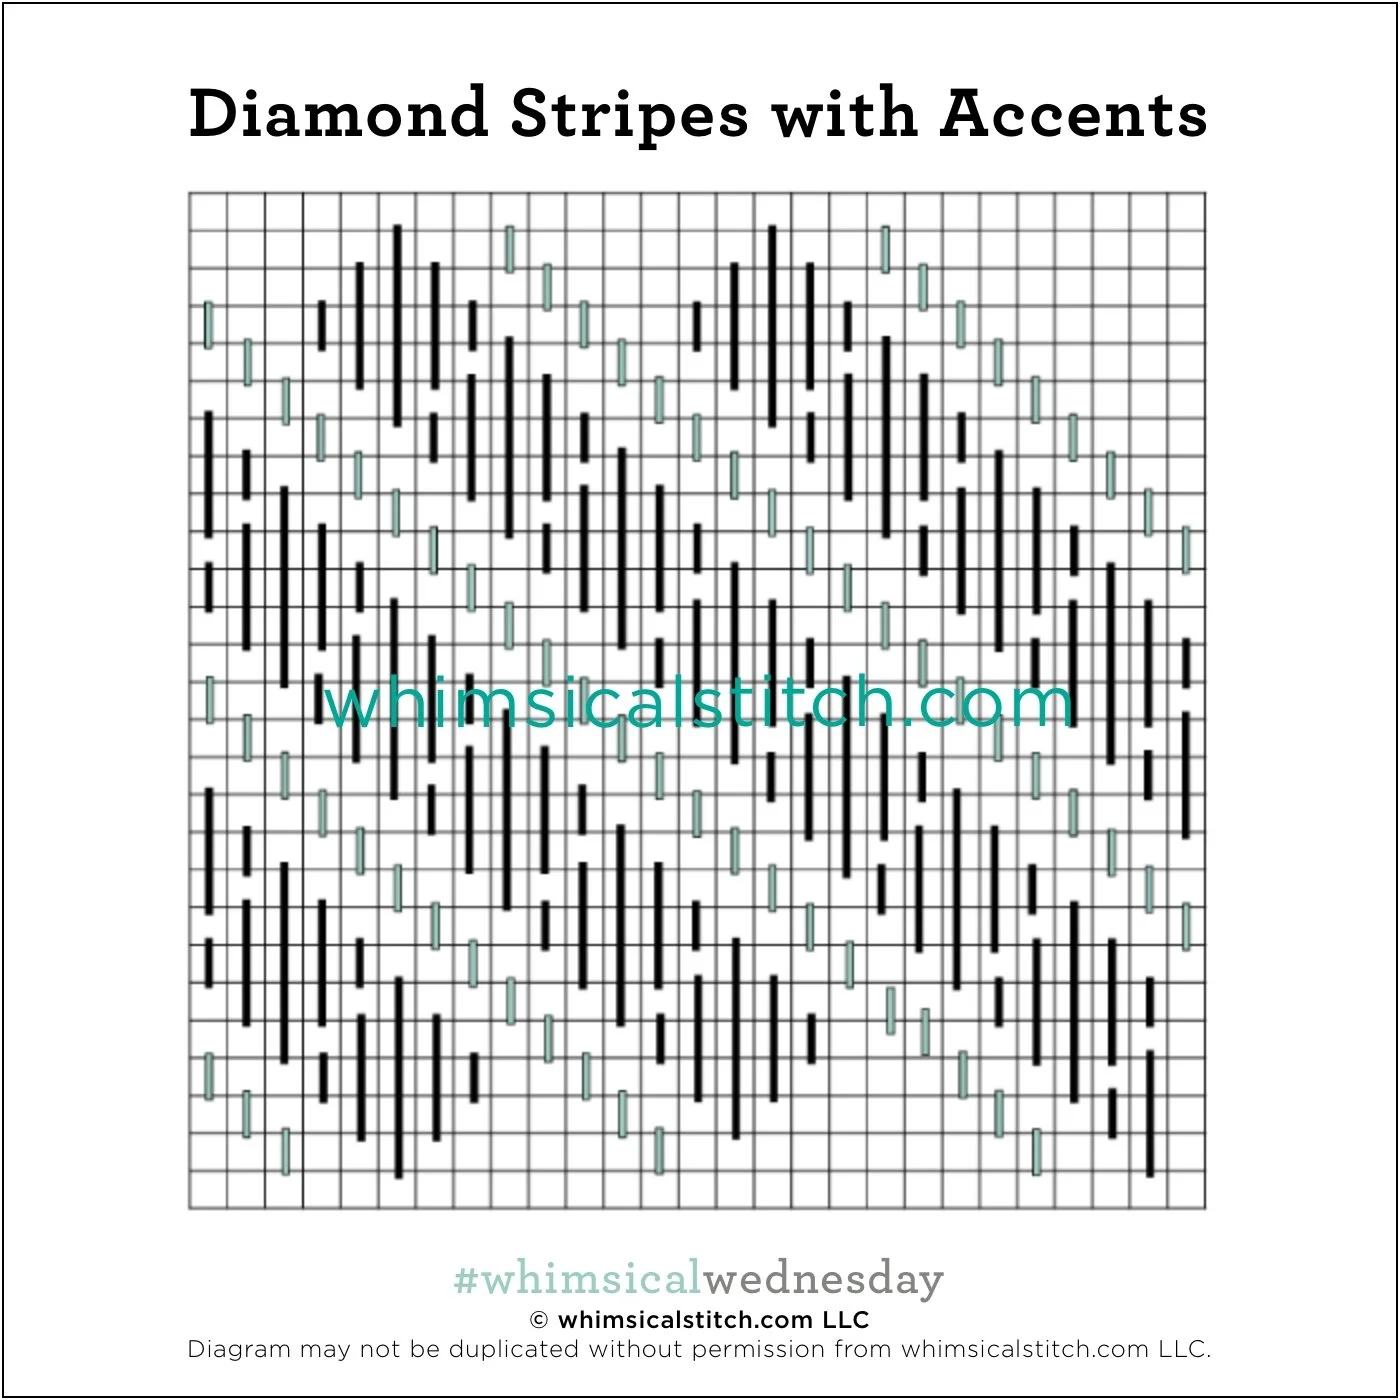
Today’s stitch was inspired by what a stitching friend insisted was mistake. I love what emerged from this friendly disagreement.

Click the image to see the whimsicalstitch.com Stitch Library on pinterest.com. Includes all #whimsicalwednesday and #smallspacesunday stitch diagrams.

Click the image to see #whimsicalwednesday and #smallspacesunday Stitched Sample Gallery on Instagram

The stitched sample is the background on a charming hydrangea canvas from Love MHB Studio. I absolutely did not need this canvas but had to have it, so I bought it while I was at Emily’s Stitchery a couple of weekends ago. (That run-on thought is due to my guilty but happy subconscious.) It all ended with a new stitch, which makes it all okay, right? I used three plies of peach Soie Cristale for the black lines and two strands of peach Petite Silk Lame for the aqua lines.

I’m looking forward to using this for a small roof, with Vineyard Silk for the black lines and Glisten for the aqua lines. I'm also planning to use it for a small sweater, with Silk Lame for the black lines and, as a little twist, Bella Lusso wool for the aqua lines.

Consider dressing it up with a single bead over two rows in the center of each diamond (in lieu of the straight stitch) for water with a Kreinik metallic for the black lines and a Sundance Bead. If you want a little more coverage, replace the straight stitch with an upright cross.

I hope you have the perfect spot for today’s small space stitch. Have fun playing with it!

Click on image to see the whimsicalstitch.com Stitch Library on pinterest.com. Includes all #whimsicalwednesday and #smallspacesunday stitch diagrams.

As you are auditioning stitches (from any stitch source), count the number of canvas threads on the diagram that match your mesh size. And there you have what an inch of the stitch will look like. Evaluate that against the area where you plan to use the stitch and make your final decision. If you start integrating this step into your stitch selection process, you may be surprised at how many stitches you think are large are much smaller than you realize.

By (sometimes) including this step in my own process, I find I am now integrating much longer stitches than I ever thought I would. I used to think a stitch six rows long was super big. I have very much changed my tune, which has helped me expand my creativity, especially for large-space stitches.

Today’s stitch diagram, along with all other #whimsicalwednesday and #smallspacesunday stitch diagrams, can also be found on a Pinterest board here. Be sure to follow whimsicalstitch.com on FacebookPinterestInstagram, and Twitter.

If you like what you see on this blog, there's more. Mary’s Whimsical Stitches is a series of four books offering contemporary how-to collections of more than 200 stitches (in each volume) for all stitchers, regardless of skill level. All books include updated and sequenced diagrams from this blog, plus a collection of all-new stitches from private lessons and other class projects. Visit here to find a needlepoint retailer that carries my books.

New to needlepoint or looking for a refresher? Please download a handy how-to guide covering basic needlepoint stitches and stitch compensation techniques along with new top-line information on needlepoint materials and tools, how to handle threads, and other helpful needlepoint resources.

whimsicalstitch.com also sells Stitch Guides and Stitch Concepts for Melissa Shirley Designs, Zecca DesignsSandra Gilmore, Purple Palm, Maggie, and Penny MacLeod, and many more. Click here to see the newest guides and click here to see the entire collection.

I hope you have the perfect spot for this stitch! Please enjoy! Have a wonderful #whimsicalwednesday!

A Note about Diagrams
I use color in diagrams to make them as clear as possible.  The primary function of different colored lines is to illustrate a stitch sequence.  For example, the layering of colors demonstrates you add them in that order.  They can also provide ideas on integrating additional threads (one line for each color).  Or, you can use the same thread for all color lines.  That's where I encourage you to use your imagination for the space you are stitching!
My Kind of Town (Chicago Is)

I can count on laughter, lively conversation, and a good stitch whenever I visit Emily’s Stitchery in Northbrook, IL. My visit this past weekend was no different.

Click the image to see the whimsicalstitch.com Stitch Library on pinterest.com. Includes all #whimsicalwednesday and #smallspacesunday stitch diagrams.

Click the image to see #whimsicalwednesday and #smallspacesunday Stitched Sample Gallery on Instagram

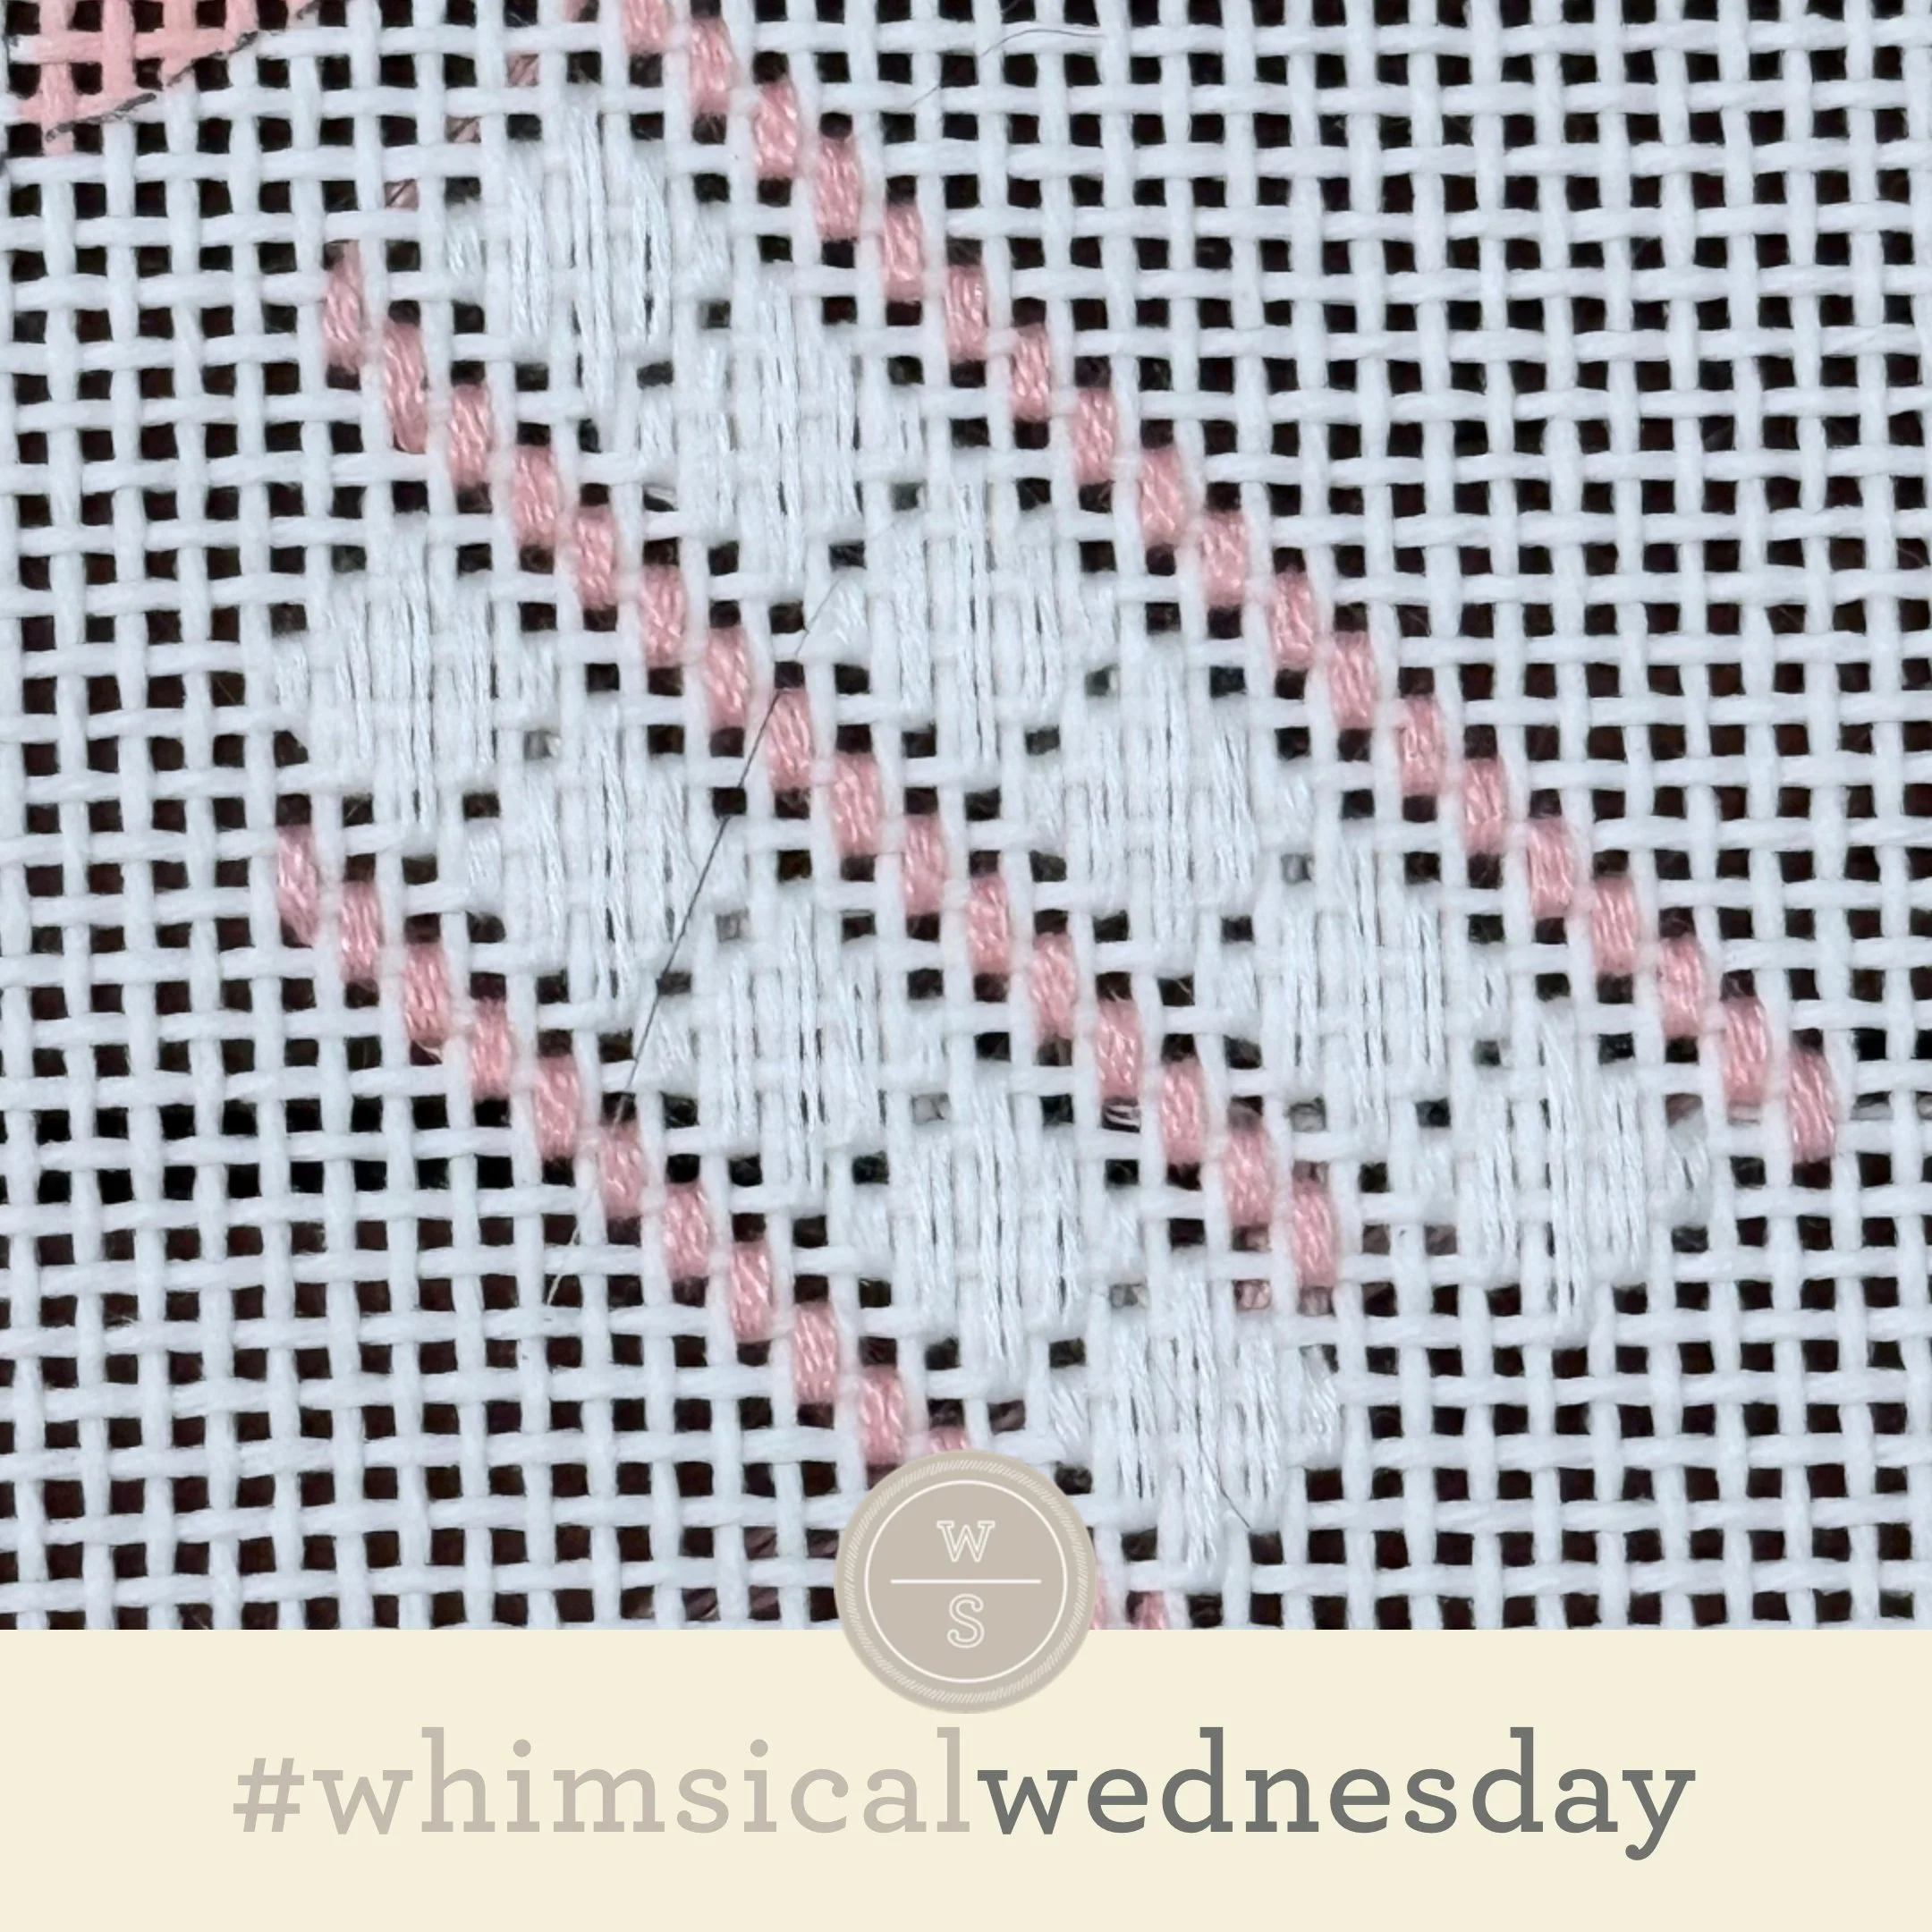
The stitch is a floor for a trio of elephants. (Naturally.) The stitched sample uses five plies of blue Splendor (black lines) and a single ply of white Watercolours (yellow lines). I created the stitch for the floor to support a companion stitch going up the wall above it. (I’m hoping to share the wall at a later date.)

I want to try this stitch on a roof or simply painted house walls with Rainbow Linen for the black lines and a silk or cotton floss for the yellow lines. It will also make an adorable checked shirt with two tones of Pepper Pot Silk or Vineyard Silk.

The best thing about this stitch is its scalability. Making the sides longer or wider for a larger area will be so easy. You could even make the shapes rectangles instead of squares.

I hope you have the perfect spot for today’s stitch. Have fun playing with it!

Click on image to see the whimsicalstitch.com Stitch Library on pinterest.com. Includes all #whimsicalwednesday and #smallspacesunday stitch diagrams.

As you are auditioning stitches (from any stitch source), count the number of canvas threads on the diagram that match your mesh size. And there you have what an inch of the stitch will look like. Evaluate that against the area where you plan to use the stitch and make your final decision. If you start integrating this step into your stitch selection process, you may be surprised at how many stitches you think are large are much smaller than you realize.

By (sometimes) including this step in my own process, I find I am now integrating much longer stitches than I ever thought I would. I used to think a stitch six rows long was super big. I have very much changed my tune, which has helped me expand my creativity, especially for large-space stitches.

Today’s stitch diagram, along with all other #whimsicalwednesday and #smallspacesunday stitch diagrams, can also be found on a Pinterest board here. Be sure to follow whimsicalstitch.com on FacebookPinterestInstagram, and Twitter.

If you like what you see on this blog, there's more. Mary’s Whimsical Stitches is a series of four books offering contemporary how-to collections of more than 200 stitches (in each volume) for all stitchers, regardless of skill level. All books include updated and sequenced diagrams from this blog, plus a collection of all-new stitches from private lessons and other class projects. Visit here to find a needlepoint retailer that carries my books.

New to needlepoint or looking for a refresher? Please download a handy how-to guide covering basic needlepoint stitches and stitch compensation techniques along with new top-line information on needlepoint materials and tools, how to handle threads, and other helpful needlepoint resources.

whimsicalstitch.com also sells Stitch Guides and Stitch Concepts for Melissa Shirley Designs, Zecca DesignsSandra Gilmore, Purple Palm, Maggie, and Penny MacLeod, and many more. Click here to see the newest guides and click here to see the entire collection.

I hope you have the perfect spot for this stitch! Please enjoy! Have a wonderful #whimsicalwednesday!

A Note about Diagrams
I use color in diagrams to make them as clear as possible.  The primary function of different colored lines is to illustrate a stitch sequence.  For example, the layering of colors demonstrates you add them in that order.  They can also provide ideas on integrating additional threads (one line for each color).  Or, you can use the same thread for all color lines.  That's where I encourage you to use your imagination for the space you are stitching!
Just a Little Something

Today’s stitch has been hiding for a bit as I couldn’t find the perfect place for it. Until I did. And I love it.

Click the image to see the whimsicalstitch.com Stitch Library on pinterest.com. Includes all #whimsicalwednesday and #smallspacesunday stitch diagrams.

Click the image to see #whimsicalwednesday and #smallspacesunday Stitched Sample Gallery on Instagram

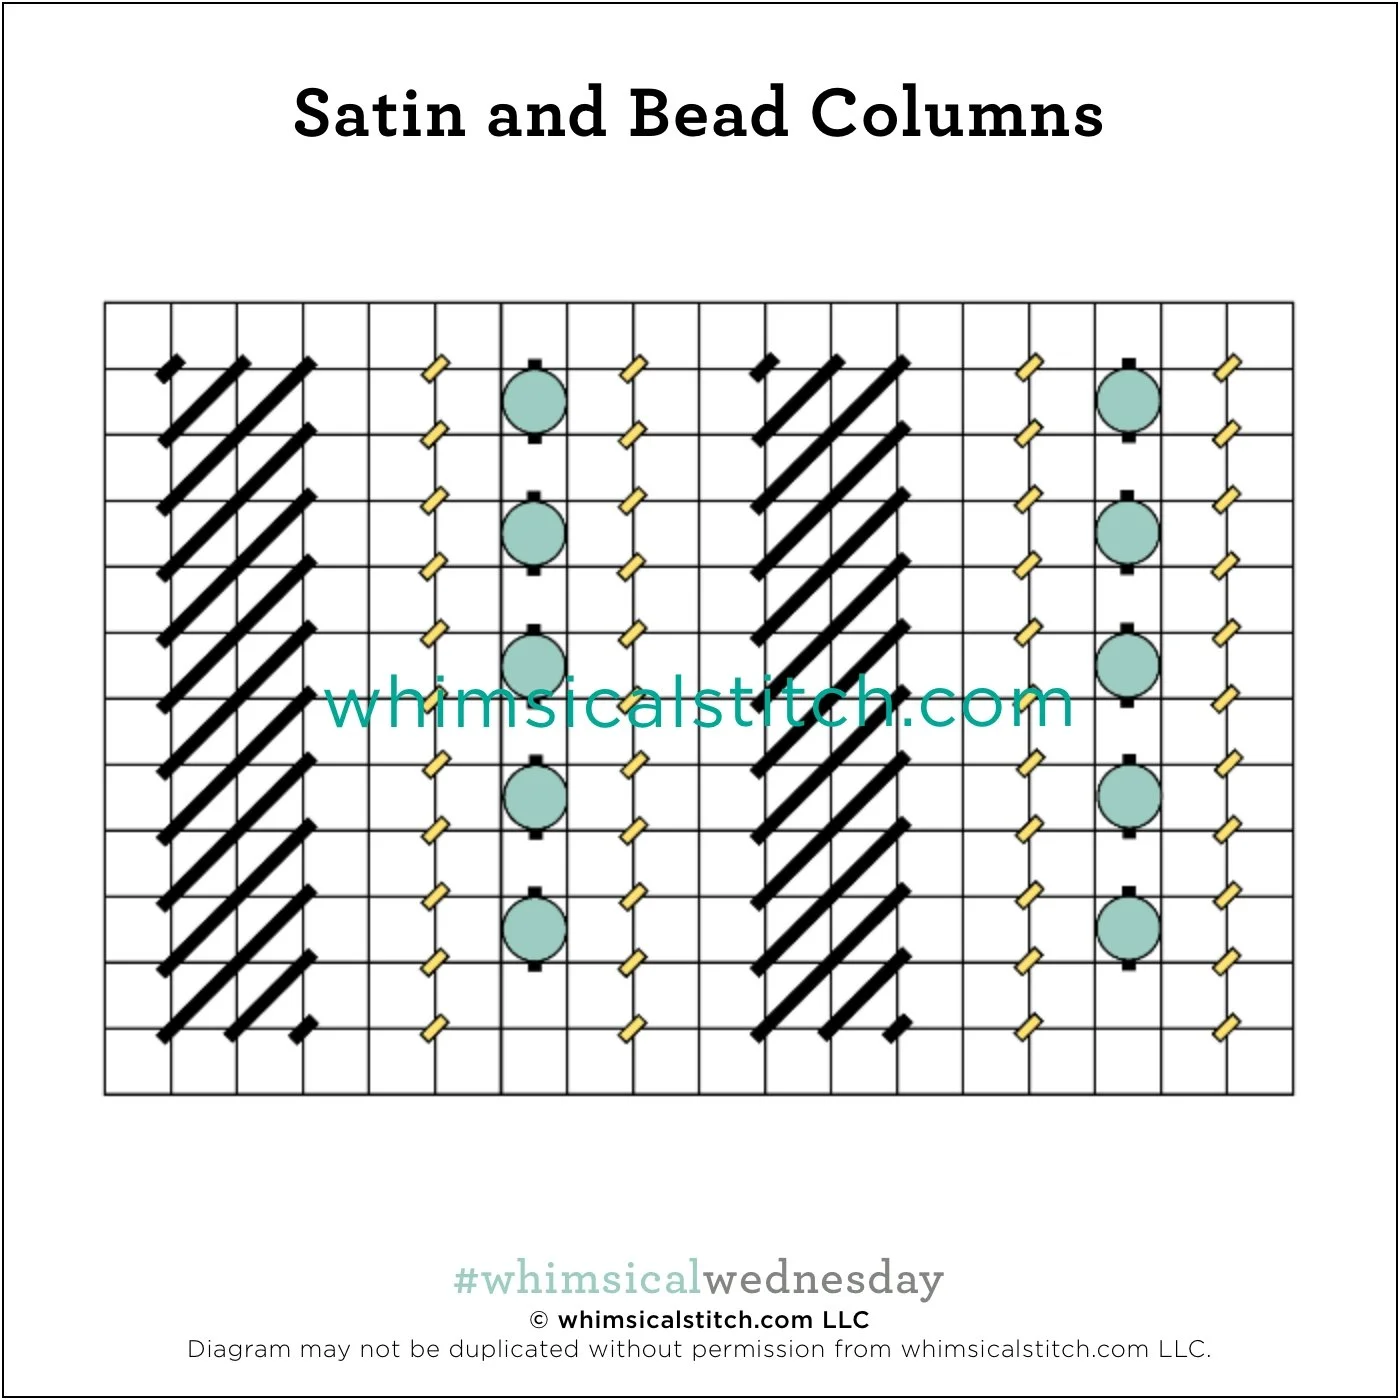
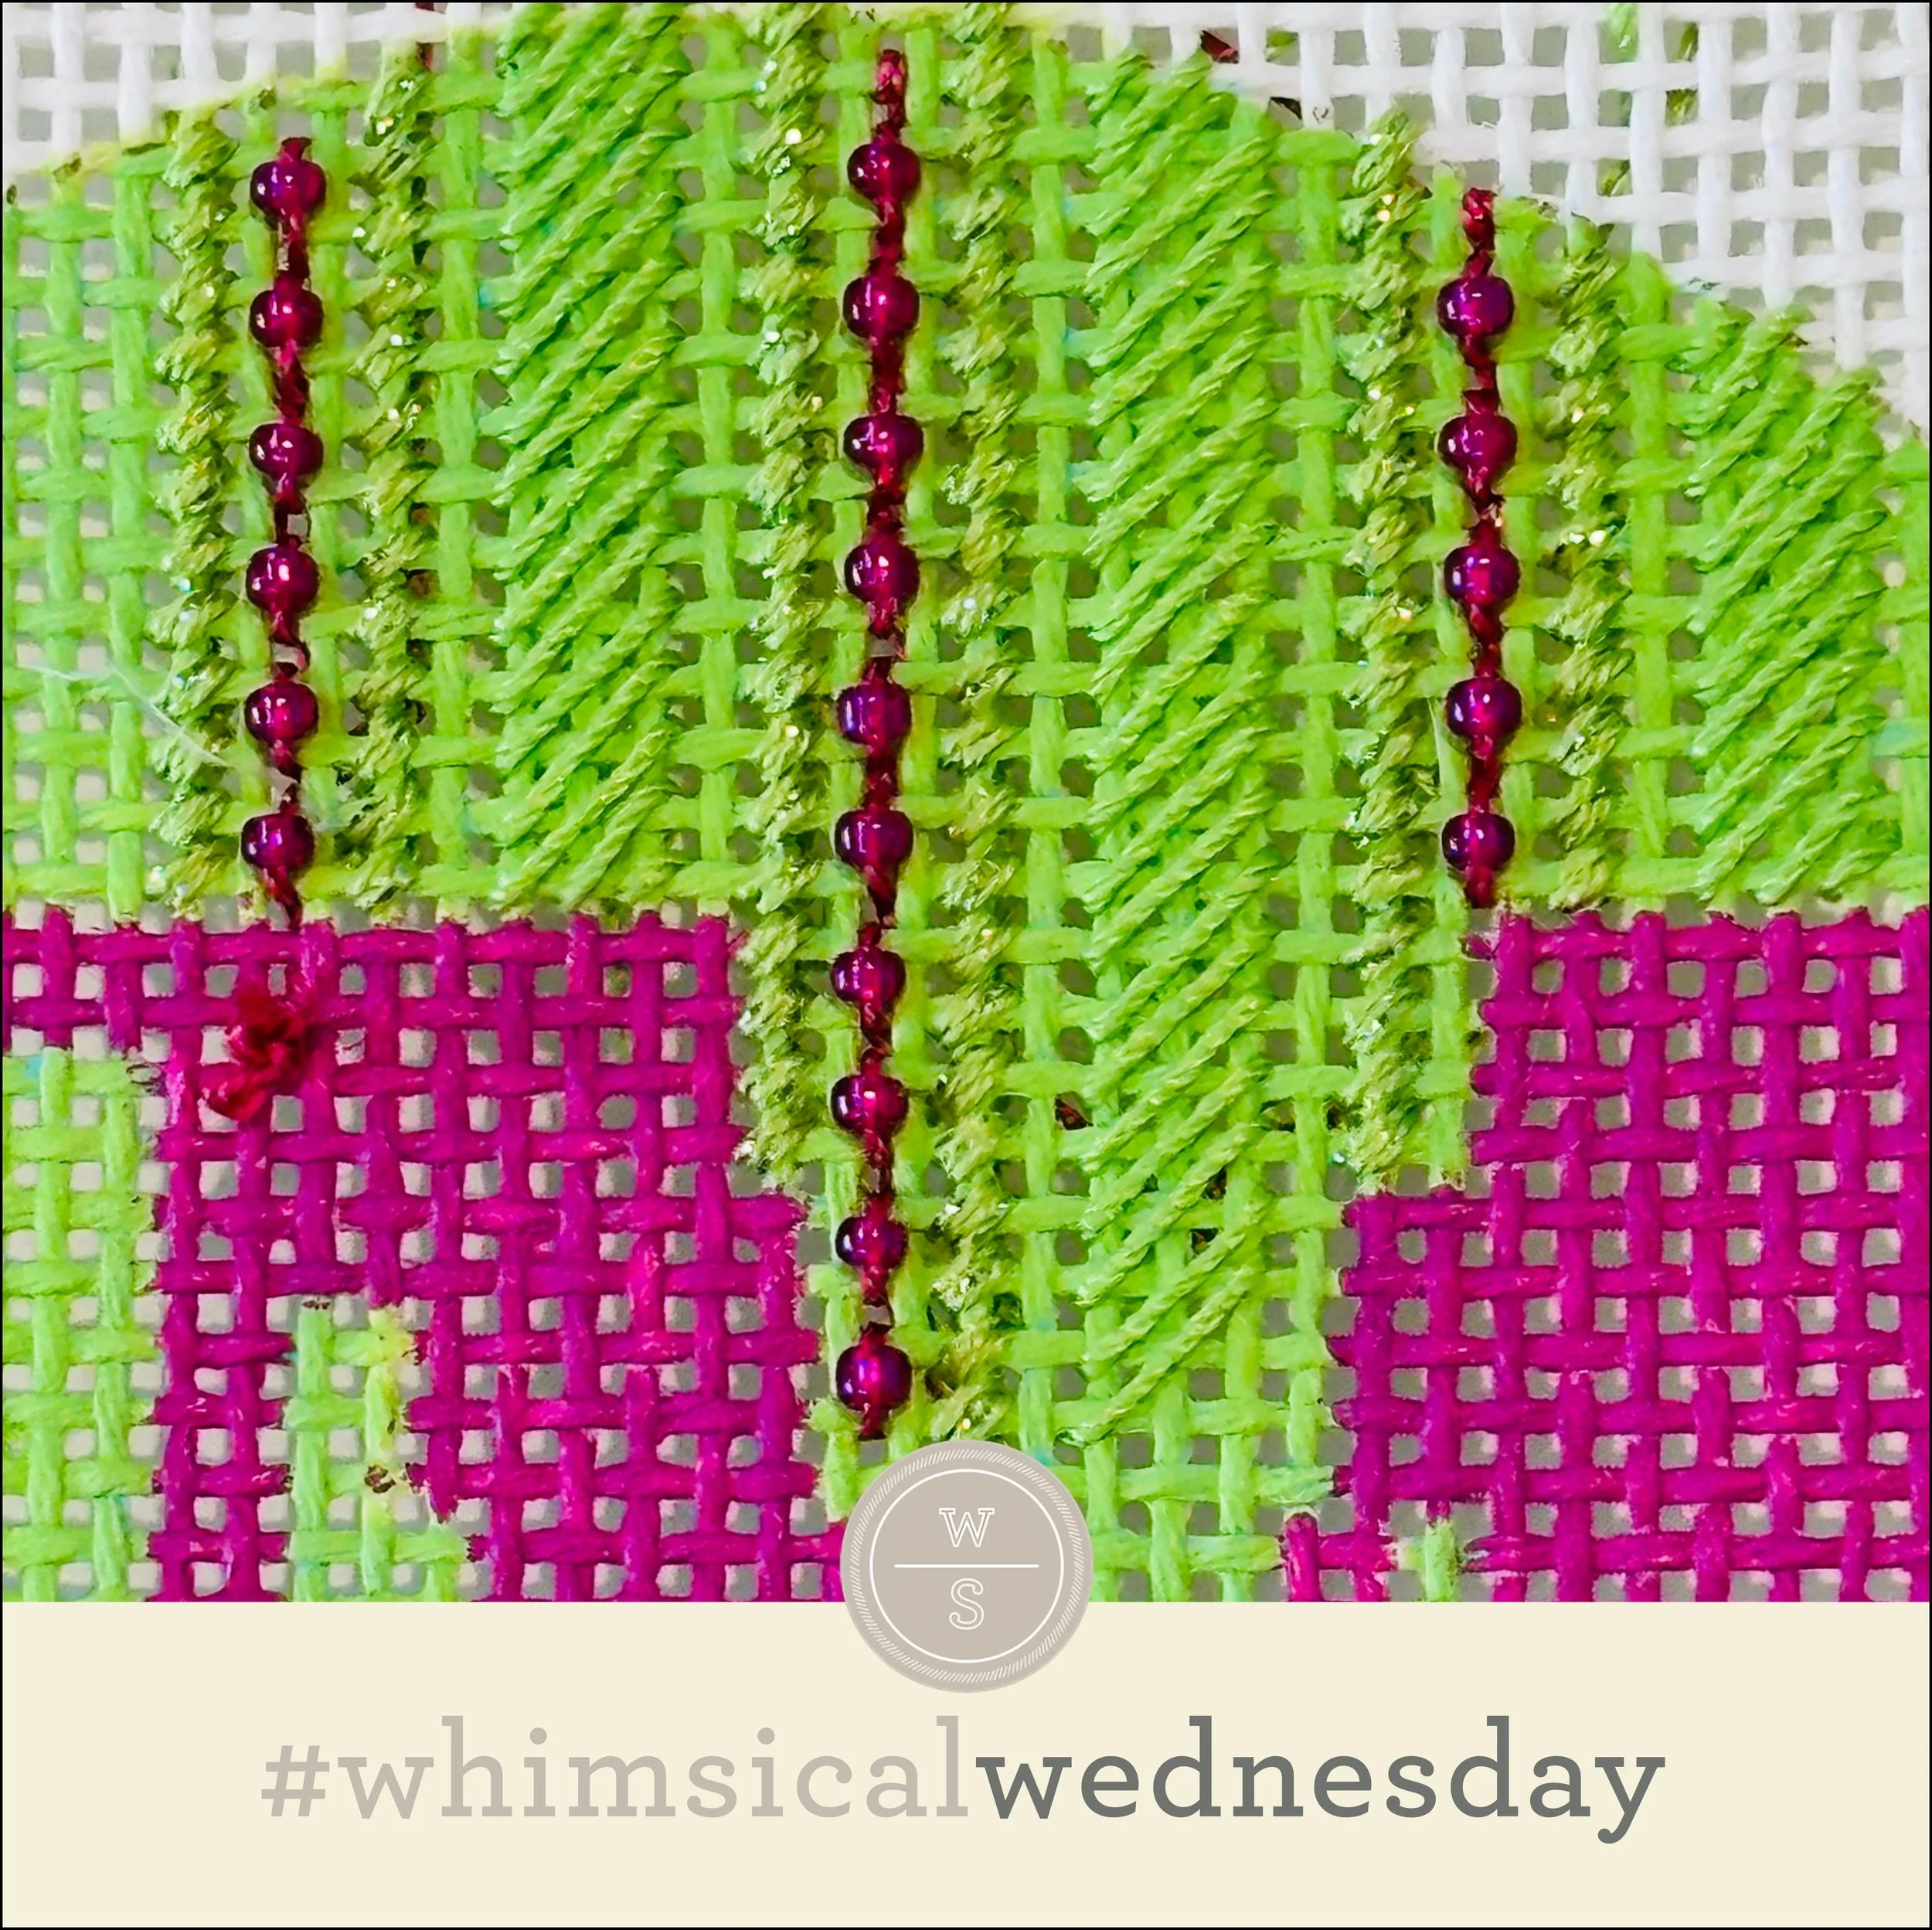
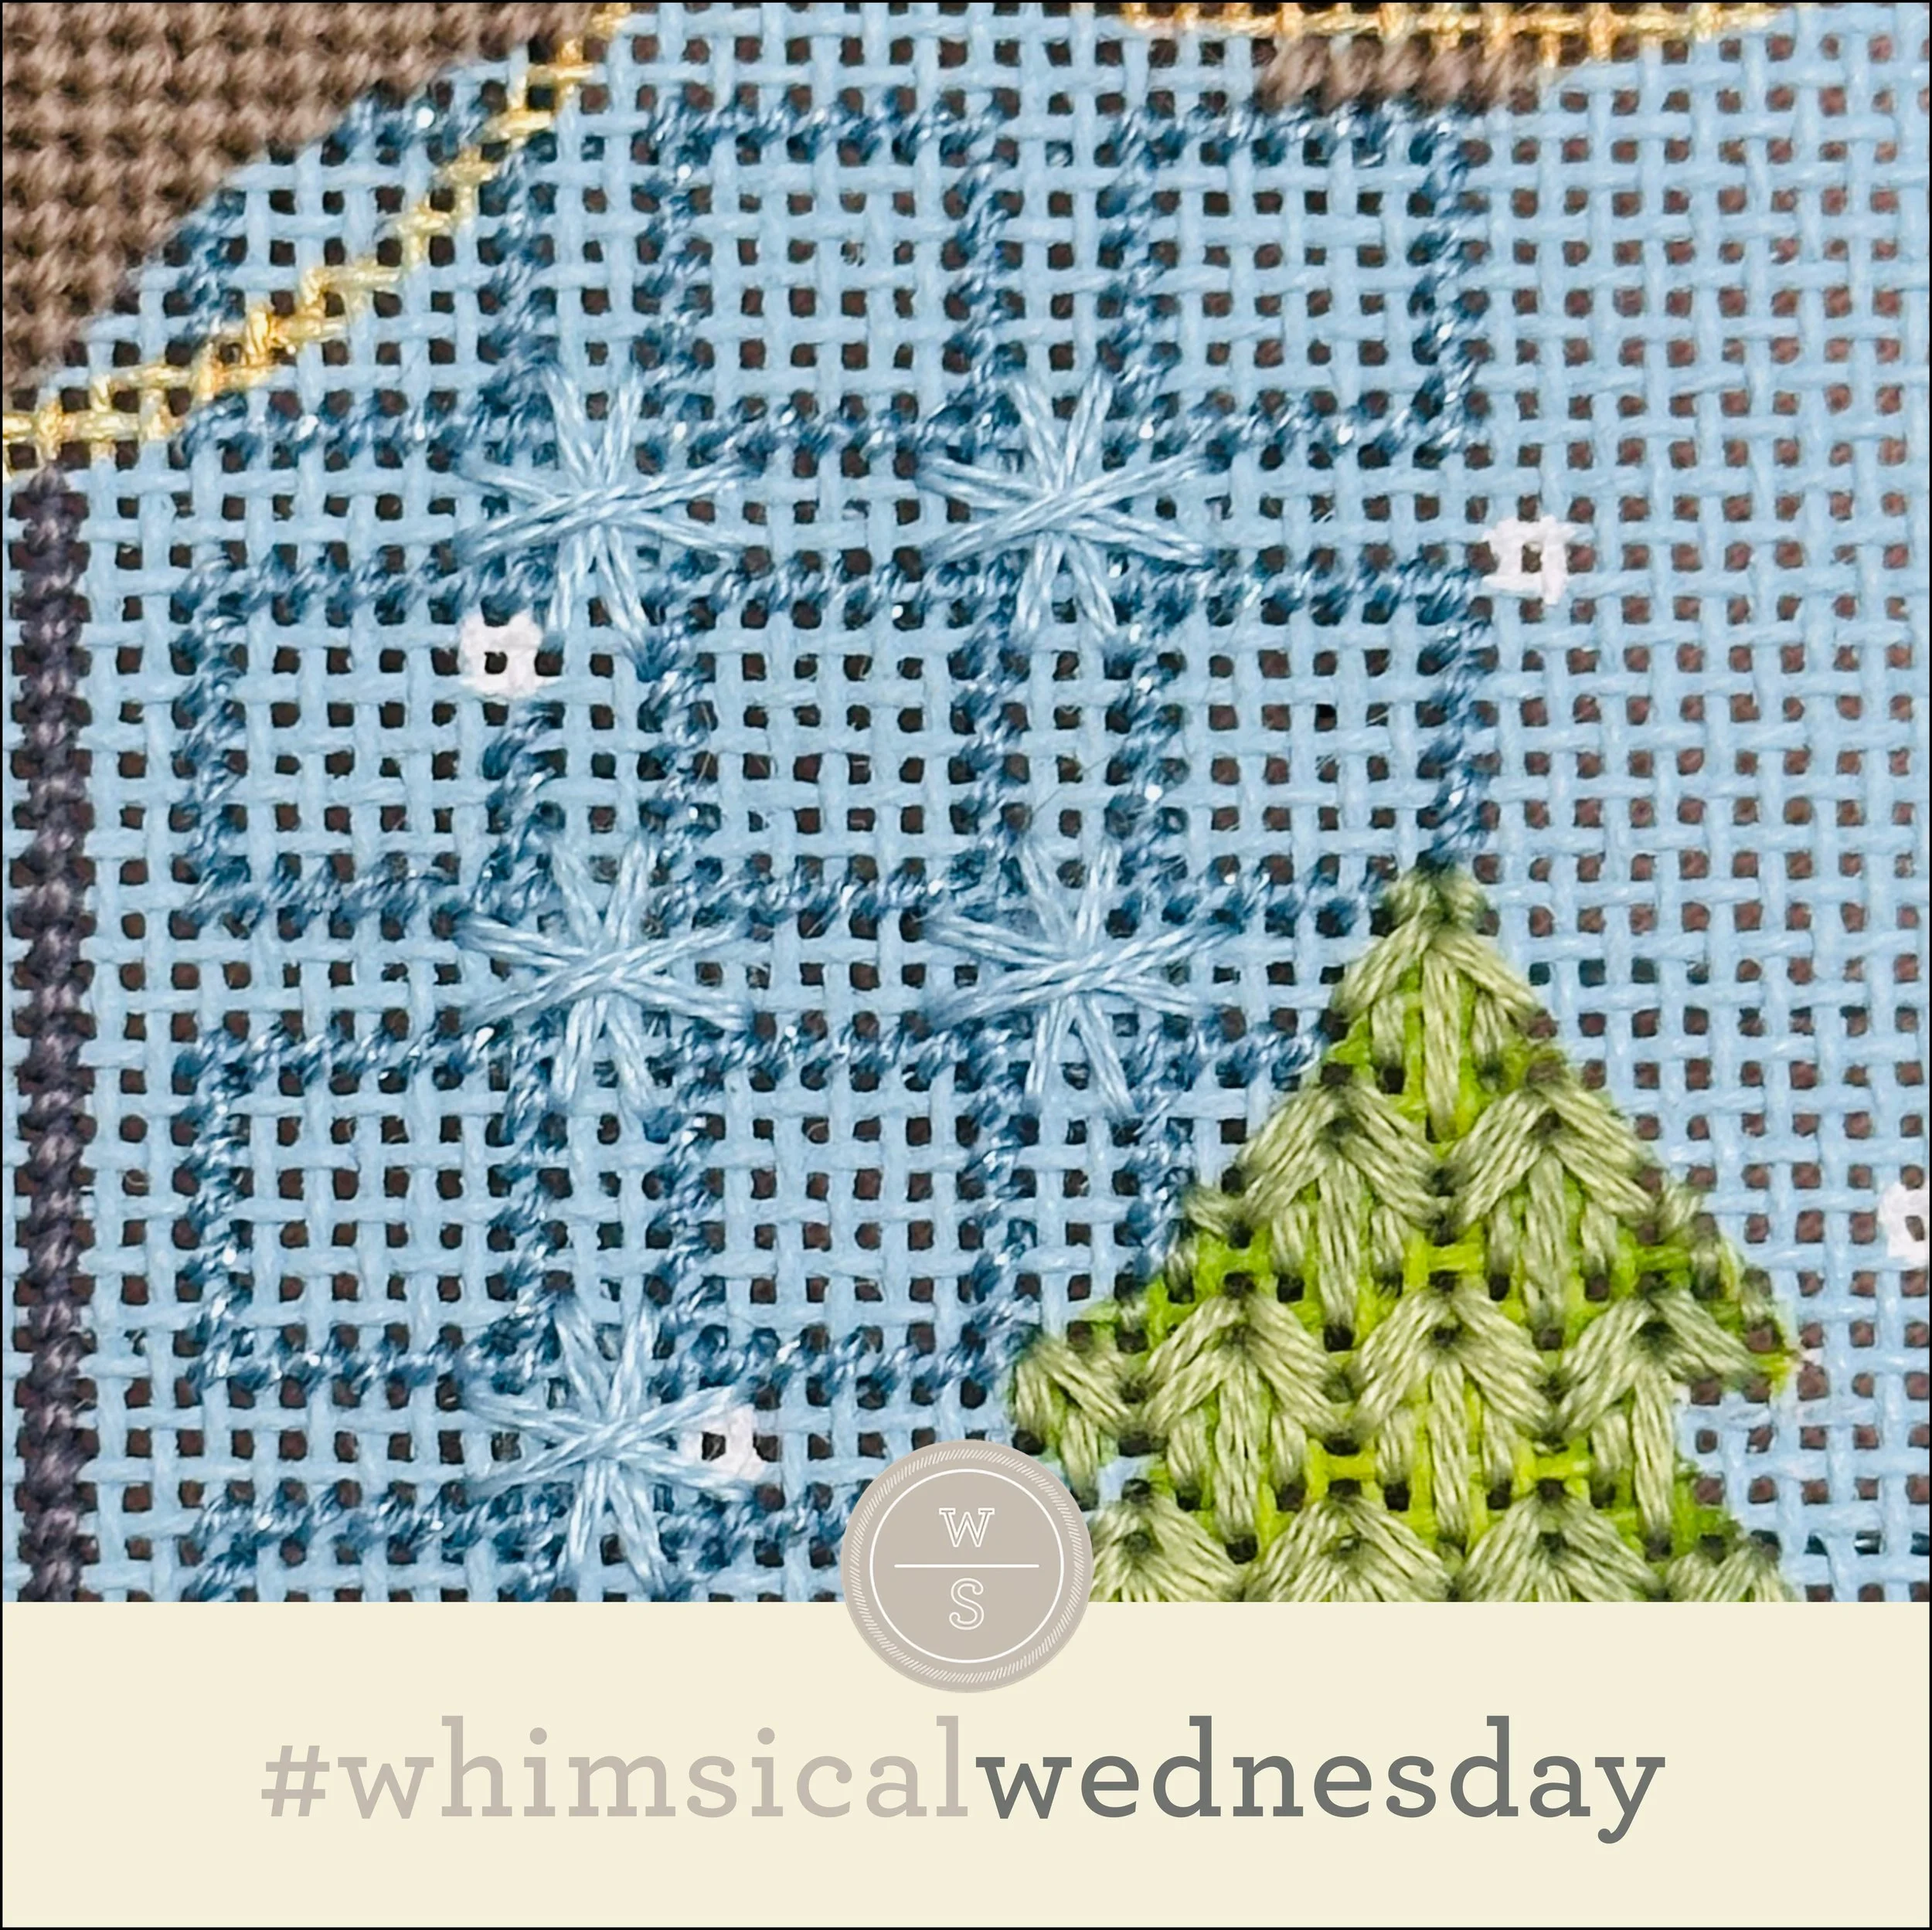
The stitched sample is a skirt on a lovely Ellen Sizemore piece and uses two plies of Soie D'Alger (black lines) and cream beads (aqua circles). The stitch is as whimsical as the canvas.

Looking forward to using it for a cloud with Glisten and a very light blue bead for a little sprinkle of color. Consider lightening it up by eliminating every other row (or column) for an open background for a still-life. You can also replace the bead with any 2X2 stitch. (A variety of 2X2 stitches are included in the beginning of the Small Stitches chapter in books 1-3.)

I hope you have the perfect spot for today’s stitch. Have fun playing with it!

Click on image to see the whimsicalstitch.com Stitch Library on pinterest.com. Includes all #whimsicalwednesday and #smallspacesunday stitch diagrams.

As you are auditioning stitches (from any stitch source), count the number of canvas threads on the diagram that match your mesh size. And there you have what an inch of the stitch will look like. Evaluate that against the area where you plan to use the stitch and make your final decision. If you start integrating this step into your stitch selection process, you may be surprised at how many stitches you think are large are much smaller than you realize.

By (sometimes) including this step in my own process, I find I am now integrating much longer stitches than I ever thought I would. I used to think a stitch six rows long was super big. I have very much changed my tune, which has helped me expand my creativity, especially for large-space stitches.

Today’s stitch diagram, along with all other #whimsicalwednesday and #smallspacesunday stitch diagrams, can also be found on a Pinterest board here. Be sure to follow whimsicalstitch.com on FacebookPinterestInstagram, and Twitter.

If you like what you see on this blog, there's more. Mary’s Whimsical Stitches is a series of four books offering contemporary how-to collections of more than 200 stitches (in each volume) for all stitchers, regardless of skill level. All books include updated and sequenced diagrams from this blog, plus a collection of all-new stitches from private lessons and other class projects. Visit here to find a needlepoint retailer that carries my books.

New to needlepoint or looking for a refresher? Please download a handy how-to guide covering basic needlepoint stitches and stitch compensation techniques along with new top-line information on needlepoint materials and tools, how to handle threads, and other helpful needlepoint resources.

whimsicalstitch.com also sells Stitch Guides and Stitch Concepts for Melissa Shirley Designs, Zecca DesignsSandra Gilmore, Purple Palm, Maggie, and Penny MacLeod, and many more. Click here to see the newest guides and click here to see the entire collection.

I hope you have the perfect spot for this stitch! Please enjoy! Have a wonderful #whimsicalwednesday!

A Note about Diagrams
I use color in diagrams to make them as clear as possible.  The primary function of different colored lines is to illustrate a stitch sequence.  For example, the layering of colors demonstrates you add them in that order.  They can also provide ideas on integrating additional threads (one line for each color).  Or, you can use the same thread for all color lines.  That's where I encourage you to use your imagination for the space you are stitching!

Work With Me Here

Simply put, I could not make up my mind today. The silver lining is you are presented with options!

Click the image to see the whimsicalstitch.com Stitch Library on pinterest.com. Includes all #whimsicalwednesday and #smallspacesunday stitch diagrams.

Click the image to see #whimsicalwednesday and #smallspacesunday Stitched Sample Gallery on Instagram.

As many know, I love columns, especially for backgrounds. I also love borders, whether they exist on a painted canvas or not. Today’s stitch started as a border, but I presented it as a background as that is a more likely stitching scenario. My indecision set in quickly as I could not land on a preferred stitched sample, so you get three ideas for combining threads.

The stitched sample uses four plies of pink Splendor and size 12 gold Kreniik. The column on the left represents only the black lines on the diagram. The center column stitches all the lines in a single thread, and the last column combines two threads, as illustrated in the diagram.

Obviously, you can add more empty rows between the columns, especially for a larger canvas. The thread combos are virtually endless and limited only by your imagination. As with last week’s stitch, I am looking forward to playing with its scalability. I think an 8-row column on an 18M canvas is a lovely width.

I hope you have the perfect spot for it. Enjoy it!

Click on image to see the whimsicalstitch.com Stitch Library on pinterest.com. Includes all #whimsicalwednesday and #smallspacesunday stitch diagrams.

As you are auditioning stitches (from any stitch source), count the number of canvas threads on the diagram that match your mesh size. And there you have what an inch of the stitch will look like. Evaluate that against the area where you plan to use the stitch and make your final decision. If you start integrating this step into your stitch selection process, you may be surprised at how many stitches you think are large are much smaller than you realize.

By (sometimes) including this step in my own process, I find I am now integrating much longer stitches than I ever thought I would. I used to think a stitch six rows long was super big. I have very much changed my tune, which has helped me expand my creativity, especially for large-space stitches.

Today’s stitch diagram, along with all other #whimsicalwednesday and #smallspacesunday stitch diagrams, can also be found on a Pinterest board here. Be sure to follow whimsicalstitch.com on FacebookPinterestInstagram, and Twitter.

If you like what you see on this blog, there's more. Mary’s Whimsical Stitches is a series of four books offering contemporary how-to collections of more than 200 stitches (in each volume) for all stitchers, regardless of skill level. All books include updated and sequenced diagrams from this blog, plus a collection of all-new stitches from private lessons and other class projects. Visit here to find a needlepoint retailer that carries my books.

New to needlepoint or looking for a refresher? Please download a handy how-to guide covering basic needlepoint stitches and stitch compensation techniques along with new top-line information on needlepoint materials and tools, how to handle threads, and other helpful needlepoint resources.

whimsicalstitch.com also sells Stitch Guides and Stitch Concepts for Melissa Shirley Designs, Zecca DesignsSandra Gilmore, Purple Palm, Maggie, and Penny MacLeod, and many more. Click here to see the newest guides and click here to see the entire collection.

I hope you have the perfect spot for this stitch! Please enjoy! Have a wonderful #whimsicalwednesday!

A Note about Diagrams
I use color in diagrams to make them as clear as possible.  The primary function of different colored lines is to illustrate a stitch sequence.  For example, the layering of colors demonstrates you add them in that order.  They can also provide ideas on integrating additional threads (one line for each color).  Or, you can use the same thread for all color lines.  That's where I encourage you to use your imagination for the space you are stitching!
I've Said It Before...

And I am saying it again. It takes a village. I spent the past weekend with the needlepoint village at the Spring show and saw wonderful new canvases, dear friends, and a particularly cute stitch.

Click the image to see the whimsicalstitch.com Stitch Library on pinterest.com. Includes all #whimsicalwednesday and #smallspacesunday stitch diagrams.

Click the image to see #whimsicalwednesday and #smallspacesunday Stitched Sample Gallery on Instagram.

The stitched sample is one of Kristine Kingston’s new spring sweaters. Kristine used Soy Luster for the black lines, Silk Lame for the aqua lines, and Sundance Beads for the yellow circles on 18M.

Clearly, I will be using it for clothing in the future. It will work for clothing from any season. For a winter sweater, I might use Vineyard Silk for the black lines, Glisten for the aqua lines, and a bead for the yellow circle. I think it would make a very pretty vase with a lightweight metallic for the black lines, a slightly heavier metallic (such as Flair) for the yellow lines, and a bead.

I am looking forward to playing with its potential scalability, which will result in either a vertical row of multiple beads to connect the black lines or the addition of another stitch. Stay tuned!

I hope you have the perfect spot for it. Enjoy it!

Click on image to see the whimsicalstitch.com Stitch Library on pinterest.com. Includes all #whimsicalwednesday and #smallspacesunday stitch diagrams.

As you are auditioning stitches (from any stitch source), count the number of canvas threads on the diagram that match your mesh size. And there you have what an inch of the stitch will look like. Evaluate that against the area where you plan to use the stitch and make your final decision. If you start integrating this step into your stitch selection process, you may be surprised at how many stitches you think are large are much smaller than you realize.

By (sometimes) including this step in my own process, I find I am now integrating much longer stitches than I ever thought I would. I used to think a stitch six rows long was super big. I have very much changed my tune, which has helped me expand my creativity, especially for large-space stitches.

Today’s stitch diagram, along with all other #whimsicalwednesday and #smallspacesunday stitch diagrams, can also be found on a Pinterest board here. Be sure to follow whimsicalstitch.com on FacebookPinterestInstagram, and Twitter.

If you like what you see on this blog, there's more. Mary’s Whimsical Stitches is a series of four books offering contemporary how-to collections of more than 200 stitches (in each volume) for all stitchers, regardless of skill level. All books include updated and sequenced diagrams from this blog, plus a collection of all-new stitches from private lessons and other class projects. Visit here to find a needlepoint retailer that carries my books.

New to needlepoint or looking for a refresher? Please download a handy how-to guide covering basic needlepoint stitches and stitch compensation techniques along with new top-line information on needlepoint materials and tools, how to handle threads, and other helpful needlepoint resources.

whimsicalstitch.com also sells Stitch Guides and Stitch Concepts for Melissa Shirley Designs, Zecca DesignsSandra Gilmore, Purple Palm, Maggie, and Penny MacLeod, and many more. Click here to see the newest guides and click here to see the entire collection.

I hope you have the perfect spot for this stitch! Please enjoy! Have a wonderful #whimsicalwednesday!

A Note about Diagrams
I use color in diagrams to make them as clear as possible.  The primary function of different colored lines is to illustrate a stitch sequence.  For example, the layering of colors demonstrates you add them in that order.  They can also provide ideas on integrating additional threads (one line for each color).  Or, you can use the same thread for all color lines.  That's where I encourage you to use your imagination for the space you are stitching!