Oldie but a Goodie

I suspect all of us have that stitch we always fall back on. You know, the stitch you start doing without even thinking about it. Mine is the Woven Stitch, especially for backgrounds. As I began adding it to yet another background, I decided I needed to do something different with it.

Click image to see the whimsicalstitch.com Stitch Library on pinterest.com. Includes all #whimsicalwednesday and #smallspacesunday stitch diagrams.

Click image to see #whimsicalwednesday and #smallspacesunday Stitched Sample Gallery on Instagram.

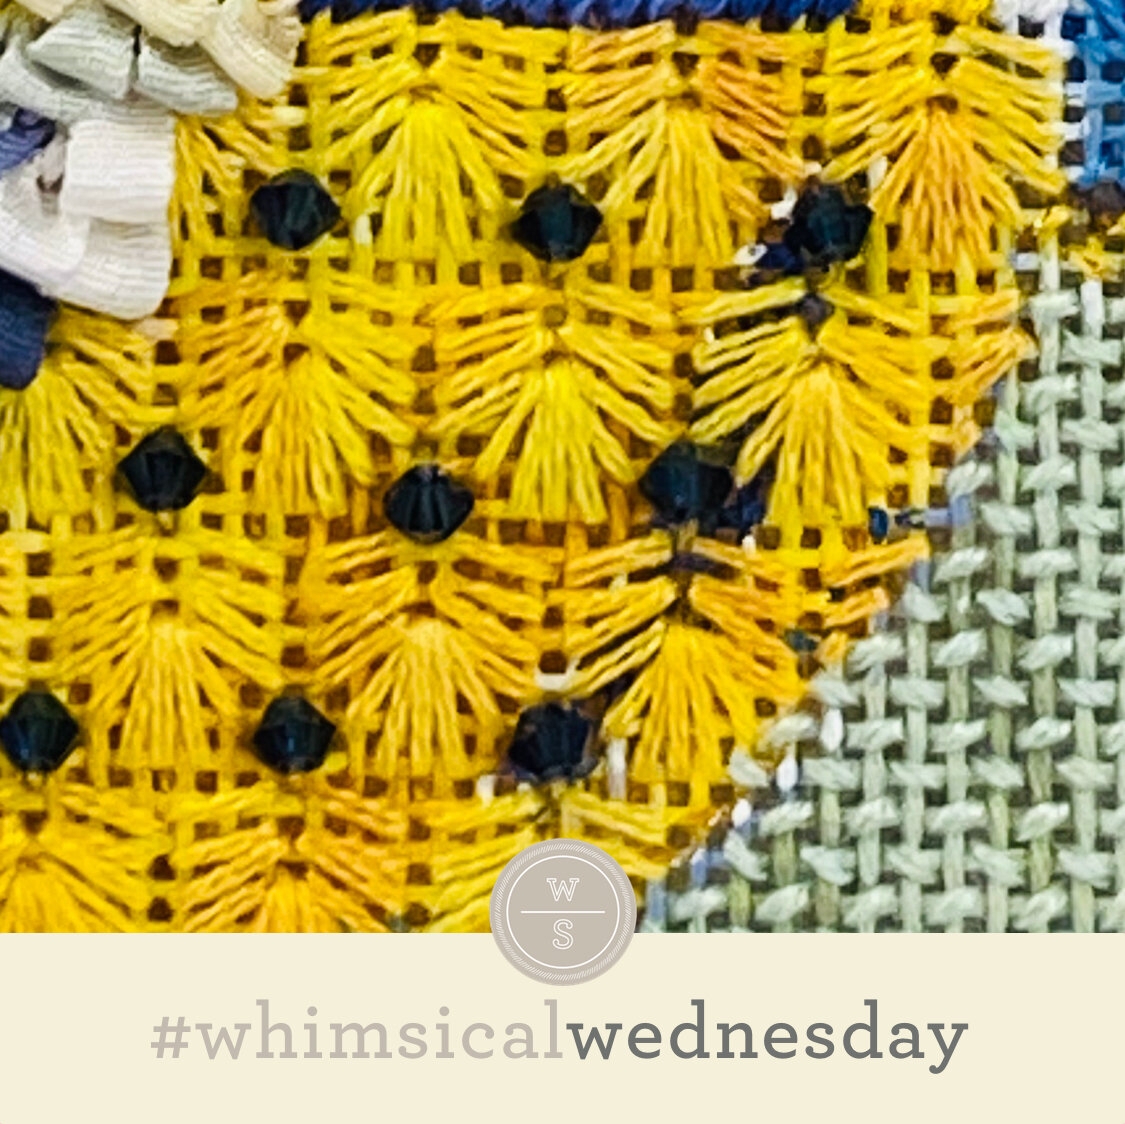
Yes, I know it still looks like a woven stitch but I really like how the added open space inserts a grid feature to the design. The stitched sample is me playing with two plies of Soie D'Alger on 18M. I’m using this stitch for the background on a floral still life. Unfortunately, I used white thread on that white background so it is not always the best example to photograph.

This stitch is perfect for places that are exactly like this stitch…clean, simple, and not screaming for attention. The repeated pattern for this stitch starts 16 rows wide and 16 rows tall, so it needs a pretty large space to achieve the effect. I like it for floors with two colors of Petite Silk Lame for a fun twist. I also played with it on a roof with Burmilana.

Click on image to see the whimsicalstitch.com Stitch Library on pinterest.com. Includes all #whimsicalwednesday and #smallspacesunday stitch diagrams.

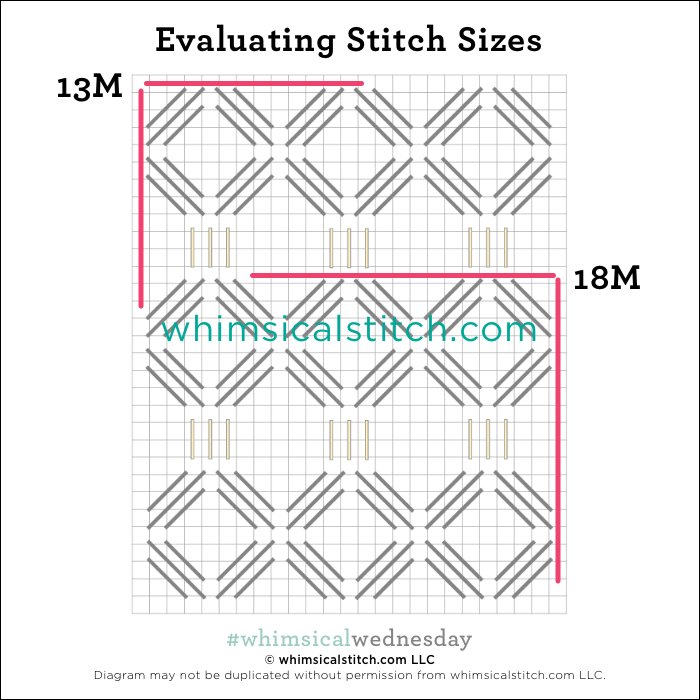
Just a reminder about how to evaluate stitches for size on your project.

As you are auditioning stitches (from any stitch source), count the number of canvas threads on the diagram that match your mesh size. And there you have what an inch of the stitch will look like. Evaluate that against the area where you plan to use the stitch and make your final decision. If you start integrating this step into your stitch selection process, you may be surprised at how many stitches you think are large are much smaller than you realize. (Or, in today’s case, the stitch is much larger than it looks.)

By (sometimes) including this step in my own process, I find I am now integrating much longer stitches than I ever thought I would. I used to think a stitch six rows long was super big. I have very much changed my tune, which has helped me expand my creativity, especially for large-space stitches.

Today’s stitch diagram, along with all other #whimsicalwednesday and #smallspacesunday stitch diagrams, can also be found on a Pinterest board here. Be sure to follow whimsicalstitch.com on FacebookPinterestInstagram, and Twitter.

If you like what you see on this blog, there's more. Mary’s Whimsical Stitches is a series of three books offering contemporary how-to collections of more than 250 stitches (in each volume) for all stitchers, regardless of skill level. All books include updated and sequenced diagrams from this blog plus a collection of all-new stitches from private lessons and other class projects. Visit here to find a needlepoint retailer that carries my books.

New to needlepoint or looking for a refresher? Please download a handy how-to guide covering basic needlepoint stitches and stitch compensation techniques along with new top-line information on needlepoint materials and tools, how to handle threads, and other helpful needlepoint resources.

whimsicalstitch.com also sells Stitch Guides and Stitch Concepts for Melissa Shirley Designs, Zecca DesignsSandra Gilmore, Purple Palm, Maggie, and Penny MacLeod, and many more. Click here to see the newest guides and click here to see the entire collection.

I hope you have the perfect spot for this stitch! Please enjoy! Have a wonderful #whimsicalwednesday!

A Note about Diagrams
I use color in diagrams to make them as clear as possible.  The primary function of different colored lines is to illustrate a stitch sequence.  For example, the layering of colors demonstrates you add them in that order.  They can also provide ideas on integrating additional threads (one line for each color).  Or, you can use the same thread for all color lines.  That's where I encourage you to use your imagination for the space you are stitching!

And We're Back

Today’s stitch is one of several leaf stitches I’ve been playing with over the past week. I’ll be sharing the others in the weeks ahead.

Click image to see the whimsicalstitch.com Stitch Library on pinterest.com. Includes all #whimsicalwednesday and #smallspacesunday stitch diagrams.

Click image to see #whimsicalwednesday and #smallspacesunday Stitched Sample Gallery on Instagram.

The stitched sample uses Gloriana Silk Floss (on 18M). I used three plies for the black lines and four for the aqua lines, as the Upright Crosses didn’t show up well with only three plies. (The leaf on the top right is not a missed stitch. It reflects compensation around a tree branch.)

Leaf stitches make great bird feather stitches! For a bird, I recommend replacing the Upright Cross (aqua lines) with a bead for a little extra punch. I’m playing with using a single leaf (represented by the black lines) as a small standalone flower, using pink metallic for the straight lines and green floss for the diagonal lines. Using two related hues of green (one for the straight and one for the diagonal lines) would also be a cute effect for leaves or birds. Clearly, there are a lot of ways to play with this stitch!

Click on image to see the whimsicalstitch.com Stitch Library on pinterest.com. Includes all #whimsicalwednesday and #smallspacesunday stitch diagrams.

Just a reminder about how to evaluate stitches for size on your project.

As you are auditioning stitches (from any stitch source), count the number of canvas threads on the diagram that match your mesh size. And there you have what an inch of the stitch will look like. Evaluate that against the area where you plan to use the stitch and make your final decision. If you start integrating this step into your stitch selection process, you may be surprised at how many stitches you think are large are much smaller than you realize.

By (sometimes) including this step in my own process, I find I am now integrating much longer stitches than I ever thought I would. I used to think a stitch six rows long was super big. I have very much changed my tune, which has helped me expand my creativity, especially for large space stitches.

Today’s stitch diagram, along with all other #whimsicalwednesday and #smallspacesunday stitch diagrams, can also be found on a Pinterest board here. Be sure to follow whimsicalstitch.com on FacebookPinterestInstagram, and Twitter.

If you like what you see on this blog, there's more. Mary’s Whimsical Stitches is a series of three books offering contemporary how-to collections of more than 250 stitches (in each volume) for all stitchers, regardless of skill level. All books include updated and sequenced diagrams from this blog plus a collection of all-new stitches from private lessons and other class projects. Visit here to find a needlepoint retailer that carries my books.

New to needlepoint or looking for a refresher? Please download a handy how-to guide covering basic needlepoint stitches and stitch compensation techniques along with new top-line information on needlepoint materials and tools, how to handle threads, and other helpful needlepoint resources.

whimsicalstitch.com also sells Stitch Guides and Stitch Concepts for Melissa Shirley Designs, Zecca DesignsSandra Gilmore, Purple Palm, Maggie, and Penny MacLeod, and many more. Click here to see the newest guides and click here to see the entire collection.

I hope you have the perfect spot for this stitch! Please enjoy! Have a wonderful #whimsicalwednesday!

A Note about Diagrams
I use color in diagrams to make them as clear as possible.  The primary function of different colored lines is to illustrate a stitch sequence.  For example, the layering of colors demonstrates you add them in that order.  They can also provide ideas on integrating additional threads (one line for each color).  Or, you can use the same thread for all color lines.  That's where I encourage you to use your imagination for the space you are stitching!

Sharing is Caring

And today’s stitch is a great case study in how to navigate shared holes. It’s also a beautiful stitch and one of those stitches that I get overly excited about when I have an opportunity to use it.

Click on image to see on whimsicalstitch.com's Pinterest account. Visit pinterest.com/whimsicalstitch/whimsicalwednesday for a library of all #whimsicalwednesday and #smallspacesunday stitch diagrams.

Click on image to see on whimsicalstitch.com's Pinterest account. Visit pinterest.com/whimsicalstitch/whimsicalwednesday for a library of all #whimsicalwednesday and #smallspacesunday stitch diagrams.

Click on image to see on whimsicalstitch.com's Instagram account. Visit instagram.com/whimsicalstitch to see a library of stitched samples for select #whimsicalwednesday and #smallspacesunday stitch diagrams.

Click on image to see on whimsicalstitch.com's Instagram account. Visit instagram.com/whimsicalstitch to see a library of stitched samples for select #whimsicalwednesday and #smallspacesunday stitch diagrams.

The stitched sample is a beautiful bird from an upcoming Stitch Guide that uses Gloriana Silk Floss (3-ply) and navy blue Swarovski Bi-cones (on 18M). As I mentioned earlier, I love opportunities to use this stitch (or its variants). Flip it upward or 90° in either direction to create the direction you need.

Shared holes are common in virtually all needlepoint. However, a shared hole typically includes two threads. This stitch has multiple shared holes sharing everything from two to seven threads. The best way to minimize wear and tear on your thread and to minimize friction on threads already in the shared hole is to stitch all the stitches from the outer edges to the inside shared hole.

Thought-starters for this stitch include birds, trees, or clothing. I’ve used this stitch for birds with both solid and overdyed silk floss and various beads. I would love to see a more substantial version of this stitch with a metallic that lays flat, such as Flair or Fyre Werks. I would love to see this as a coat with a Pepper Pot Silk and seed bead. And, lastly, I look forward to using it for a Christmas tree with solid silk floss and varied colors of sequins or crystals for the bead accent.

This stitch diagram, along with all other #whimsicalwednesday and #smallspacesunday stitch diagrams, can also be found on a Pinterest board here. Be sure to follow whimsicalstitch.com on FacebookPinterestInstagram, and Twitter.

If you like what you see on this blog, want to learn some very creative decorative stitches, and how to put them all together, whimsicalstitch.com has books (!) for you! Mary’s Whimsical Stitches Volume 1 is a contemporary how-to collection of more than 250 stitches for stitchers regardless of skill level. The book includes updated and sequenced diagrams from this blog, all-new stitches, and a chapter on the basics of needlepoint. For more information, visit here. Volume 2 debuts in January 2021.

whimsicalstitch.com also sells Stitch Guides and Stitch Concepts for Melissa Shirley Designs, Zecca DesignsSandra Gilmore, Purple Palm, Maggie, and Penny MacLeod, and many more. Click here to see the newest guides and click here to see the entire collection.

I hope you have the perfect spot for this stitch! Please enjoy! Have a wonderful #whimsicalwednesday!

A Note about Diagrams
I use color in diagrams to make them as clear as possible.  The primary function of different colored lines is to illustrate a stitch sequence.  For example, layering of colors demonstrates you add them in that order.  They can also provide ideas on how to integrate additional threads (one line for each color).  Or, you can use the same thread for all color lines.  That's where I encourage you to use your imagination for the space you are stitching!