Beware of the Technical Terms

Today’s stitch is a classic embroidery stitch that works so well in needlepoint. The Lazy Daisy is an easy stitch that adds charm and interest to your projects.

Click image to see the whimsicalstitch Stitch Library on pinterest.com. Includes all #whimsicalwednesday and #smallspacesunday stitch diagrams.

Click image to see the whimsicalstitch Stitch Library on pinterest.com. Includes all #whimsicalwednesday and #smallspacesunday stitch diagrams.

Click image to see #whimsicalwednesday and #smallspacesunday Stitched Sample Gallery on Instagram.

Creating a Lazy Daisy is super easy. Come up at 1 and return your needle through the same hole, leaving a small-ish loop (plus some extra thread) on top of the canvas. Bring your needle up two or so holes away and catch the loop with your needle. Continue pulling on the thread until you create a small loop on top of the canvas, returning the thread one hole away to attach the loop to the canvas.

Here is where the technical terms come in. I prefer more oval loops, so I will use my needle to play with the aforementioned extra thread to scooch, finagle, or wrangle the loop into my desired shape before I tack it down.

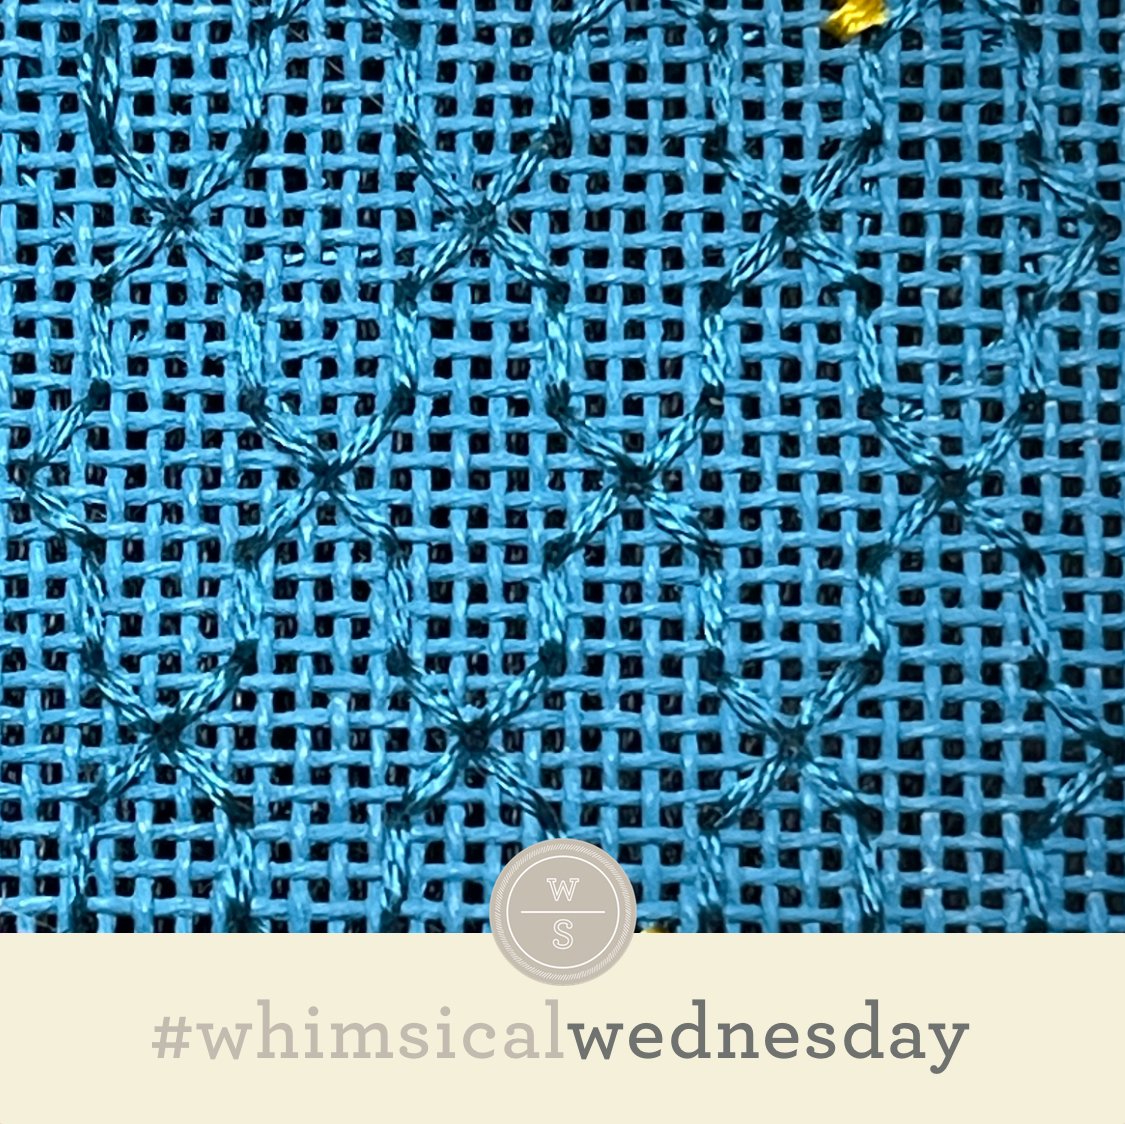
Lazy daisy coverage can be tricky. Sometimes, if you pack every single inch of an area with lazy daisies, the effect can be…a lot. One of my favorite stitchers shared her solution with me. She adds a layer of Plain Needlepoint on the area before she adds any Lazy Daisies, as illustrated by the second diagram and the stitched sample. The end result is a lovely compromise where you can see individual lazy daisies along with a full coverage look. I love how this works out!

The stitched sample is my friend’s adorable Melissa Shirley angel ornament with DMC Floss (turquoise lines) and ThreadWorx Floss (black lines).

Fun fact. Lazy daisies make fantastic flower petals.

Click image to see #whimsicalwednesday and #smallspacesunday Stitched Sample Gallery on Instagram.

Click image to see #whimsicalwednesday and #smallspacesunday Stitched Sample Gallery on Instagram. (Note: swipe left to see this image in carousel of photos from this blog post.)

Super easy. The stitched sample is River Silks 7mm ribbon (black lines) with Kreinik (yellow lines) on 18M. Generally speaking, I recommend stitching the Smyrna Cross center first. When I stitched the stitched sample (eons ago), I don’t recall having issues with the silk ribbon versus the Kreinik. However, I would still advise patience and caution with that thread mix.

These stitch diagrams, along with all other #whimsicalwednesday and #smallspacesunday stitch diagrams, can also be found on a Pinterest board here. Be sure to follow whimsicalstitch.com on FacebookPinterestInstagram, and Twitter.

If you like what you see on this blog, there's more: Mary’s Whimsical Stitches Volume 1 is a contemporary how-to collection of more than 250 stitches for stitchers regardless of skill level. The book includes updated and sequenced diagrams from this blog, all-new stitches, and a chapter on the basics of needlepoint; Mary’s Whimsical Stitches Volume 2 features chapters on Balanced, Beading, Diagonal, Layered, Oblique, Small, and Straight stitches.

Also, you can download for free the first chapter from my first book which covers basic needlepoint stitches and stitch compensation techniques along with new top-line information on needlepoint materials and tools, how to handle threads, and other helpful needlepoint resources.

whimsicalstitch.com also sells Stitch Guides and Stitch Concepts for Melissa Shirley Designs, Zecca DesignsSandra Gilmore, Purple Palm, Maggie, and Penny MacLeod, and many more. Click here to see the newest guides and click here to see the entire collection.

I hope you have the perfect spot for this stitch! Please enjoy! Have a wonderful #whimsicalwednesday!

A Note about Diagrams
I use color in diagrams to make them as clear as possible.  The primary function of different colored lines is to illustrate a stitch sequence.  For example, layering of colors demonstrates you add them in that order.  They can also provide ideas on how to integrate additional threads (one line for each color).  Or, you can use the same thread for all color lines.  That's where I encourage you to use your imagination for the space you are stitching!

More Smiles

Today’s stitch is fun, easy, and cute. It doesn’t get much better than that.

Click image to see the whimsicalstitch Stitch Library on pinterest.com. Includes all #whimsicalwednesday and #smallspacesunday stitch diagrams.

Click image to see #whimsicalwednesday and #smallspacesunday Stitched Sample Gallery on Instagram.

The stitched sample is me playing with three plies of Soie d’Alger (black lines) and Flair (yellow lines) on a little skirt (on 13M). To minimize visible threads between the rectangles (in all directions), I added the rectangles starting at the upper left, moving diagonally down towards the lower right. The X’s covered any visible threads between the rectangles in that path. I followed a similar path for the X’s, burying my thread in and behind the pre-existing rectangles to get to the next open space (as needed).

I created this stitch for a background on an upcoming Stitch Concept. I wanted something interesting but nothing too dramatic as the background is behind some lettering. This will add interest and will also be very easy to compensate around the letters. Since I want to keep it really simple, I’ll most likely recommend a single strand matte (such as DMC Perle Cotton, Rainbow Gallery’s Elegance, or a single strand of Impressions) for the black lines and Neon Rays for the yellow lines. (I want to keep the background as flat as possible.)

As with a lot of my stitches here of late, it’s another great all-purpose stitch. I’m looking forward to using Vineyard Silk for the black lines and a Silk Lame for the yellow lines for more substantial clothing, such as a jacket or a pair of slacks.

You can replace the “X” with any of your favorite 2X2 stitches. Also consider replacing the X with four single beads for a glammed-up look, say for a dress or a vase. One other consideration is to fill in the remaining open rectangles at the top, bottom, and sides with smaller Cashmere stitches to fit with either a contrasting metallic (red would be adorable above) or a second blue metallic.

These stitch diagrams, along with all other #whimsicalwednesday and #smallspacesunday stitch diagrams, can also be found on a Pinterest board here. Be sure to follow whimsicalstitch.com on FacebookPinterestInstagram, and Twitter.

IIf you like what you see on this blog, there's more: Mary’s Whimsical Stitches Volume 1 is a contemporary how-to collection of more than 250 stitches for stitchers regardless of skill level. The book includes updated and sequenced diagrams from this blog, all-new stitches, and a chapter on the basics of needlepoint; Mary’s Whimsical Stitches Volume 2 features chapters on Balanced, Beading, Diagonal, Layered, Oblique, Small, and Straight stitches.

Also, you can download for free the first chapter from my first book which covers basic needlepoint stitches and stitch compensation techniques along with new top-line information on needlepoint materials and tools, how to handle threads, and other helpful needlepoint resources.

whimsicalstitch.com also sells Stitch Guides and Stitch Concepts for Melissa Shirley Designs, Zecca DesignsSandra Gilmore, Purple Palm, Maggie, and Penny MacLeod, and many more. Click here to see the newest guides and click here to see the entire collection.

I hope you have the perfect spot for this stitch! Please enjoy! Have a wonderful #whimsicalwednesday!

A Note about Diagrams
I use color in diagrams to make them as clear as possible.  The primary function of different colored lines is to illustrate a stitch sequence.  For example, layering of colors demonstrates you add them in that order.  They can also provide ideas on how to integrate additional threads (one line for each color).  Or, you can use the same thread for all color lines.  That's where I encourage you to use your imagination for the space you are stitching!

Thanks for the Memories

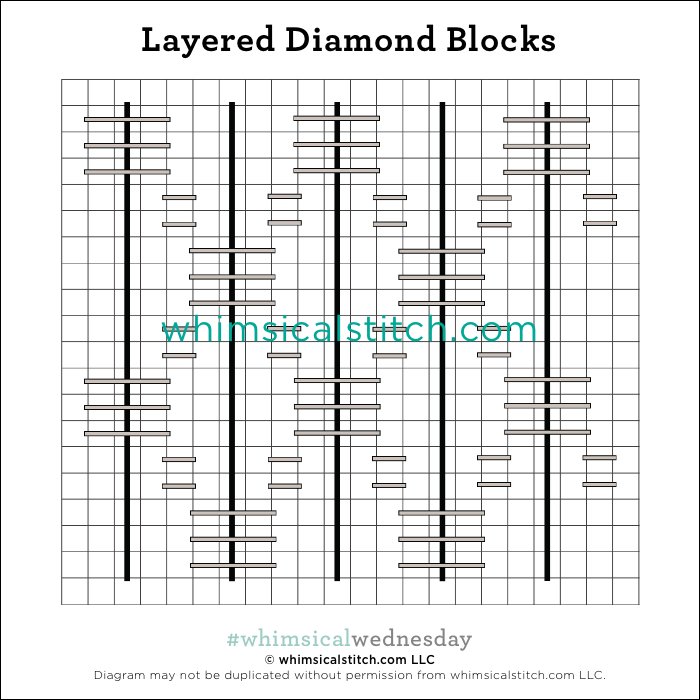
Today’s stitch comes to us straight from…iPhone photo memories. A stitching friend shared this stitch with me, um, years ago and I kinda forgot about it. Shame on me.

Click image to see the whimsicalstitch Stitch Library on pinterest.com. Includes all #whimsicalwednesday and #smallspacesunday stitch diagrams.

Click image to see #whimsicalwednesday and #smallspacesunday Stitched Sample Gallery on Instagram.

It’s a really cute…and interesting…layered stitch creating diamond blocks of sorts. The stitched sample is me playing with size 12 Kreinik (black lines) and Elegance (gray lines) on a cute little skirt.

I’m looking forward to using this stitch on a variety of architectural elements, such as a chimney or a roof with a matte single strand thread, such as Elegance or DMC Perle Cotton, and the matching Splendor or DMC Floss on top (gray lines). I also want to flip the diagram 90° and use it for a medium-size body of water with two shades of Petite Silk Lame or size 8 Kreinik. The stitch, as presented, will work well to accentuate anything tall, such as pants or jackets. Using threads with contrasting colors or finishes (or both) will add even more interest to this stitch.

These stitch diagrams, along with all other #whimsicalwednesday and #smallspacesunday stitch diagrams, can also be found on a Pinterest board here. Be sure to follow whimsicalstitch.com on FacebookPinterestInstagram, and Twitter.

IIf you like what you see on this blog, there's more: Mary’s Whimsical Stitches Volume 1 is a contemporary how-to collection of more than 250 stitches for stitchers regardless of skill level. The book includes updated and sequenced diagrams from this blog, all-new stitches, and a chapter on the basics of needlepoint; Mary’s Whimsical Stitches Volume 2 features chapters on Balanced, Beading, Diagonal, Layered, Oblique, Small, and Straight stitches.

Also, you can download for free the first chapter from my first book which covers basic needlepoint stitches and stitch compensation techniques along with new top-line information on needlepoint materials and tools, how to handle threads, and other helpful needlepoint resources.

whimsicalstitch.com also sells Stitch Guides and Stitch Concepts for Melissa Shirley Designs, Zecca DesignsSandra Gilmore, Purple Palm, Maggie, and Penny MacLeod, and many more. Click here to see the newest guides and click here to see the entire collection.

I hope you have the perfect spot for this stitch! Please enjoy! Have a wonderful #whimsicalwednesday!

A Note about Diagrams
I use color in diagrams to make them as clear as possible.  The primary function of different colored lines is to illustrate a stitch sequence.  For example, layering of colors demonstrates you add them in that order.  They can also provide ideas on how to integrate additional threads (one line for each color).  Or, you can use the same thread for all color lines.  That's where I encourage you to use your imagination for the space you are stitching!

Charlie Brown

I suspect the proper name for this stitch would include chevrons, bargello, stripes, or some combination thereof. However, I took one look at the stitched sample and instantly saw Charlie Brown’s shirt.

Click image to see the whimsicalstitch Stitch Library on pinterest.com. Includes all #whimsicalwednesday and #smallspacesunday stitch diagrams.

Click image to see #whimsicalwednesday and #smallspacesunday Stitched Sample Gallery on Instagram.

I was inspired by an oblique diamond background (created by straight stitches over four rows). I took the top half of that pattern, added two rows on either side, and ended up with these adorable stripes. The stitched sample is me playing with three plies of Mandarin Floss (black lines) and Fyre Werks (aqua lines). The drama of this stitch is undeniable, even with the open areas between the stripes.

This stitch will make fantastic clothing, especially a large Santa coat or dress you want to draw attention to. For the coat, I would use Vineyard Silk or Pepper Pot Silk for the black lines and a Silk Lame for the aqua lines. For a dress, I would like to find a silk floss for the black lines and a Flair for the aqua lines. I love the lightness of Flair, despite its persnickety nature. (Hint: The second I see the short end starting to fray, I snip the errant strand and carry on.) I would also consider using the Flair for the black lines with the silk floss as the accent stitches. I love dramatic stitches like this one for the stars of Melissa Shirley’s fruit or pumpkin pieces. To add even more drama to those, consider replacing the stitches over two rows with a bead centered over two rows.

These stitch diagrams, along with all other #whimsicalwednesday and #smallspacesunday stitch diagrams, can also be found on a Pinterest board here. Be sure to follow whimsicalstitch.com on FacebookPinterestInstagram, and Twitter.

IIf you like what you see on this blog, there's more: Mary’s Whimsical Stitches Volume 1 is a contemporary how-to collection of more than 250 stitches for stitchers regardless of skill level. The book includes updated and sequenced diagrams from this blog, all-new stitches, and a chapter on the basics of needlepoint; Mary’s Whimsical Stitches Volume 2 features chapters on Balanced, Beading, Diagonal, Layered, Oblique, Small, and Straight stitches.

Also, you can download for free the first chapter from my first book which covers basic needlepoint stitches and stitch compensation techniques along with new top-line information on needlepoint materials and tools, how to handle threads, and other helpful needlepoint resources.

whimsicalstitch.com also sells Stitch Guides and Stitch Concepts for Melissa Shirley Designs, Zecca DesignsSandra Gilmore, Purple Palm, Maggie, and Penny MacLeod, and many more. Click here to see the newest guides and click here to see the entire collection.

I hope you have the perfect spot for this stitch! Please enjoy! Have a wonderful #whimsicalwednesday!

A Note about Diagrams
I use color in diagrams to make them as clear as possible.  The primary function of different colored lines is to illustrate a stitch sequence.  For example, layering of colors demonstrates you add them in that order.  They can also provide ideas on how to integrate additional threads (one line for each color).  Or, you can use the same thread for all color lines.  That's where I encourage you to use your imagination for the space you are stitching!

So Many Small Stitches, So Little Time

Today’s a fun #smallspacesunday. There’s a new stitch for you AND there are also several examples of previous #smallspacesundays. It’s a reunion!

Click image to see the whimsicalstitch Stitch Library on pinterest.com. Includes all #whimsicalwednesday and #smallspacesunday stitch diagrams.

Click image to see #whimsicalwednesday and #smallspacesunday Stitched Sample Gallery on Instagram.

Click image to see #whimsicalwednesday and #smallspacesunday Stitched Sample Gallery on Instagram.

Today’s stitch is a wonderfully simple layered stitch. I love how the color and finish of the accent threads (top threads) change between vertical columns. It’s such a great way to bring attention to an otherwise forgettable area. The stitched sample is the red scarf on an adorable Christmas ornament with Vineyard Silk (gray lines) and a size 8 Kreinik (yellow lines) on 18M.

In addition to today’s stitch, the stitched sample on the far right includes Encroaching Gobelin (blue cap), Upright Crosses (green cap), Woven Hungarian (orange scarf), and Diamonds with Cross Stitches (red cap). This is an ornament I stitched a very long time ago, so the threads I’m about to offer are my best guesses. I used Bella Lusso or Designers Dream (no longer available) for the blue and red caps. I used DMC Floss for the green cap and orange scarf. Sundance Beads are also included on the orange scarp.

Back to today’s new stitch. I love layered stitches and love how this deceptively small one fits perfectly into the scarf area. I’ve used variations of this stitch for other short, wide areas such as the neck of a vase with two colors of Petite Silk Lame. The texture of Rainbow Linen is perfect for trees and roofs. For either of those applications, use the Rainbow LInen for the gray lines and Vineyard Silk for the yellow lines. I would flip the stitch 90° for a roof.

This stitch diagram, along with all other #whimsicalwednesday and #smallspacesunday stitch diagrams, can also be found on a Pinterest board here. Be sure to follow whimsicalstitch.com on FacebookPinterestInstagram, and Twitter.

IIf you like what you see on this blog, there's more: Mary’s Whimsical Stitches Volume 1 is a contemporary how-to collection of more than 250 stitches for stitchers regardless of skill level. The book includes updated and sequenced diagrams from this blog, all-new stitches, and a chapter on the basics of needlepoint; Mary’s Whimsical Stitches Volume 2 features chapters on Balanced, Beading, Diagonal, Layered, Oblique, Small, and Straight stitches.

Also, you can download for free the first chapter from my first book which covers basic needlepoint stitches and stitch compensation techniques along with new top-line information on needlepoint materials and tools, how to handle threads, and other helpful needlepoint resources.

whimsicalstitch.com also sells Stitch Guides and Stitch Concepts for Melissa Shirley Designs, Zecca DesignsSandra Gilmore, Purple Palm, Maggie, and Penny MacLeod, and many more. Click here to see the newest guides and click here to see the entire collection.

I hope you have the perfect spot for this stitch! Please enjoy! Have a wonderful #whimsicalwednesday!

A Note about Diagrams
I use color in diagrams to make them as clear as possible.  The primary function of different colored lines is to illustrate a stitch sequence.  For example, layering of colors demonstrates you add them in that order.  They can also provide ideas on how to integrate additional threads (one line for each color).  Or, you can use the same thread for all color lines.  That's where I encourage you to use your imagination for the space you are stitching!
Looking Through a Keyhole

I certainly went down a stitching rabbit hole last night. I love where I landed but it was certainly a circuitous route.

Click image to see the whimsicalstitch Stitch Library on pinterest.com. Includes all #whimsicalwednesday and #smallspacesunday stitch diagrams.

Click image to see #whimsicalwednesday and #smallspacesunday Stitched Sample Gallery on Instagram.

I discovered the general shape for the Diamond Keyholes stitch on Instagram. The stitched sample is me playing with two plies of Soie d’Alger on 18M. The stitch is larger than I anticipated, even on 18M. I love how the openness of the stitch lends itself to an interesting background that will do just that…stay in the background. I am already envisioning a variation with a couple of vertical rows in between the individual keyhole shapes for an even more subtle background (or wallpaper or floor).

Finding something to fill the keyholes was the very interesting journey I alluded to earlier. After a LOT of trial and error, I landed on a smaller keyhole (inside the larger keyhole) and NOT repeated in every keyhole.

I did not photograph every filling I tried because I wasn’t thrilled with the end results. Simply put, most of the attempts drowned out the larger keyhole, which is how I ended up with the smaller keyhole in select locations, allowing the larger outline shape to dominate. It was an interesting journey (for me), as I was confident it was going to be an easy shape to fill. Oops.

Either version will work well as a background or as architectural elements. I’m looking forward to using the filled version with two different color threads for a floor. If it’s a kitchen, the threads will be lightweight metallic, such as Petite Silk Lame. If it’s a hardwood floor in a hallway or dining room, I’ll use two shades of brown silk floss. For the top diagram, it will be a new go-to for backgrounds. I can’t wait to find that perfect piece where I can alternate colors between vertical columns. For some reason, I’ve got pink and white columns on my mind. That will be adorable. I love lightweight single strand threads for backgrounds, such as silk perle or perle cotton (e.g., Elegance or DMC size 8 perle cotton).

These stitch diagrams, along with all other #whimsicalwednesday and #smallspacesunday stitch diagrams, can also be found on a Pinterest board here. Be sure to follow whimsicalstitch.com on FacebookPinterestInstagram, and Twitter.

IIf you like what you see on this blog, there's more: Mary’s Whimsical Stitches Volume 1 is a contemporary how-to collection of more than 250 stitches for stitchers regardless of skill level. The book includes updated and sequenced diagrams from this blog, all-new stitches, and a chapter on the basics of needlepoint; Mary’s Whimsical Stitches Volume 2 features chapters on Balanced, Beading, Diagonal, Layered, Oblique, Small, and Straight stitches.

Also, you can download for free the first chapter from my first book which covers basic needlepoint stitches and stitch compensation techniques along with new top-line information on needlepoint materials and tools, how to handle threads, and other helpful needlepoint resources.

whimsicalstitch.com also sells Stitch Guides and Stitch Concepts for Melissa Shirley Designs, Zecca DesignsSandra Gilmore, Purple Palm, Maggie, and Penny MacLeod, and many more. Click here to see the newest guides and click here to see the entire collection.

I hope you have the perfect spot for this stitch! Please enjoy! Have a wonderful #whimsicalwednesday!

A Note about Diagrams
I use color in diagrams to make them as clear as possible.  The primary function of different colored lines is to illustrate a stitch sequence.  For example, layering of colors demonstrates you add them in that order.  They can also provide ideas on how to integrate additional threads (one line for each color).  Or, you can use the same thread for all color lines.  That's where I encourage you to use your imagination for the space you are stitching!

What a Morning

Today’s stitch is more than just a really pretty stitch. It also represents where I suspect more than a few of us would like to be right now.

Click image to see the whimsicalstitch Stitch Library on pinterest.com. Includes all #whimsicalwednesday and #smallspacesunday stitch diagrams.

Click image to see #whimsicalwednesday and #smallspacesunday Stitched Sample Gallery on Instagram.

The stitched sample is the sky from a Cooper Oaks seaside scene and uses DMC Perle Cotton (black lines) and a Kreinik Metallic (on 18M). I love how skipping a row between the diamonds (yellow lines) creates more interest in the borders (black lines) and makes the diamonds closer together. I suspect you will be seeing that element in some future variations of this stitch. Visit here to see a similar diamond stitch to understand the context of what I’m describing in context. (TLDR: the link takes you to a diamond that skips three rows between the diamonds for a different look.)

This full-coverage stitch will also work very well for any number of architectural elements, such as floors, wallpaper, or roofs. I would love to stitch a floor in two different colors, even something as simple as black (black lines) and white (yellow lines) lightweight metallics, such as Petite Silk Lame. For a roof, I would use a matte thread, such as Vineyard Silk, for the yellow lines and a mild metallic (Glisten or Silk Lame) for the black lines.

These stitch diagrams, along with all other #whimsicalwednesday and #smallspacesunday stitch diagrams, can also be found on a Pinterest board here. Be sure to follow whimsicalstitch.com on FacebookPinterestInstagram, and Twitter.

IIf you like what you see on this blog, there's more: Mary’s Whimsical Stitches Volume 1 is a contemporary how-to collection of more than 250 stitches for stitchers regardless of skill level. The book includes updated and sequenced diagrams from this blog, all-new stitches, and a chapter on the basics of needlepoint; Mary’s Whimsical Stitches Volume 2 features chapters on Balanced, Beading, Diagonal, Layered, Oblique, Small, and Straight stitches.

Also, you can download for free the first chapter from my first book which covers basic needlepoint stitches and stitch compensation techniques along with new top-line information on needlepoint materials and tools, how to handle threads, and other helpful needlepoint resources.

whimsicalstitch.com also sells Stitch Guides and Stitch Concepts for Melissa Shirley Designs, Zecca DesignsSandra Gilmore, Purple Palm, Maggie, and Penny MacLeod, and many more. Click here to see the newest guides and click here to see the entire collection.

I hope you have the perfect spot for this stitch! Please enjoy! Have a wonderful #whimsicalwednesday!

A Note about Diagrams
I use color in diagrams to make them as clear as possible.  The primary function of different colored lines is to illustrate a stitch sequence.  For example, layering of colors demonstrates you add them in that order.  They can also provide ideas on how to integrate additional threads (one line for each color).  Or, you can use the same thread for all color lines.  That's where I encourage you to use your imagination for the space you are stitching!

Two-fer Part 2

Today’s post wraps up (see what I did there?) this past Wednesday’s post with another stitch from the same project and a full-ish reveal of the Santa.

Click image to see the whimsicalstitch Stitch Library on pinterest.com. Includes all #whimsicalwednesday and #smallspacesunday stitch diagrams.

Click image to see #whimsicalwednesday and #smallspacesunday Stitched Sample Gallery on Instagram.

Click image to see #whimsicalwednesday and #smallspacesunday Stitched Sample Gallery on Instagram.

Today’s stitch is a composite stitch that includes Rhodes squares (aqua lines) and Scotch squares (yellow lines) outlined with tent stitches and beads. Yum! It makes the perfect Santa Coat. The stitched sample is a cute Santa from Painted Pony Designs and uses red Shimmer Ribbon for the yellow lines and green Shimmer Ribbon for the black and aqua lines (on 18M). The beads (gray circles) are from Sundance Designs.

The stitch is colorful, cute, and easy. Clothing is an obvious choice for this stitch. It will also work for architectural elements, such as a roof, chimney, or exterior house wall with two hues of wool for the yellow and aqua lines combined with Rainbow LInen for the black lines. In this scenario, I would substitute a simple Cross Stitch for the bead.

Today’s stitch also reminds me of a blog post from the blog’s early days that discusses how to combine smaller stitches for larger areas. Scroll down the blog post to see a selection of 3X3 stitches and how they were mixed to create 9X9 squares. This link will take you to the stitched sample for one of the 3X3 mixes. Today’s stitch took this concept one step further by skipping a row in all directions between the 3X3 stitches. Have fun with the endless combinations!

These stitch diagrams, along with all other #whimsicalwednesday and #smallspacesunday stitch diagrams, can also be found on a Pinterest board here. Be sure to follow whimsicalstitch.com on FacebookPinterestInstagram, and Twitter.

IIf you like what you see on this blog, there's more: Mary’s Whimsical Stitches Volume 1 is a contemporary how-to collection of more than 250 stitches for stitchers regardless of skill level. The book includes updated and sequenced diagrams from this blog, all-new stitches, and a chapter on the basics of needlepoint; Mary’s Whimsical Stitches Volume 2 features chapters on Balanced, Beading, Diagonal, Layered, Oblique, Small, and Straight stitches.

Also, you can download for free the first chapter from my first book which covers basic needlepoint stitches and stitch compensation techniques along with new top-line information on needlepoint materials and tools, how to handle threads, and other helpful needlepoint resources.

whimsicalstitch.com also sells Stitch Guides and Stitch Concepts for Melissa Shirley Designs, Zecca DesignsSandra Gilmore, Purple Palm, Maggie, and Penny MacLeod, and many more. Click here to see the newest guides and click here to see the entire collection.

I hope you have the perfect spot for this stitch! Please enjoy! Have a wonderful #whimsicalwednesday!

A Note about Diagrams
I use color in diagrams to make them as clear as possible.  The primary function of different colored lines is to illustrate a stitch sequence.  For example, layering of colors demonstrates you add them in that order.  They can also provide ideas on how to integrate additional threads (one line for each color).  Or, you can use the same thread for all color lines.  That's where I encourage you to use your imagination for the space you are stitching!

Two-fer Part 1

Today’s stitch is the background from a cute little Santa stand-up one of my favorite stitchers is working on. Truth be told, Byzantine stitches are not top of mind for me but I always like them when I see them. Weird, huh?

Click image to see the whimsicalstitch Stitch Library on pinterest.com. Includes all #whimsicalwednesday and #smallspacesunday stitch diagrams.

Click image to see #whimsicalwednesday and #smallspacesunday Stitched Sample Gallery on Instagram.

Click image to see the whimsicalstitch Stitch Library on pinterest.com. Includes all #whimsicalwednesday and #smallspacesunday stitch diagrams.

Today’s stitch is a Tall Byzantine (three rows wide and nine rows tall). The stitched sample uses Pepper Pot Silk on 18M. (The two-fer is NOT the two diagrams. The two-fer is that other stitching on this project will be revealed on this upcoming Sunday as well as a full shot of the Santa.)

I’ve talked about Byzantines before and can offer a variety of earlier examples (here and here). One thing that stands out for me with today’s stitch is the height (obviously). I love how the long vertical columns accentuate the tall, narrow Santa (that you will see next Sunday). Yet, what I really love about this stitch is the horizontal version. Flip the diagram 90° and you have a fantastic water stitch, giving you the ebb and flow of a lake or ocean. It’s really fascinating how the two different directions offer completely different looks.

In addition to backgrounds, I love the tall version for clothing, such as pants or jackets, even a flapper’s dress. Single strand silks or silk floss are excellent choices for those. To jazz it up, consider alternating columns between two different threads (color, finish, or both). You can also fill the empty rows with tent stitches in a contrasting thread for a little more attention. I would love to see the flapper’s dress with silk floss and the empty rows filled with beads! The horizontal version works well for water with Kreinik Metallic or a Petite Silk Lame. It will also make a great ground cover with an overdyed floss or perle cotton.

These stitch diagrams, along with all other #whimsicalwednesday and #smallspacesunday stitch diagrams, can also be found on a Pinterest board here. Be sure to follow whimsicalstitch.com on FacebookPinterestInstagram, and Twitter.

IIf you like what you see on this blog, there's more: Mary’s Whimsical Stitches Volume 1 is a contemporary how-to collection of more than 250 stitches for stitchers regardless of skill level. The book includes updated and sequenced diagrams from this blog, all-new stitches, and a chapter on the basics of needlepoint; Mary’s Whimsical Stitches Volume 2 features chapters on Balanced, Beading, Diagonal, Layered, Oblique, Small, and Straight stitches.

Also, you can download for free the first chapter from my first book which covers basic needlepoint stitches and stitch compensation techniques along with new top-line information on needlepoint materials and tools, how to handle threads, and other helpful needlepoint resources.

whimsicalstitch.com also sells Stitch Guides and Stitch Concepts for Melissa Shirley Designs, Zecca DesignsSandra Gilmore, Purple Palm, Maggie, and Penny MacLeod, and many more. Click here to see the newest guides and click here to see the entire collection.

I hope you have the perfect spot for this stitch! Please enjoy! Have a wonderful #whimsicalwednesday!

A Note about Diagrams
I use color in diagrams to make them as clear as possible.  The primary function of different colored lines is to illustrate a stitch sequence.  For example, layering of colors demonstrates you add them in that order.  They can also provide ideas on how to integrate additional threads (one line for each color).  Or, you can use the same thread for all color lines.  That's where I encourage you to use your imagination for the space you are stitching!

Which Comes First?

Do I start with a stitch idea or a stitched piece for the weekly blog? Well, truth be told, it’s both. The red background from a couple of weeks ago started with the seed of a stitch idea I had and today’s started with a small ornament I recently picked up from the finisher.

Click image to see the whimsicalstitch Stitch Library on pinterest.com. Includes all #whimsicalwednesday and #smallspacesunday stitch diagrams.

Click image to see #whimsicalwednesday and #smallspacesunday Stitched Sample Gallery on Instagram.

Click image to see #whimsicalwednesday and #smallspacesunday Stitched Sample Gallery on Instagram.

Today’s stitched sample, a vintage Melissa Shirley teapot ornament, uses Perle Cotton (black lines) and pink and white Kreinik (yellow and aqua lines). The white Kreinik is barely visible on the stitched samples, but I promise it’s there. The teapot bowl is stitched in a Brick Stitch (diagram here and another stitched sample is here) with DMC Floss or Splendor. (The leaves are double French Knots with overdyed silk ribbons and the flowers are spider roses with silk ribbons.)

I love how the openness of the Diamond Trellis helps the remainder of the full coverage stitching stand out. This stitch makes a great background (as illustrated). Other thread ideas for a background include silk floss (three plies for 18M and five plies for 13M) for the black lines and Silk Lame for the colored lines (Petite Silk Lame for 18M and Silk Lame 18M for 13M). I strongly recommend using a laying tool to keep the plies of floss untangled and flat. (And, for those of you who use your finger for this, you be you. If it keeps it untangled, go for it!) The laying tool (or finger) will make a meaningful difference, I promise.

This stitch will also make a very pretty piece of fabric, such as a sofa or a coat. I recommend two adjustments for this stitch as fabric. First, I would use a size 12 Kreinik for the black lines and a matte thread for the Upright Crosses, say a silk floss for the sofa or Vineyard Silk for the couch. On top of that, I would cover all of the intersections with the Upright Crosses (instead of just every other row). I love the hint of metallic under the silks. It’s an elegant twist on this stitch.

These stitch diagrams, along with all other #whimsicalwednesday and #smallspacesunday stitch diagrams, can also be found on a Pinterest board here. Be sure to follow whimsicalstitch.com on FacebookPinterestInstagram, and Twitter.

IIf you like what you see on this blog, there's more: Mary’s Whimsical Stitches Volume 1 is a contemporary how-to collection of more than 250 stitches for stitchers regardless of skill level. The book includes updated and sequenced diagrams from this blog, all-new stitches, and a chapter on the basics of needlepoint; Mary’s Whimsical Stitches Volume 2 features chapters on Balanced, Beading, Diagonal, Layered, Oblique, Small, and Straight stitches.

Also, you can download for free the first chapter from my first book which covers basic needlepoint stitches and stitch compensation techniques along with new top-line information on needlepoint materials and tools, how to handle threads, and other helpful needlepoint resources.

whimsicalstitch.com also sells Stitch Guides and Stitch Concepts for Melissa Shirley Designs, Zecca DesignsSandra Gilmore, Purple Palm, Maggie, and Penny MacLeod, and many more. Click here to see the newest guides and click here to see the entire collection.

I hope you have the perfect spot for this stitch! Please enjoy! Have a wonderful #whimsicalwednesday!

A Note about Diagrams
I use color in diagrams to make them as clear as possible.  The primary function of different colored lines is to illustrate a stitch sequence.  For example, layering of colors demonstrates you add them in that order.  They can also provide ideas on how to integrate additional threads (one line for each color).  Or, you can use the same thread for all color lines.  That's where I encourage you to use your imagination for the space you are stitching!