Is Pizzazz-y a Word?

If it is, then it describes these pants. If it isn’t, well, it should be because of these pants.

Click on image to see on whimsicalstitch.com's Pinterest account. Visit pinterest.com/whimsicalstitch/whimsicalwednesday for a library of all #whimsicalwednesday and #smallspacesunday stitch diagrams.

Click on image to see on whimsicalstitch.com's Pinterest account. Visit pinterest.com/whimsicalstitch/whimsicalwednesday for a library of all #whimsicalwednesday and #smallspacesunday stitch diagrams.

Click on image to see on whimsicalstitch.com's Instagram account. Visit instagram.com/whimsicalstitch to see a library of stitched samples for select #whimsicalwednesday and #smallspacesunday stitch diagrams.

Click on image to see on whimsicalstitch.com's Instagram account. Visit instagram.com/whimsicalstitch to see a library of stitched samples for select #whimsicalwednesday and #smallspacesunday stitch diagrams.

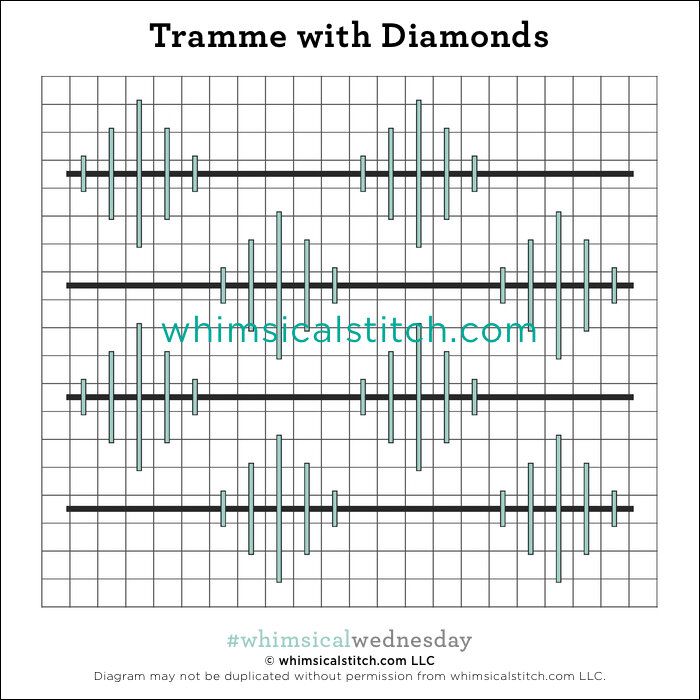
The stitched sample is a pair of trousers for a Thanksgiving standup. It uses two plies of Impressions (aqua lines) and three plies of Lorikeet (black lines). This is from a long, long ago project I worked on with Aristeia Needlepoint.

I’m very glad I stumbled across this piece because it reminds me I need to integrate more overdyed threads into projects and those threads don’t have to be used for trees or flowers (overdyed threads are my general go-to for those). That said, I like these pants because the ratio of solid color to overdyed color is appropriate for me. I love the sassiness of the stripes. And that sassiness is solely due to the Lorikeet.

This stitch would make a great mountainside with a Perle Cotton and overdyed silk or cotton floss. Obviously, it would make a great jacket with the same threads as above. I’m playing with the idea of adding an empty row between the blocks of stitches and using it for a t-shirt with silk floss and Petite Silk Lame. And, when I’m done posting this, I’m going to play with increasing the height of both sets of rows and using it for a background stitch on a current project.

This stitch diagram, along with all other #whimsicalwednesday and #smallspacesunday stitch diagrams, can also be found on a Pinterest board here. Be sure to follow whimsicalstitch.com on FacebookPinterestInstagram, and Twitter.

IIf you like what you see on this blog, there's more: Mary’s Whimsical Stitches Volume 1 is a contemporary how-to collection of more than 250 stitches for stitchers regardless of skill level. The book includes updated and sequenced diagrams from this blog, all-new stitches, and a chapter on the basics of needlepoint; Mary’s Whimsical Stitches Volume 2 features chapters on Balanced, Beading, Diagonal, Layered, Oblique, Small, and Straight stitches.

Also, you can download for free the first chapter from my first book which covers basic needlepoint stitches and stitch compensation techniques along with new top-line information on needlepoint materials and tools, how to handle threads, and other helpful needlepoint resources.

whimsicalstitch.com also sells Stitch Guides and Stitch Concepts for Melissa Shirley Designs, Zecca DesignsSandra Gilmore, Purple Palm, Maggie, and Penny MacLeod, and many more. Click here to see the newest guides and click here to see the entire collection.

I hope you have the perfect spot for this stitch! Please enjoy! Have a wonderful #whimsicalwednesday!

A Note about Diagrams
I use color in diagrams to make them as clear as possible.  The primary function of different colored lines is to illustrate a stitch sequence.  For example, layering of colors demonstrates you add them in that order.  They can also provide ideas on how to integrate additional threads (one line for each color).  Or, you can use the same thread for all color lines.  That's where I encourage you to use your imagination for the space you are stitching!

Back Down the Rabbit Hole

Don’t get me wrong. I love darning stitches, yet I’ve been eager for something other than my go-to darning stitches. Going down that rabbit hole this past weekend landed me on this cute little layered stripe.

Click on image to see on whimsicalstitch.com's Pinterest account. Visit pinterest.com/whimsicalstitch/whimsicalwednesday for a library of all #whimsicalwednesday and #smallspacesunday stitch diagrams.

Click on image to see on whimsicalstitch.com's Pinterest account. Visit pinterest.com/whimsicalstitch/whimsicalwednesday for a library of all #whimsicalwednesday and #smallspacesunday stitch diagrams.

Click on image to see on whimsicalstitch.com's Instagram account. Visit instagram.com/whimsicalstitch to see a library of stitched samples for select #whimsicalwednesday and #smallspacesunday stitch diagrams.

Click on image to see on whimsicalstitch.com's Instagram account. Visit instagram.com/whimsicalstitch to see a library of stitched samples for select #whimsicalwednesday and #smallspacesunday stitch diagrams.

The first layer is what I call the base threads with Petite Silk Lame (gray lines). I covered the base threads with pairs of horizontal stitches over three rows with size 12 Finca Perle (aqua lines). I filled the six rows in between the stripes in Alternating Skip Tent with white Petite Silk Lame (black lines). Truth be told, that could be any stitch you favor. You could do vertical (or horizontal) rows of Continental stitches with an empty row between columns. I strongly considered leaving the white areas completely empty but changed my mind when given the opportunity to add a bit more sparkle.

The great thing about this stitch is its scalability. It will literally work for columns of any width. The top layer of the stripes starts at the outer row and ends one row in from the opposite edge. For wider rows, consider making the groups of straight stitches more than two stitches. This stitch doesn’t need painted stripes to work. I would love to see the stripes on pants with 1-2 empty rows between the stripes. If the pants have shading, leave the rows between the stripes unstitched. If you want to add a stitch, I would stitch in between the stripes in basketweave or a Satin Stitch.

This stitch diagram, along with all other #whimsicalwednesday and #smallspacesunday stitch diagrams, can also be found on a Pinterest board here. Be sure to follow whimsicalstitch.com on FacebookPinterestInstagram, and Twitter.

IIf you like what you see on this blog, there's more: Mary’s Whimsical Stitches Volume 1 is a contemporary how-to collection of more than 250 stitches for stitchers regardless of skill level. The book includes updated and sequenced diagrams from this blog, all-new stitches, and a chapter on the basics of needlepoint. Mary’s Whimsical Stitches Volume 2 features chapters on Balanced, Beading, Diagonal, Layered, Oblique, Small, and Straight stitches.

Also, you can download The Essentials for free. The Essentials is the first chapter from my first book which covers basic needlepoint stitches and stitch compensation techniques along with new top-line information on needlepoint materials and tools, how to handle threads, and other helpful needlepoint resources.

whimsicalstitch.com also sells Stitch Guides and Stitch Concepts for Melissa Shirley Designs, Zecca DesignsSandra Gilmore, Purple Palm, Maggie, and Penny MacLeod, and many more. Click here to see the newest guides and click here to see the entire collection.

I hope you have the perfect spot for this stitch! Please enjoy! Have a wonderful #whimsicalwednesday!

A Note about Diagrams
I use color in diagrams to make them as clear as possible.  The primary function of different colored lines is to illustrate a stitch sequence.  For example, layering of colors demonstrates you add them in that order.  They can also provide ideas on how to integrate additional threads (one line for each color).  Or, you can use the same thread for all color lines.  That's where I encourage you to use your imagination for the space you are stitching!

Gather

This morning’s #smallspacesunday connects the dots with the most recent #smallspacesunday post. And, voila, we have a completed project!

Click on image to see on whimsicalstitch.com's Pinterest account. Visit pinterest.com/whimsicalstitch/whimsicalwednesday for a library of all #whimsicalwednesday and #smallspacesunday stitch diagrams.

Click on image to see on whimsicalstitch.com's Pinterest account. Visit pinterest.com/whimsicalstitch/whimsicalwednesday for a library of all #whimsicalwednesday and #smallspacesunday stitch diagrams.

Click on image to see on whimsicalstitch.com's Instagram account. Visit instagram.com/whimsicalstitch to see a library of stitched samples for select #whimsicalwednesday and #smallspacesunday stitch diagrams.

Click on image to see on whimsicalstitch.com's Instagram account. Visit instagram.com/whimsicalstitch to see a library of stitched samples for select #whimsicalwednesday and #smallspacesunday stitch diagrams.

Today’s stitch is the sky that goes with the snow from the piece I shared with you a few weeks ago. The stitched sample uses three plies of Splendor on 18M. Jump over to the stitched sample on Instagram to see the final piece in its entirety.

I loved the snowflakes that Joanna painted on the canvas and knew I wanted to keep them. I brought some attention to them by stitching the four points in Cross Stitches and then added a size 11 seed bead in the center. Once that was complete, the question was how to keep the background light and vertical (to balance with the horizontal stitch on the snow). As I mentioned with the snow, I was kinda tired of darning stitches and wanted to integrate simple stitches. And blocks of five tent stitches is about as simple as it can get. I added the 3X3 squares to liven it up a little and absolutely love it.

This stitch will make really cute wallpaper, especially if you alternate colors or thread finishes (or both) between the vertical columns. I want to play with it for a window stitch with Petite Silk Lame or a lightweight Kreinik. I suspect that might be a fun surprise on a larger window.

These stitch diagrams, along with all other #whimsicalwednesday and #smallspacesunday stitch diagrams, can also be found on a Pinterest board here. Be sure to follow whimsicalstitch.com on FacebookPinterestInstagram, and Twitter.

If you like what you see on this blog, there's more: Mary’s Whimsical Stitches Volume 1 is a contemporary how-to collection of more than 250 stitches for stitchers regardless of skill level. The book includes updated and sequenced diagrams from this blog, all-new stitches, and a chapter on the basics of needlepoint; Mary’s Whimsical Stitches Volume 2 features chapters on Balanced, Beading, Diagonal, Layered, Oblique, Small, and Straight stitches.

Also, you can download The Essentials, a free guide covering basic needlepoint stitches and stitch compensation techniques along with new top-line information on needlepoint materials and tools, how to handle threads, and other helpful needlepoint resources.

whimsicalstitch.com also sells Stitch Guides and Stitch Concepts for Melissa Shirley Designs, Zecca DesignsSandra Gilmore, Purple Palm, Maggie, and Penny MacLeod, and many more. Click here to see the newest guides and click here to see the entire collection.

I hope you have the perfect spot for this stitch! Please enjoy! Have a wonderful #whimsicalwednesday!

A Note about Diagrams
I use color in diagrams to make them as clear as possible.  The primary function of different colored lines is to illustrate a stitch sequence.  For example, layering of colors demonstrates you add them in that order.  They can also provide ideas on how to integrate additional threads (one line for each color).  Or, you can use the same thread for all color lines.  That's where I encourage you to use your imagination for the space you are stitching!

Joy!

Everything about today’s stitched sample gives me joy. The colors, the threads, and the adorable red nose.

Click on image to see on whimsicalstitch.com's Pinterest account. Visit pinterest.com/whimsicalstitch/whimsicalwednesday for a library of all #whimsicalwednesday and #smallspacesunday stitch diagrams.

Click on image to see on whimsicalstitch.com's Pinterest account. Visit pinterest.com/whimsicalstitch/whimsicalwednesday for a library of all #whimsicalwednesday and #smallspacesunday stitch diagrams.

Click on image to see on whimsicalstitch.com's Instagram account. Visit instagram.com/whimsicalstitch to see a library of stitched samples for select #whimsicalwednesday and #smallspacesunday stitch diagrams.

Click on image to see on whimsicalstitch.com's Instagram account. Visit instagram.com/whimsicalstitch to see a library of stitched samples for select #whimsicalwednesday and #smallspacesunday stitch diagrams.

Today’s stitch is a(nother) Tramme stitch with Kreinik size 12 (black lines) and Elegance (aqua lines). I wrote at length about tramme stitches here (if you are interested). The canvas is from Pepperberry Designs.

This stitch has so much potential for clothing with Vineyard Silk (black lines) and Silk Lame (aqua lines). Or reverse the two if you want a more subtle combo. It will add a lot of interest to a roof or chimney with two related hues of Elegance. I’m also looking forward to using it with a solid single strand silk (black lines) and an overdyed silk floss or metallic on top (aqua lines) for a tree.

These stitch diagrams, along with all other #whimsicalwednesday and #smallspacesunday stitch diagrams, can also be found on a Pinterest board here. Be sure to follow whimsicalstitch.com on FacebookPinterestInstagram, and Twitter.

If you like what you see on this blog, there's more: Mary’s Whimsical Stitches Volume 1 is a contemporary how-to collection of more than 250 stitches for stitchers regardless of skill level. The book includes updated and sequenced diagrams from this blog, all-new stitches, and a chapter on the basics of needlepoint; Mary’s Whimsical Stitches Volume 2 features chapters on Balanced, Beading, Diagonal, Layered, Oblique, Small, and Straight stitches.

Also, you can download The Essentials, a free guide covering basic needlepoint stitches and stitch compensation techniques along with new top-line information on needlepoint materials and tools, how to handle threads, and other helpful needlepoint resources.

whimsicalstitch.com also sells Stitch Guides and Stitch Concepts for Melissa Shirley Designs, Zecca DesignsSandra Gilmore, Purple Palm, Maggie, and Penny MacLeod, and many more. Click here to see the newest guides and click here to see the entire collection.

I hope you have the perfect spot for this stitch! Please enjoy! Have a wonderful #whimsicalwednesday!

A Note about Diagrams
I use color in diagrams to make them as clear as possible.  The primary function of different colored lines is to illustrate a stitch sequence.  For example, layering of colors demonstrates you add them in that order.  They can also provide ideas on how to integrate additional threads (one line for each color).  Or, you can use the same thread for all color lines.  That's where I encourage you to use your imagination for the space you are stitching!

Hello Your Majesty

Hydrangeas! Pink! Spring has sprung on this morning’s #whimsicalwednesday.

Click on image to see on whimsicalstitch.com's Pinterest account. Visit pinterest.com/whimsicalstitch/whimsicalwednesday for a library of all #whimsicalwednesday and #smallspacesunday stitch diagrams.

Click on image to see on whimsicalstitch.com's Pinterest account. Visit pinterest.com/whimsicalstitch/whimsicalwednesday for a library of all #whimsicalwednesday and #smallspacesunday stitch diagrams.

Click on image to see on whimsicalstitch.com's Instagram account. Visit instagram.com/whimsicalstitch to see a library of stitched samples for select #whimsicalwednesday and #smallspacesunday stitch diagrams.

Click on image to see on whimsicalstitch.com's Instagram account. Visit instagram.com/whimsicalstitch to see a library of stitched samples for select #whimsicalwednesday and #smallspacesunday stitch diagrams.

Today’s stitch is a variation I have admired over the years and was thrilled that Patty from Stitch-Stash shared her stitched sample with us. It’s a far more glamorous version of the Crown Stitch and makes me smile. The stitched sample is Vineyard Silk (black lines), Flair (yellow lines), and 2mm pearls (aqua circles). As you can see, it’s a fabulous background stitch for a colorful bag of hydrangeas by Laura Megroz. (Also, hydrangeas are a favorite flower, so this piece gives me all the smiles.)

A quick note on the pearls. They are not obvious on the stitched sample because I wanted to show as much background as possible for the full effect. I promise pearls are on the stitched sample and I promise they are adorable. In addition, there is not a line (representing beading thread) through the circles representing the pearls on the diagram. I recommend bringing the beading thread up and down through the same hole (a technique I’ve yet to replicate on a blog diagram). This works well with pearls because, unlike seed beads, they are perfectly round. Consider using a single strand (not doubled) of your beading thread with the pearls and securing them twice with the thread. I’ve learned the hard way that attaching single beads (or pearls) twice provides extra protection from getting snagged or loosening over time, especially if you are planning on fabricating your project into a pillow.

Clearly, this is a great stitch for a large area such as a background. I think Patty did a great job of balancing this glamorous background with simple elegant stitches for the remainder of the piece. That said, there are some rather large canvases that this stitch could be part of a menagerie of decorative stitches. Kathryn Molineux has some simply stunning large pieces where this stitch would work in many of the areas. (The website doesn’t have unique pages for projects but it does have a search function that helps illustrate this point. Along the top banner, it has a pulldown menu for Project Size. Select “Even Larger”.) This stitch would be a beautiful addition to one of the tall borders with two shades of a lightweight metallic (such as Petite Silk Lame). This stitch would be a fantastic coat stitch for one of Amanda Lawford’s large Santas (30” tall). (Scroll down to see the largest Santas.) I would love to use Very Velvet and a Kreinik Metallic for one of those coats. I would use appropriately sized sequin with a contrasting bead in lieu of the pearls.

These stitch diagrams, along with all other #whimsicalwednesday and #smallspacesunday stitch diagrams, can also be found on a Pinterest board here. Be sure to follow whimsicalstitch.com on FacebookPinterestInstagram, and Twitter.

If you like what you see on this blog, there's more: Mary’s Whimsical Stitches Volume 1 is a contemporary how-to collection of more than 250 stitches for stitchers regardless of skill level. The book includes updated and sequenced diagrams from this blog, all-new stitches, and a chapter on the basics of needlepoint; Mary’s Whimsical Stitches Volume 2 features chapters on Balanced, Beading, Diagonal, Layered, Oblique, Small, and Straight stitches.

Also, you can download The Essentials, a free guide covering basic needlepoint stitches and stitch compensation techniques along with new top-line information on needlepoint materials and tools, how to handle threads, and other helpful needlepoint resources.

whimsicalstitch.com also sells Stitch Guides and Stitch Concepts for Melissa Shirley Designs, Zecca DesignsSandra Gilmore, Purple Palm, Maggie, and Penny MacLeod, and many more. Click here to see the newest guides and click here to see the entire collection.

I hope you have the perfect spot for this stitch! Please enjoy! Have a wonderful #whimsicalwednesday!

A Note about Diagrams
I use color in diagrams to make them as clear as possible.  The primary function of different colored lines is to illustrate a stitch sequence.  For example, layering of colors demonstrates you add them in that order.  They can also provide ideas on how to integrate additional threads (one line for each color).  Or, you can use the same thread for all color lines.  That's where I encourage you to use your imagination for the space you are stitching!

How it Started…How it’s Going

Today’s post continues the theme from this past Sunday. I know what I always do and I want something different.

Click on the image to see on whimsicalstitch.com's Pinterest account. Visit pinterest.com/whimsicalstitch/whimsicalwednesday for a library of all #whimsicalwednesday and #smallspacesunday stitch diagrams.

Click on the image to see on whimsicalstitch.com's Pinterest account. Visit pinterest.com/whimsicalstitch/whimsicalwednesday for a library of all #whimsicalwednesday and #smallspacesunday stitch diagrams.

Click on the image to see on whimsicalstitch.com's Pinterest account. Visit pinterest.com/whimsicalstitch/whimsicalwednesday for a library of all #whimsicalwednesday and #smallspacesunday stitch diagrams.

Click on the image to see on whimsicalstitch.com's Pinterest account. Visit pinterest.com/whimsicalstitch/whimsicalwednesday for a library of all #whimsicalwednesday and #smallspacesunday stitch diagrams.

Click on image to see on whimsicalstitch.com's Instagram account. Visit instagram.com/whimsicalstitch to see a library of stitched samples for select #whimsicalwednesday and #smallspacesunday stitch diagrams.

Click on image to see on whimsicalstitch.com's Instagram account. Visit instagram.com/whimsicalstitch to see a library of stitched samples for select #whimsicalwednesday and #smallspacesunday stitch diagrams.

I needed a stitch for a cute little basket. It just so happened the canvas was painted in an almost perfect match to a 2X6 Alternating Cashmere stitch (far left diagram). Cute, right? But I’ve done too many Alternating Cashmere stitches to count. (You want proof of that? Here, here, and here.)

I wanted something different but couldn’t see past the way the canvas was painted and I knew it was right to stitch it in that pattern. After a lot of staring and getting up to go to the kitchen too many times to count, I landed on the solution…a 2X6 layered stitch (middle image). I love the texture the layers in the 2X6 areas adds. The stitched sample uses two colors of DMC Cotton Floss (gray lines and aqua lines) and Petite Silk Lame (yellow lines) on 13M.

This stitch will work really well for virtually any winter clothing…pants, sweaters, or a hat as thought starters. Any or all of those will work well with overdyed wool (gray and aqua lines) and a solid colored metallic such as Flair or Fyre Werks. The stitch also has the right texture for a weathered roof, using Rainbow Linen. I would eliminate the Smyrna Cross accent (yellow lines) for that scenario. And last, but not least, I’m looking forward to using it for an outdoor floor with silk floss (gray and aqua lines) and a lightweight metallic, such as Petite Silk Lame, for the yellow lines.

These stitch diagrams, along with all other #whimsicalwednesday and #smallspacesunday stitch diagrams, can also be found on a Pinterest board here. Be sure to follow whimsicalstitch.com on FacebookPinterestInstagram, and Twitter.

If you like what you see on this blog, there's more: Mary’s Whimsical Stitches Volume 1 is a contemporary how-to collection of more than 250 stitches for stitchers regardless of skill level. The book includes updated and sequenced diagrams from this blog, all-new stitches, and a chapter on the basics of needlepoint; Mary’s Whimsical Stitches Volume 2 features chapters on Balanced, Beading, Diagonal, Layered, Oblique, Small, and Straight stitches.

Also, you can download The Essentials, a free guide covering basic needlepoint stitches and stitch compensation techniques along with new top-line information on needlepoint materials and tools, how to handle threads, and other helpful needlepoint resources.

whimsicalstitch.com also sells Stitch Guides and Stitch Concepts for Melissa Shirley Designs, Zecca DesignsSandra Gilmore, Purple Palm, Maggie, and Penny MacLeod, and many more. Click here to see the newest guides and click here to see the entire collection.

I hope you have the perfect spot for this stitch! Please enjoy! Have a wonderful #whimsicalwednesday!

A Note about Diagrams
I use color in diagrams to make them as clear as possible.  The primary function of different colored lines is to illustrate a stitch sequence.  For example, layering of colors demonstrates you add them in that order.  They can also provide ideas on how to integrate additional threads (one line for each color).  Or, you can use the same thread for all color lines.  That's where I encourage you to use your imagination for the space you are stitching!

Tiny Crowns

After a long hiatus, #smallspacesunday returns with a sweet little stitch that reminds me of tiny crowns.

Click on image to see on whimsicalstitch.com's Pinterest account. Visit pinterest.com/whimsicalstitch/whimsicalwednesday for a library of all #whimsicalwednesday and #smallspacesunday stitch diagrams.

Click on image to see on whimsicalstitch.com's Pinterest account. Visit pinterest.com/whimsicalstitch/whimsicalwednesday for a library of all #whimsicalwednesday and #smallspacesunday stitch diagrams.

Click on image to see on whimsicalstitch.com's Instagram account. Visit instagram.com/whimsicalstitch to see a library of stitched samples for select #whimsicalwednesday and #smallspacesunday stitch diagrams.

Click on image to see on whimsicalstitch.com's Instagram account. Visit instagram.com/whimsicalstitch to see a library of stitched samples for select #whimsicalwednesday and #smallspacesunday stitch diagrams.

Today’s stitch is the snow under some snowmen with a white Kreinik Metallics Fine Braid (#8) from my stash on 18M.

My go-to stitches for snow are darning stitches on the horizontal axis, or some sort of horizontal straight stitch, with a lightweight metallic to highlight any shading and/or to keep the area light so the focus will go elsewhere. Even when you don’t factor in teaching projects, I get tired of my go-to stitches. Factor in teaching projects and, well, you can understand why I was hungry for something different. The inspiration for this stitch came from the last page of the Lagniappe section of the Lone Star’s Grab ‘N Go stitches. I combined the two directions they offered and added more space between the rows for more separation between the rows.

And I’m thrilled with it and can’t wait to use it for water with two colors of Petite Silk Lame or size 8 Kreinik (on 18M). I’m looking forward to flipping the stitch 90° and using it for a tree trunk with Rainbow Linen or a Burmilana Wool.

I elaborated on the origin of this stitch because I was hoping you would have two takeaways. The first is that any stitch book has more inspiration than just the stitches included in it. Many of my composite stitches, especially from my earliest blogs and from both books, find their inspiration in grand and complex composite stitches that I really liked but were not perfect for me. My solution was to remove one or two elements of the inspiring stitch and, voila, I thought they were perfect. Alternatively, feel free to add things! You can rarely go wrong with adding beads to a stitch. I find that skipping a row or rows in any stitch is a great way to find new things. I did a whole post about that a few years ago. You can find it here.

These stitch diagrams, along with all other #whimsicalwednesday and #smallspacesunday stitch diagrams, can also be found on a Pinterest board here. Be sure to follow whimsicalstitch.com on FacebookPinterestInstagram, and Twitter.

If you like what you see on this blog, there's more: Mary’s Whimsical Stitches Volume 1 is a contemporary how-to collection of more than 250 stitches for stitchers regardless of skill level. The book includes updated and sequenced diagrams from this blog, all-new stitches, and a chapter on the basics of needlepoint; Mary’s Whimsical Stitches Volume 2 features chapters on Balanced, Beading, Diagonal, Layered, Oblique, Small, and Straight stitches.

Also, you can download The Essentials, a free guide covering basic needlepoint stitches and stitch compensation techniques along with new top-line information on needlepoint materials and tools, how to handle threads, and other helpful needlepoint resources.

whimsicalstitch.com also sells Stitch Guides and Stitch Concepts for Melissa Shirley Designs, Zecca DesignsSandra Gilmore, Purple Palm, Maggie, and Penny MacLeod, and many more. Click here to see the newest guides and click here to see the entire collection.

I hope you have the perfect spot for this stitch! Please enjoy! Have a wonderful #whimsicalwednesday!

A Note about Diagrams
I use color in diagrams to make them as clear as possible.  The primary function of different colored lines is to illustrate a stitch sequence.  For example, layering of colors demonstrates you add them in that order.  They can also provide ideas on how to integrate additional threads (one line for each color).  Or, you can use the same thread for all color lines.  That's where I encourage you to use your imagination for the space you are stitching!

Stash is a Four Letter Word

Today’s stitch comes from a long-forgotten WIP that I stumbled across last weekend as I was rearranging my shipping room…because that’s where all stitches come from, right?

Click on image to see on whimsicalstitch.com's Pinterest account. Visit pinterest.com/whimsicalstitch/whimsicalwednesday for a library of all #whimsicalwednesday and #smallspacesunday stitch diagrams.

Click on image to see on whimsicalstitch.com's Pinterest account. Visit pinterest.com/whimsicalstitch/whimsicalwednesday for a library of all #whimsicalwednesday and #smallspacesunday stitch diagrams.

Click on image to see on whimsicalstitch.com's Instagram account. Visit instagram.com/whimsicalstitch to see a library of stitched samples for select #whimsicalwednesday and #smallspacesunday stitch diagrams.

Click on image to see on whimsicalstitch.com's Instagram account. Visit instagram.com/whimsicalstitch to see a library of stitched samples for select #whimsicalwednesday and #smallspacesunday stitch diagrams.

The stitched sample is size 12 Perle Cotton (black lines) and a size 8 Kreinik (gray lines) on 18M. It’s the background for an adorable Melissa Shirley stand-up Christmas Tree.

My best advice for this stitch is to stitch each square one at a time, beginning and ending a thread within each square. That is the best way to eliminate the possibility of visible threads. An alternative is to do the groups of five tent stitches first and then slide your thread under the back of the tent stitches as you travel between 5X5 squares. The 3X3’s should still be stitched independently.

I am looking forward to finishing this project in my lifetime. I am also looking forward to including this stitch in a stitch plan for wallpaper with Silk Floss (for the 5X5 squares and the groups of five tent stitches) and Petite Silk Lame for the 3X3 squares. I can’t lie. As I stare at it, I can’t help but want to try it in a large window, say from one of Sandra Gilmore’s exquisite room pieces. I suspect I would use a single lightweight metallic in that scenario. Now I need to find one of the rooms to play with.

These stitch diagrams, along with all other #whimsicalwednesday and #smallspacesunday stitch diagrams, can also be found on a Pinterest board here. Be sure to follow whimsicalstitch.com on FacebookPinterestInstagram, and Twitter.

If you like what you see on this blog, there's more: Mary’s Whimsical Stitches Volume 1 is a contemporary how-to collection of more than 250 stitches for stitchers regardless of skill level. The book includes updated and sequenced diagrams from this blog, all-new stitches, and a chapter on the basics of needlepoint; Mary’s Whimsical Stitches Volume 2 features chapters on Balanced, Beading, Diagonal, Layered, Oblique, Small, and Straight stitches.

Also, you can download The Essentials, a free guide covering basic needlepoint stitches and stitch compensation techniques along with new top-line information on needlepoint materials and tools, how to handle threads, and other helpful needlepoint resources.

whimsicalstitch.com also sells Stitch Guides and Stitch Concepts for Melissa Shirley Designs, Zecca DesignsSandra Gilmore, Purple Palm, Maggie, and Penny MacLeod, and many more. Click here to see the newest guides and click here to see the entire collection.

I hope you have the perfect spot for this stitch! Please enjoy! Have a wonderful #whimsicalwednesday!

A Note about Diagrams
I use color in diagrams to make them as clear as possible.  The primary function of different colored lines is to illustrate a stitch sequence.  For example, layering of colors demonstrates you add them in that order.  They can also provide ideas on how to integrate additional threads (one line for each color).  Or, you can use the same thread for all color lines.  That's where I encourage you to use your imagination for the space you are stitching!

Meet the Neighbors!

Today’s stitch comes from last week’s project. It’s another cute full coverage stitch that will work almost anywhere.

Click on image to see on whimsicalstitch.com's Pinterest account. Visit pinterest.com/whimsicalstitch/whimsicalwednesday for a library of all #whimsicalwednesday and #smallspacesunday stitch diagrams.

Click on image to see on whimsicalstitch.com's Pinterest account. Visit pinterest.com/whimsicalstitch/whimsicalwednesday for a library of all #whimsicalwednesday and #smallspacesunday stitch diagrams.

Click on image to see on whimsicalstitch.com's Instagram account. Visit instagram.com/whimsicalstitch to see a library of stitched samples for select #whimsicalwednesday and #smallspacesunday stitch diagrams.

Click on image to see on whimsicalstitch.com's Instagram account. Visit instagram.com/whimsicalstitch to see a library of stitched samples for select #whimsicalwednesday and #smallspacesunday stitch diagrams.

The stitch is from a neighboring square at the bottom of the stocking from last week. The stitched sample is two strands of Impressions (black lines) and Shimmer Ribbon (yellow lines) on 13M. As I mentioned last week, I don’t have a clear recollection of where I stumbled across the stitches. However, I’m confident I selected this stitch because it fit the 12X12 square perfectly. And, yes, the upper right-hand corner is wonky and I have no idea what I did with that corner.

It’s another great all-purpose stitch. I will use it again for a riff on a checkerboard floor with black and white silk floss. It will make a pretty jacket with Elegance (black lines) and Petite Silk Lame (yellow lines). Consider lightening it up with two strands of silk floss (black lines) and a size 4 Kreinik Metallic (yellow lines) for a tabletop (on 18M).

These stitch diagrams, along with all other #whimsicalwednesday and #smallspacesunday stitch diagrams, can also be found on a Pinterest board here. Be sure to follow whimsicalstitch.com on FacebookPinterestInstagram, and Twitter.

If you like what you see on this blog, there's more: Mary’s Whimsical Stitches Volume 1 is a contemporary how-to collection of more than 250 stitches for stitchers regardless of skill level. The book includes updated and sequenced diagrams from this blog, all-new stitches, and a chapter on the basics of needlepoint; Mary’s Whimsical Stitches Volume 2 features chapters on Balanced, Beading, Diagonal, Layered, Oblique, Small, and Straight stitches.

Also, you can download The Essentials, a free guide covering basic needlepoint stitches and stitch compensation techniques along with new top-line information on needlepoint materials and tools, how to handle threads, and other helpful needlepoint resources.

whimsicalstitch.com also sells Stitch Guides and Stitch Concepts for Melissa Shirley Designs, Zecca DesignsSandra Gilmore, Purple Palm, Maggie, and Penny MacLeod, and many more. Click here to see the newest guides and click here to see the entire collection.

I hope you have the perfect spot for this stitch! Please enjoy! Have a wonderful #whimsicalwednesday!

A Note about Diagrams
I use color in diagrams to make them as clear as possible.  The primary function of different colored lines is to illustrate a stitch sequence.  For example, layering of colors demonstrates you add them in that order.  They can also provide ideas on how to integrate additional threads (one line for each color).  Or, you can use the same thread for all color lines.  That's where I encourage you to use your imagination for the space you are stitching!
Such a Good Kid

Today’s stitch comes from a stocking I did for one of my favorite kids ten years ago. So, said kid is at least two heads taller than me now but still thanks me for the stocking…every single Christmas. I adore him.

Click on image to see on whimsicalstitch.com's Pinterest account. Visit pinterest.com/whimsicalstitch/whimsicalwednesday for a library of all #whimsicalwednesday and #smallspacesunday stitch diagrams.

Click on image to see on whimsicalstitch.com's Pinterest account. Visit pinterest.com/whimsicalstitch/whimsicalwednesday for a library of all #whimsicalwednesday and #smallspacesunday stitch diagrams.

Click on image to see on whimsicalstitch.com's Instagram account. Visit instagram.com/whimsicalstitch to see a library of stitched samples for select #whimsicalwednesday and #smallspacesunday stitch diagrams.

Click on image to see on whimsicalstitch.com's Instagram account. Visit instagram.com/whimsicalstitch to see a library of stitched samples for select #whimsicalwednesday and #smallspacesunday stitch diagrams.

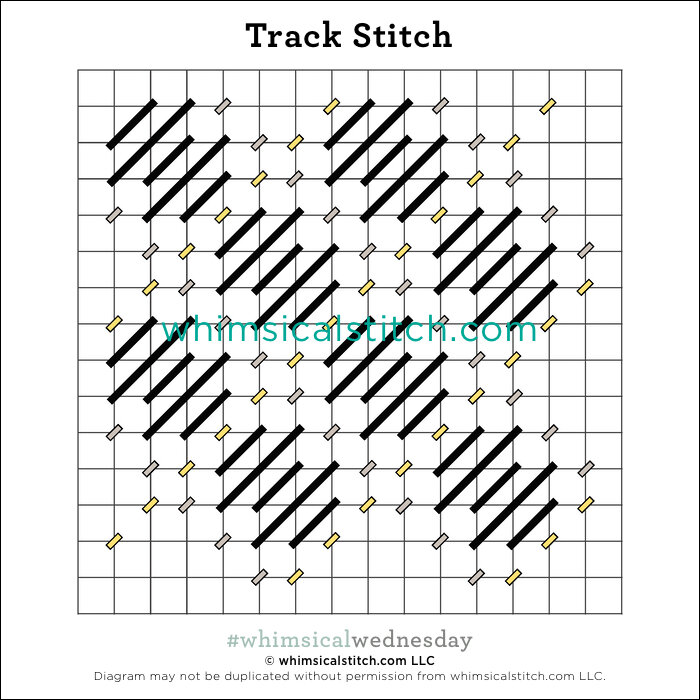
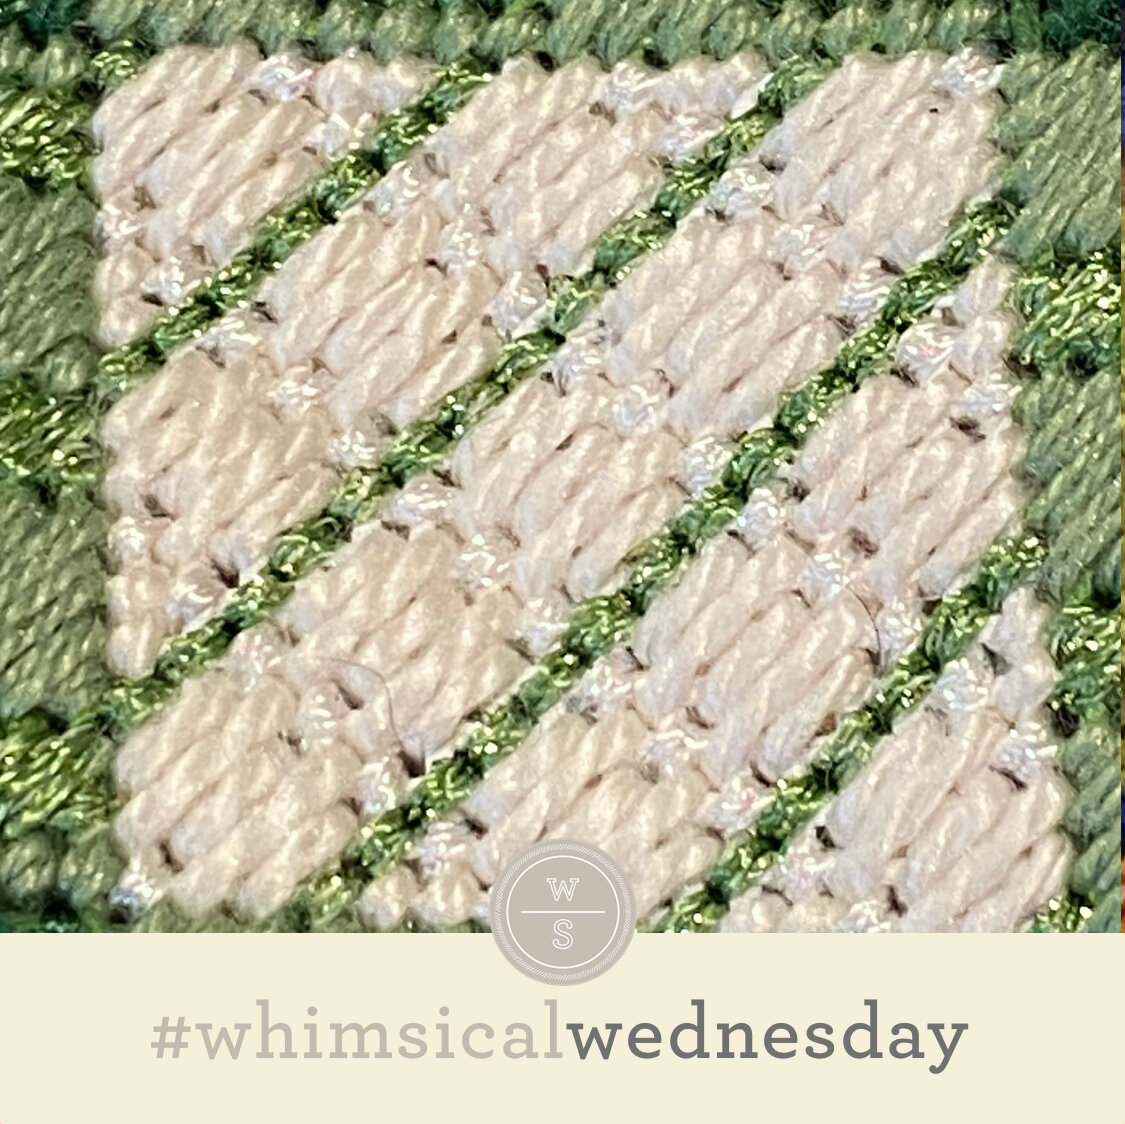
Since I stitched this almost ten years ago, I don’t have a clear recollection of where I stumbled across this stitch. What I do remember is I loved it the moment I saw it. Diagonal stitches are not my forte but the contrasting diagonal stripe made all the difference for me. That simple and uncommon accent makes this stitch sing for me. The stitched sample is Pepper Pot Silk (black lines), white Shimmer (gray lines), and green Shimmer (yellow lines). It’s one of three patterns in a checked pattern at the bottom of a Melissa Shirley stocking.

It’s a great all-purpose diagonal stitch. I’m looking forward to including it in a stitch plan for a wooly coat with Burmilana (black lines), a mild metallic such as Glisten (yellow lines), and a darker Burmilana (gray lines). There are many household objects that this will work for, such as a blanket or a pillow. I would love to see it as a blanket with Alpaca (black lines), Silk Lame (yellow lines), and a contrasting Silk Lame (gray lines).

These stitch diagrams, along with all other #whimsicalwednesday and #smallspacesunday stitch diagrams, can also be found on a Pinterest board here.

Be sure to follow whimsicalstitch.com on FacebookPinterestInstagram, and Twitter.

IIf you like what you see on this blog, there's more: Mary’s Whimsical Stitches Volume 1 is a contemporary how-to collection of more than 250 stitches for stitchers regardless of skill level. The book includes updated and sequenced diagrams from this blog, all-new stitches, and a chapter on the basics of needlepoint; Mary’s Whimsical Stitches Volume 2 features chapters on Balanced, Beading, Diagonal, Layered, Oblique, Small, and Straight stitches.

Also, you can download The Essentials, a free guide covering basic needlepoint stitches and stitch compensation techniques along with new top-line information on needlepoint materials and tools, how to handle threads, and other helpful needlepoint resources.

whimsicalstitch.com also sells Stitch Guides and Stitch Concepts for Melissa Shirley Designs, Zecca DesignsSandra Gilmore, Purple Palm, Maggie, and Penny MacLeod, and many more. Click here to see the newest guides and click here to see the entire collection.

I hope you have the perfect spot for this stitch! Please enjoy! Have a wonderful #whimsicalwednesday!

A Note about Diagrams
I use color in diagrams to make them as clear as possible.  The primary function of different colored lines is to illustrate a stitch sequence.  For example, layering of colors demonstrates you add them in that order.  They can also provide ideas on how to integrate additional threads (one line for each color).  Or, you can use the same thread for all color lines.  That's where I encourage you to use your imagination for the space you are stitching!