Being Wrong is Occasionally Fun

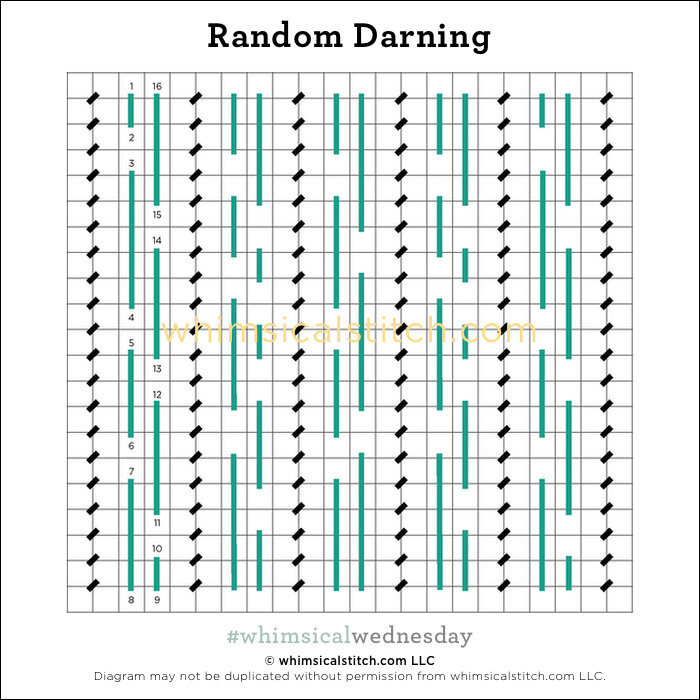
I’m not sure what I like more about today’s stitch…how it uses an overdyed thread or the fact the darning stitches are random. Regardless of the answer, I can’t wait to integrate this into an upcoming project.

Click on image to see on whimsicalstitch.com's Pinterest account. Visit pinterest.com/whimsicalstitch/whimsicalwednesday for a library of all #whimsicalwednesday and #smallspacesunday stitch diagrams.

Click on image to see on whimsicalstitch.com's Pinterest account. Visit pinterest.com/whimsicalstitch/whimsicalwednesday for a library of all #whimsicalwednesday and #smallspacesunday stitch diagrams.

Click on image to see on whimsicalstitch.com's Instagram account. Visit instagram.com/whimsicalstitch to see a library of stitched samples for select #whimsicalwednesday and #smallspacesunday stitch diagrams.

Click on image to see on whimsicalstitch.com's Instagram account. Visit instagram.com/whimsicalstitch to see a library of stitched samples for select #whimsicalwednesday and #smallspacesunday stitch diagrams.

I numbered the darning sequence in one of the columns simply to remind you that darning stitches are similar to running stitches, traveling across or down a straight axis, creating a smooth stitch versus the crisp wrapped edge of a traditional needlepoint stitch. Make sure you have enough thread to complete a row from edge to edge, as ending a darning stitch mid-row creates an uneven look.

A tiny bit of background. I love overdyed threads and, as you may know by now, I love me my darning stitches. Prior to a dear stitching friend sharing this stitch with me, I would have said I use overdyed thread sparingly and typically for leaves, flowers, and water. I rarely, if ever, used overdyed thread for basketweave or continental stitches. And darning stitches always involved distinct, repeated sequences.

Yeah…I was wrong. The combination of this darning idea with the overdyed is just charming. It’s everything I would have said no to and I love it.

The stitched sample is an exterior wall with Gloriana Silk Floss (black lines) and Perle Cotton (turquoise lines).

I plan on using this stitch for tree trunks with two colors of Impressions or a pair of pants with overdyed silk floss (black lines) and solid silk floss (turquoise lines). Flip the stitch 90° and use it for a green field with overdyed silk floss or overdyed wool (black lines) with a single strand silk (turquoise lines).

Something to remember…you can make the columns of darning stitches as wide as you need. Say, five rows of darning for every column of Continental stitches. It’s up to you!

This stitch diagram, along with all other #whimsicalwednesday and #smallspacesunday stitch diagrams, can also be found on a Pinterest board here.

Be sure to follow whimsicalstitch.com on FacebookPinterestInstagram, and Twitter.

If you like what you see on this blog, want to learn some very creative decorative stitches, and how to put them all together, whimsicalstitch.com has a book for you! Mary’s Whimsical Stitches is a contemporary how-to collection of more than 250 stitches for stitchers regardless of skill level. The book includes updated and sequenced diagrams from this blog, all-new stitches, and a chapter on the basics of needlepoint. For more information, visit here.

whimsicalstitch.com also sells Stitch Guides and Stitch Concepts for Melissa Shirley Designs, Zecca DesignsSandra Gilmore, Purple Palm, Maggie, and Penny MacLeod, and many more. Click here to see the newest guides and click here to see the entire collection.

I hope you have the perfect spot for this stitch! Please enjoy! Have a wonderful #whimsicalwednesday!

A Note about Diagrams
I use color in diagrams to make them as clear as possible.  The primary function of different colored lines is to illustrate a stitch sequence.  For example, layering of colors demonstrates you add them in that order.  They can also provide ideas on how to integrate additional threads (one line for each color).  Or, you can use the same thread for all color lines.  That's where I encourage you to use your imagination for the space you are stitching!

Or What?

Or Nue is an exquisite goldwork embroidery technique that translates perfectly to needlepoint. Today’s post focuses on very simple Or Nue with standard needlepoint threads. Two examples are provided, illustrating a solid color and a pattern.

Very simply put, Or Nue combines pairs of threads on canvas with one thread covering the second thread. It’s similar to couching. However, I consider couching as a method to tack down a piece of thread on top of the canvas at strategic points to keep a shape, say attaching a piece of cording as a tendril. My version* of Or Nue covers the entirety of one of the threads in the pair with the second, creating beautiful ridges. * I use the expression “my version” because Or Nue is a elaborate technique in embroidery using silver-gilt (gold) threads, e.g. Japan Gold. A very simplified version of it is being shared here.

Click on image to see on whimsicalstitch.com's Pinterest account. Visit pinterest.com/whimsicalstitch/whimsicalwednesday for a library of all #whimsicalwednesday and #smallspacesunday stitch diagrams.

Click on image to see on whimsicalstitch.com's Pinterest account. Visit pinterest.com/whimsicalstitch/whimsicalwednesday for a library of all #whimsicalwednesday and #smallspacesunday stitch diagrams.

Click on image to see on whimsicalstitch.com's Instagram account. Visit instagram.com/whimsicalstitch to see a library of stitched samples for select #whimsicalwednesday and #smallspacesunday stitch diagrams.

Click on image to see on whimsicalstitch.com's Instagram account. Visit instagram.com/whimsicalstitch to see a library of stitched samples for select #whimsicalwednesday and #smallspacesunday stitch diagrams.

The first example above illustrates a solid color Or Nue. I numbered two separate threads in a single sequence to illustrate how to navigate the multiple threads. It’s important to complete an entire row with both threads before you proceed to the next row.

To begin, add your base thread from edge to edge on a single row (black line, step 1-2). The base thread rests in the ditch between two canvas threads. Park the first thread on the side and bring your second needle up from the hole under the first thread and return the needle in the hole immediately above, gently pulling the base thread on top of the canvas thread above. Repeat this step across the row. When you get to the end with the second thread, park it to the side and return to your first thread. Add your next base thread from edge to edge and cover with the second thread. (The numbering may appear odd but remember you are picking up your work from where you last left the thread.)

The stitched sample uses size 16 Kreinik for the base threads (black lines) and Flair for every other row of the covering stitches (gray lines) and the same size 16 Kreinik for the remaining rows of the covering stitches (gray lines).

The next example illustrates how to create a pattern. The diagram below is virtually identical, except for the numbering for the threads on top of the base threads.

Click on image to see on whimsicalstitch.com's Pinterest account. Visit pinterest.com/whimsicalstitch/whimsicalwednesday for a library of all #whimsicalwednesday and #smallspacesunday stitch diagrams.

Click on image to see on whimsicalstitch.com's Pinterest account. Visit pinterest.com/whimsicalstitch/whimsicalwednesday for a library of all #whimsicalwednesday and #smallspacesunday stitch diagrams.

Click on image to see on whimsicalstitch.com's Instagram account. Visit instagram.com/whimsicalstitch to see a library of stitched samples for select #whimsicalwednesday and #smallspacesunday stitch diagrams.

Click on image to see on whimsicalstitch.com's Instagram account. Visit instagram.com/whimsicalstitch to see a library of stitched samples for select #whimsicalwednesday and #smallspacesunday stitch diagrams.

The diagram certainly does not portray the stitched sample on the right BUT represents the numbering strategy. Simply put, when using more than one color for the top threads in a row, add each color one at a time. I like to add the color with the smallest representation first and end with the color with the most real estate. For example, in the stitched sample, I added the silver first in any row that needed it and then filled in the cream threads.

Let’s talk about threads because one thread choice really matters. Earlier, I mentioned how Or Nue creates small ridges. The base thread is what makes that work. The base thread needs to be a roundish shaped thread that holds its shape. An ideal matte thread is Very Velvet, Petite Very Velvet, a large size Perle Cotton (#3 or #5), or single strand silk. Good metallic threads include Kreinik Metallics (size 12 or 16) or Silk Lame (18 or 13). You can cover those with virtually any other thread, including silk or cotton floss. I’ve used matte threads covered with matte, metallics covered with metallics, metallics covered with matte, and matte covered with metallics. Personally, I prefer it when a tiny bit of the base thread shows through so, as an example, when I’m using silk floss over a metallic thread, I keep the floss ply count low. It’s the best of both worlds and I love the tiniest bit of sparkle that emerges.

Or Nue looks so much more difficult than it is. It’s a beautiful technique for rugs, bags, hats, purses, baskets…anything requiring a subtle texture and/or an elegant touch.

These stitch diagrams, along with all other #whimsicalwednesday and #smallspacesunday stitch diagrams, can also be found on a Pinterest board here.

Be sure to follow whimsicalstitch.com on FacebookPinterestInstagram, and Twitter.

If you like what you see on this blog, want to learn some very creative decorative stitches, and how to put them all together, whimsicalstitch.com has a book for you! Mary’s Whimsical Stitches is a contemporary how-to collection of more than 250 stitches for stitchers regardless of skill level. The book includes updated and sequenced diagrams from this blog, all-new stitches, and a chapter on the basics of needlepoint. For more information, visit here.

whimsicalstitch.com also sells Stitch Guides and Stitch Concepts for Melissa Shirley Designs, Zecca DesignsSandra Gilmore, Purple Palm, Maggie, and Penny MacLeod, and many more. Click here to see the newest guides and click here to see the entire collection.

I hope you have the perfect spot for this stitch! Please enjoy! Have a wonderful #whimsicalwednesday!

A Note about Diagrams
I use color in diagrams to make them as clear as possible.  The primary function of different colored lines is to illustrate a stitch sequence.  For example, layering of colors demonstrates you add them in that order.  They can also provide ideas on how to integrate additional threads (one line for each color).  Or, you can use the same thread for all color lines.  That's where I encourage you to use your imagination for the space you are stitching!

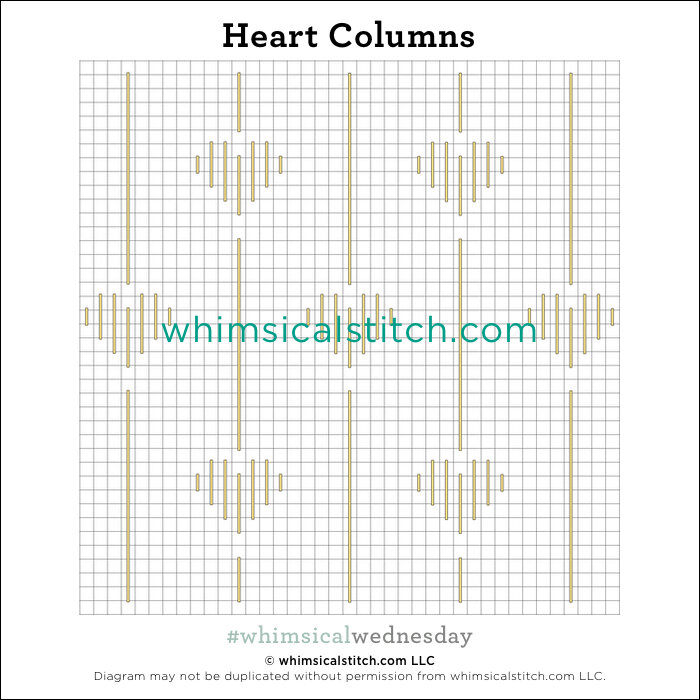
It's Valentine's Day AND Christmas

Heart shaped stitches are filling my social feeds quite a bit these days. And I would have sworn I didn’t have any in my stash. Well, today’s stitch proves I would have been delightfully wrong.

Click on image to see on whimsicalstitch.com's Pinterest account. Visit pinterest.com/whimsicalstitch/whimsicalwednesday for a library of all #whimsicalwednesday and #smallspacesunday stitch diagrams.

Click on image to see on whimsicalstitch.com's Pinterest account. Visit pinterest.com/whimsicalstitch/whimsicalwednesday for a library of all #whimsicalwednesday and #smallspacesunday stitch diagrams.

Click on image to see on whimsicalstitch.com's Instagram account. Visit instagram.com/whimsicalstitch to see a library of stitched samples for select #whimsicalwednesday and #smallspacesunday stitch diagrams.

Click on image to see on whimsicalstitch.com's Instagram account. Visit instagram.com/whimsicalstitch to see a library of stitched samples for select #whimsicalwednesday and #smallspacesunday stitch diagrams.

Like a lot of us these days, I’m using my extra time at home re-organizing. I was surprised and thrilled to stumble across this adorable ornament in the back of a drawer in a chest I use for my thread stash. The stitched sample uses nothing more than DMC Perle Cotton on 18-mesh. (Bonus links: the stitch for the dress can be found here and the stitch for the wings is here.)

It’s an easy and scalable stitch. Create the heart in vertical straight stitches from top to bottom so they have crisp, wrapped top edges. When you get to the far side of the heart, bring your needle across the back to one hole below the center thread in the heart and add a single, long running stitch to the top of the next heart, and repeat. In the stitched sample, the running stitch is 16 rows high. If you want more hearts in your background, make shorter running stitches. But take the time to count it out so the hearts is subsequent vertical columns are centered against the running stitch on its side. Or not, it’s up to you.

This stitch is a great template for any kind of theme oriented background. Select your thematic element and you are off to the races. I’ve seen these columns with small pumpkins instead of hearts. You could do a bat instead of a heart for a Halloween piece. I’ve used single tiny snowflakes for the repeated element and I’ve seen dramatic single snowflakes as the element (on pinterest.com). The possibilities are virtually endless.

This stitch diagram, along with all other #whimsicalwednesday and #smallspacesunday stitch diagrams, can also be found on a Pinterest board here.

Be sure to follow whimsicalstitch.com on FacebookPinterestInstagram, and Twitter.

If you like what you see on this blog, want to learn some very creative decorative stitches, and how to put them all together, whimsicalstitch.com has a book for you! Mary’s Whimsical Stitches is a contemporary how-to collection of more than 250 stitches for stitchers regardless of skill level. The book includes updated and sequenced diagrams from this blog, all-new stitches, and a chapter on the basics of needlepoint. For more information, visit here.

whimsicalstitch.com also sells Stitch Guides and Stitch Concepts for Melissa Shirley Designs, Zecca DesignsSandra Gilmore, Purple Palm, Maggie, and Penny MacLeod, and many more. Click here to see the newest guides and click here to see the entire collection.

I hope you have the perfect spot for this stitch! Please enjoy! Have a wonderful #whimsicalwednesday!

A Note about Diagrams
I use color in diagrams to make them as clear as possible.  The primary function of different colored lines is to illustrate a stitch sequence.  For example, layering of colors demonstrates you add them in that order.  They can also provide ideas on how to integrate additional threads (one line for each color).  Or, you can use the same thread for all color lines.  That's where I encourage you to use your imagination for the space you are stitching!
Which Came First?

I’m often asked what comes first for a blog post…the stitch or the stitched sample? In all honesty, it’s both. Some weeks I am inspired by new stitches I’ve used for class projects and get to share student’s wonderful stitching. Other weeks I am walking around my house on Tuesday afternoon desperately looking for something I haven’t shared with you. Today and last week were definitely Tuesday afternoon scenarios.

Click on image to see on whimsicalstitch.com's Pinterest account. Visit pinterest.com/whimsicalstitch/whimsicalwednesday for a library of all #whimsicalwednesday and #smallspacesunday stitch diagrams.

Click on image to see on whimsicalstitch.com's Pinterest account. Visit pinterest.com/whimsicalstitch/whimsicalwednesday for a library of all #whimsicalwednesday and #smallspacesunday stitch diagrams.

Click on image to see on whimsicalstitch.com's Instagram account. Visit instagram.com/whimsicalstitch to see a library of stitched samples for select #whimsicalwednesday and #smallspacesunday stitch diagrams.

Click on image to see on whimsicalstitch.com's Instagram account. Visit instagram.com/whimsicalstitch to see a library of stitched samples for select #whimsicalwednesday and #smallspacesunday stitch diagrams.

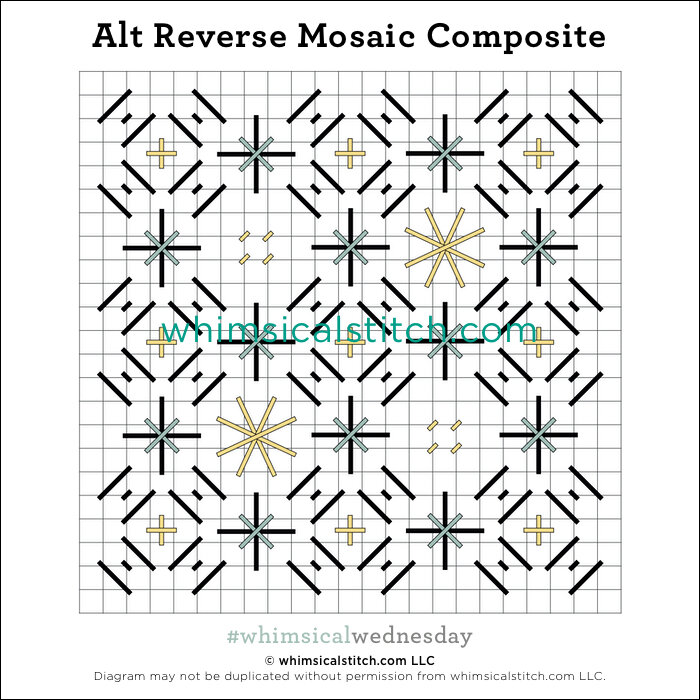
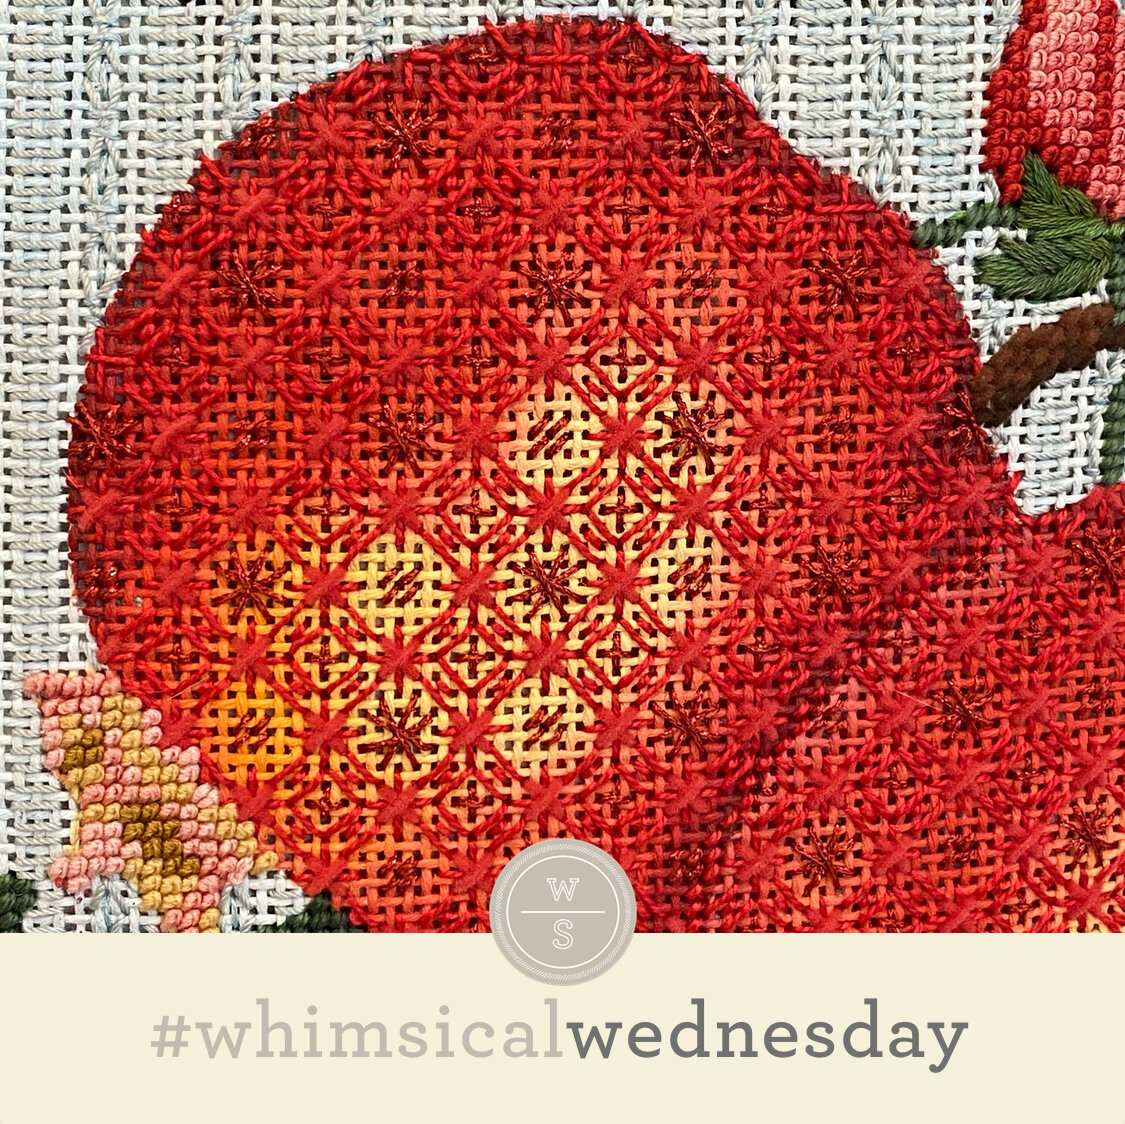
There is a LOT to unpack in today’s stitch. I stitched these pillows in the early 2000’s and I was all about dramatic composite stitches. In fact, the more dramatic, the better. In my opinion, it works here because there is so much real estate to cover. The pillow, which you can see in its entirety on today’s Instagram post, includes basketweave leaves and a low key background to balance the dramatic stitches and threads on each of the fruit. Just like your diet, needlepoint needs to have balance. And, just like your diet, I’m all about fruit in needlepoint.

The stitched sample is a retired fruit pillow from Melissa Shirley Designs and uses DMC Perle Cotton (black lines), Very Velvet (aqua lines), Very Velvet (aqua lines), and a whole lotta red size 12 Kreinik (yellow lines). I recommend stitching the black liems first, folllowed by the yellow, and wrapping up with the aqua lines.

This stitch would make a beautiful fabric of any kind, say a dress with silk floss (black lines), a lightweight metallic such as Kreinik Metallics Fine Braid (#8) or Petite Silk Lame (yellow lines), and Flair (aqua lines). Extending the fabric theme, how about a pillow with Vineyard Silk (black lines), Silk Lame (yellow lines), and size 12 Kreinik (aqua lines). I may go so far as to replace the black lines under the aqua lines with the thread used for the aqua lines.

This stitch diagram, along with all other #whimsicalwednesday and #smallspacesunday stitch diagrams, can also be found on a Pinterest board here.

Be sure to follow whimsicalstitch.com on FacebookPinterestInstagram, and Twitter.

If you like what you see on this blog, want to learn some very creative decorative stitches, and how to put them all together, whimsicalstitch.com has a book for you! Mary’s Whimsical Stitches is a contemporary how-to collection of more than 250 stitches for stitchers regardless of skill level. The book includes updated and sequenced diagrams from this blog, all-new stitches, and a chapter on the basics of needlepoint. For more information, visit here.

whimsicalstitch.com also sells Stitch Guides and Stitch Concepts for Melissa Shirley Designs, Zecca DesignsSandra Gilmore, Purple Palm, Maggie, and Penny MacLeod, and many more. Click here to see the newest guides and click here to see the entire collection.

I hope you have the perfect spot for this stitch! Please enjoy! Have a wonderful #whimsicalwednesday!

A Note about Diagrams
I use color in diagrams to make them as clear as possible.  The primary function of different colored lines is to illustrate a stitch sequence.  For example, layering of colors demonstrates you add them in that order.  They can also provide ideas on how to integrate additional threads (one line for each color).  Or, you can use the same thread for all color lines.  That's where I encourage you to use your imagination for the space you are stitching!

Beep Beep!

What better anecdote to today’s doldrums than a splash of color and beads? Well, I think Painters Threads, a whole lotta beads, and some really bright colors are exactly what we all need today.

Click on image to see on whimsicalstitch.com's Pinterest account. Visit pinterest.com/whimsicalstitch/whimsicalwednesday for a library of all #whimsicalwednesday and #smallspacesunday stitch diagrams.

Click on image to see on whimsicalstitch.com's Pinterest account. Visit pinterest.com/whimsicalstitch/whimsicalwednesday for a library of all #whimsicalwednesday and #smallspacesunday stitch diagrams.

Click on image to see on whimsicalstitch.com's Instagram account. Visit instagram.com/whimsicalstitch to see a library of stitched samples for select #whimsicalwednesday and #smallspacesunday stitch diagrams.

Click on image to see on whimsicalstitch.com's Instagram account. Visit instagram.com/whimsicalstitch to see a library of stitched samples for select #whimsicalwednesday and #smallspacesunday stitch diagrams.

The stitch is a simple elongated leaf stitch connected by not one but pairs of beads! Naturally, when I think leaves, I think Painters Thread Shimmer Ribbon. Not really, but it certainly is the perfect thread choice for a Zecca bird from my Royal Peeps Stitch Concept.

Funny thing is that it would make a really beautiful tree with some overdyed silk floss and beads or Swarovski Crystal Rounds (2mm or 3mm). Now that I’m pondering, I think this stitch could make a very interesting roof for a tall, narrow house. I would use Rainbow Linen with a matte bead for that application.

This stitch diagram, along with all other #whimsicalwednesday and #smallspacesunday stitch diagrams, can also be found on a Pinterest board here.

Be sure to follow whimsicalstitch.com on FacebookPinterestInstagram, and Twitter.

If you like what you see on this blog, want to learn some very creative decorative stitches, and how to put them all together, whimsicalstitch.com has a book for you! Mary’s Whimsical Stitches is a contemporary how-to collection of more than 250 stitches for stitchers regardless of skill level. The book includes updated and sequenced diagrams from this blog, all-new stitches, and a chapter on the basics of needlepoint. For more information, visit here.

whimsicalstitch.com also sells Stitch Guides and Stitch Concepts for Melissa Shirley Designs, Zecca DesignsSandra Gilmore, Purple Palm, Maggie, and Penny MacLeod, and many more. Click here to see the newest guides and click here to see the entire collection.

I hope you have the perfect spot for this stitch! Please enjoy! Have a wonderful #whimsicalwednesday!

A Note about Diagrams
I use color in diagrams to make them as clear as possible.  The primary function of different colored lines is to illustrate a stitch sequence.  For example, layering of colors demonstrates you add them in that order.  They can also provide ideas on how to integrate additional threads (one line for each color).  Or, you can use the same thread for all color lines.  That's where I encourage you to use your imagination for the space you are stitching!

This Stitch Needs an IMDB Page

Today’s stitch has been hanging around in the background for far too long and it’s time for its closeup.

Click on image to see on whimsicalstitch.com's Pinterest account. Visit pinterest.com/whimsicalstitch/whimsicalwednesday for a library of all #whimsicalwednesday and #smallspacesunday stitch diagrams.

Click on image to see on whimsicalstitch.com's Pinterest account. Visit pinterest.com/whimsicalstitch/whimsicalwednesday for a library of all #whimsicalwednesday and #smallspacesunday stitch diagrams.

Click on image to see on whimsicalstitch.com's Instagram account. Visit instagram.com/whimsicalstitch to see a library of stitched samples for select #whimsicalwednesday and #smallspacesunday stitch diagrams.

Click on image to see on whimsicalstitch.com's Instagram account. Visit instagram.com/whimsicalstitch to see a library of stitched samples for select #whimsicalwednesday and #smallspacesunday stitch diagrams.

Yes, this stitch’s first uncredited appearance was in December 2015 and its most recent uncredited appearance was, oh, a month ago. (You can see it here, here, here, here, here, here, here, and here.) I used this for the water on Emma Williams Rooftops; it uses Elegance (black lines), Fyre Werks (aqua lines), and Sundance Seed Beads (yellow circles with black lines).

Scallop stitches are an unending source of inspiration. I am convinced there are too many to detail because of the the countless variations. For example, I shared simple scallop stitches a while ago (here and here), illustrating how to skip rows for a lighter look and how to combine colors for a cute background. This example shows they how small they can be and still be impactful. And, of course, you can offset rows (and also not skip rows) for a completely different look. The last example also shows a much “deeper” scallop than even today’s gorgeous example. Bottom line, you could craft a scallop to fit most spaces and tastes.

My most common uses of scallop stitches are for skies, water, and backgrounds. However, I’ve seen them used for dresses (which is adorable) with Flair, silk floss, and lightweight Kreinik. I would love to see scallops as a tablecloth hanging down the side of a table for full effect. Lastly, I think scallops would be a great roof with an overdyed Vineyard Silk.

This stitch diagram, along with all other #whimsicalwednesday and #smallspacesunday stitch diagrams, can also be found on a Pinterest board here.

Be sure to follow whimsicalstitch.com on FacebookPinterestInstagram, and Twitter.

If you like what you see on this blog, want to learn some very creative decorative stitches, and how to put them all together, whimsicalstitch.com has a book for you! Mary’s Whimsical Stitches is a contemporary how-to collection of more than 250 stitches for stitchers regardless of skill level. The book includes updated and sequenced diagrams from this blog, all-new stitches, and a chapter on the basics of needlepoint. For more information, visit here.

whimsicalstitch.com also sells Stitch Guides and Stitch Concepts for Melissa Shirley Designs, Zecca DesignsSandra Gilmore, Purple Palm, Maggie, and Penny MacLeod, and many more. Click here to see the newest guides and click here to see the entire collection.

I hope you have the perfect spot for this stitch! Please enjoy! Have a wonderful #whimsicalwednesday!

A Note about Diagrams
I use color in diagrams to make them as clear as possible.  The primary function of different colored lines is to illustrate a stitch sequence.  For example, layering of colors demonstrates you add them in that order.  They can also provide ideas on how to integrate additional threads (one line for each color).  Or, you can use the same thread for all color lines.  That's where I encourage you to use your imagination for the space you are stitching!

Starting Small

I’m back! And starting with a cute little something something that reminds me that sometimes what you are looking for is right in front of you.

Click on image to see on whimsicalstitch.com's Pinterest account. Visit pinterest.com/whimsicalstitch/whimsicalwednesday for a library of all #whimsicalwednesday and #smallspacesunday stitch diagrams.

Click on image to see on whimsicalstitch.com's Pinterest account. Visit pinterest.com/whimsicalstitch/whimsicalwednesday for a library of all #whimsicalwednesday and #smallspacesunday stitch diagrams.

Click on image to see on whimsicalstitch.com's Instagram account. Visit instagram.com/whimsicalstitch to see a library of stitched samples for select #whimsicalwednesday and #smallspacesunday stitch diagrams.

Click on image to see on whimsicalstitch.com's Instagram account. Visit instagram.com/whimsicalstitch to see a library of stitched samples for select #whimsicalwednesday and #smallspacesunday stitch diagrams.

The stitched sample is one of the many adorable buckets from Pippin’s Sand Buckets from an embellishment event I did last February. (Ah, the good old days of traveling outside of your living room and wearing makeup.) It uses Soie d’Alger and Neon Rays on 13-mesh.

I love me my Pippin collage canvases. The colors and the themes just make me smile. They’re a (good) challenge because they use mostly small stitches. I wanted to do something new (for me), but I thought I was tapped out until I remembered I’ve been able to transform favorite stitches by simply skipping a row. And, voila, we have a “new” stitch.

This is a great all-purpose small stitch, perfect for almost all clothing. I would love to see an overdyed wool and solid wool for a sweater or pants. I’m using this for some architectural accents (with two metallics) for Big Ben on a current project I’m working on. It will also make a cute little tree trunk with two shades of Vineyard Silk.

This stitch diagram, along with all other #whimsicalwednesday and #smallspacesunday stitch diagrams, can also be found on a Pinterest board here.

Be sure to follow whimsicalstitch.com on FacebookPinterestInstagram, and Twitter.

If you like what you see on this blog, want to learn some very creative decorative stitches, and how to put them all together, whimsicalstitch.com has a book for you! Mary’s Whimsical Stitches is a contemporary how-to collection of more than 250 stitches for stitchers regardless of skill level. The book includes updated and sequenced diagrams from this blog, all-new stitches, and a chapter on the basics of needlepoint. For more information, visit here.

whimsicalstitch.com also sells Stitch Guides and Stitch Concepts for Melissa Shirley Designs, Zecca DesignsSandra Gilmore, Purple Palm, Maggie, and Penny MacLeod, and many more. Click here to see the newest guides and click here to see the entire collection.

I hope you have the perfect spot for this stitch! Please enjoy! Have a wonderful #whimsicalwednesday!

A Note about Diagrams
I use color in diagrams to make them as clear as possible.  The primary function of different colored lines is to illustrate a stitch sequence.  For example, layering of colors demonstrates you add them in that order.  They can also provide ideas on how to integrate additional threads (one line for each color).  Or, you can use the same thread for all color lines.  That's where I encourage you to use your imagination for the space you are stitching!

Well, Hello.

I’ve had today’s stitch in the queue for a bit and I’m so excited it’s finally here! It literally* fills 7/8 of a canvas and brings interest, elegance, and a whole lotta yellow to life. (* Please read that phrase in Chris Traeger’s voice for full impact.)

Click on image to see on whimsicalstitch.com's Pinterest account. Visit pinterest.com/whimsicalstitch/whimsicalwednesday for a library of all #whimsicalwednesday and #smallspacesunday stitch diagrams.

Click on image to see on whimsicalstitch.com's Pinterest account. Visit pinterest.com/whimsicalstitch/whimsicalwednesday for a library of all #whimsicalwednesday and #smallspacesunday stitch diagrams.

Click on image to see on whimsicalstitch.com's Instagram account. Visit instagram.com/whimsicalstitch to see a library of stitched samples for select #whimsicalwednesday and #smallspacesunday stitch diagrams.

Click on image to see on whimsicalstitch.com's Instagram account. Visit instagram.com/whimsicalstitch to see a library of stitched samples for select #whimsicalwednesday and #smallspacesunday stitch diagrams.

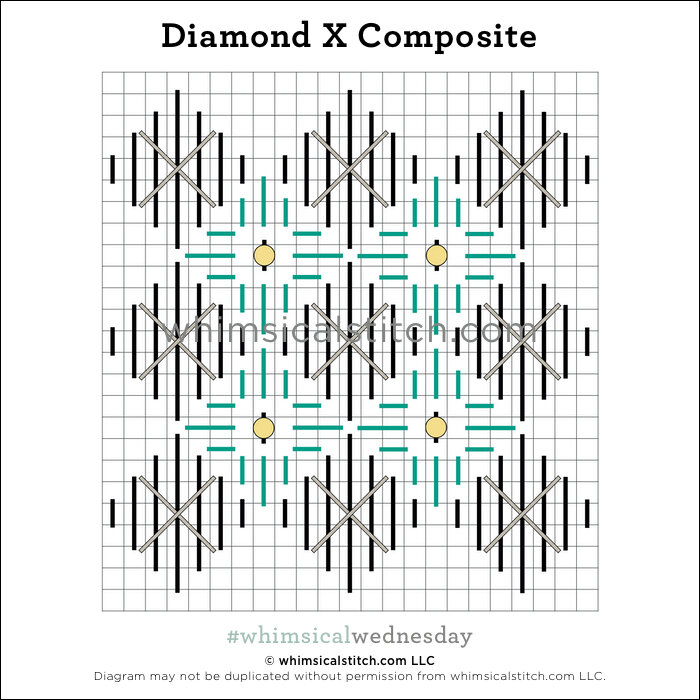
The stitch is composed of two distinct diamond patterns, each eight rows high in the center. The stitched sample uses Vineyard Silk (black lines), Sparkle Rays (turquoise lines), Crystal Braid (gray lines), and Sundance Beads (yellow circles) on 13-mesh. It’s a retired Melissa Shirley Lemon canvas.

This dramatic stitch calls for a large space for full impact. I’m thinking Santa’s coat with silk floss (black lines), Neon Rays (turquoise lines), Kreinik Metallics (gray lines) and Sundance Beads (yellow circles). I can also see it as a tree with overdyed perle cotton (black lines), Petite Silk Lame (gray lines), solid silk floss (such as Splendor or Soie d’Alger), and a Smyrna Cross (in lieu of a bead) in a contrasting color to mimic fruit or a small flower.

This stitch diagram, along with all other #whimsicalwednesday and #smallspacesunday stitch diagrams, can also be found on a Pinterest board here.

Be sure to follow whimsicalstitch.com on FacebookPinterestInstagram, and Twitter.

If you like what you see on this blog, want to learn some very creative decorative stitches, and how to put them all together, whimsicalstitch.com has a book for you! Mary’s Whimsical Stitches is a contemporary how-to collection of more than 250 stitches for stitchers regardless of skill level. The book includes updated and sequenced diagrams from this blog, all-new stitches, and a chapter on the basics of needlepoint. For more information, visit here.

whimsicalstitch.com also sells Stitch Guides and Stitch Concepts for Melissa Shirley Designs, Zecca DesignsSandra Gilmore, Purple Palm, Maggie, and Penny MacLeod, and many more. Click here to see the newest guides and click here to see the entire collection.

I hope you have the perfect spot for this stitch! Please enjoy! Have a wonderful #whimsicalwednesday!

A Note about Diagrams
I use color in diagrams to make them as clear as possible.  The primary function of different colored lines is to illustrate a stitch sequence.  For example, layering of colors demonstrates you add them in that order.  They can also provide ideas on how to integrate additional threads (one line for each color).  Or, you can use the same thread for all color lines.  That's where I encourage you to use your imagination for the space you are stitching!

Just Right

I confess I have a formula for windows. Open stitch? Check. Small stitch? Check. Lightweight metallic? Check. Well, two out of three of those “rules" apply to today’s stitch.

Click on image to see on whimsicalstitch.com's Pinterest account. Visit pinterest.com/whimsicalstitch/whimsicalwednesday for a library of all #whimsicalwednesday and #smallspacesunday stitch diagrams.

Click on image to see on whimsicalstitch.com's Pinterest account. Visit pinterest.com/whimsicalstitch/whimsicalwednesday for a library of all #whimsicalwednesday and #smallspacesunday stitch diagrams.

Click on image to see on whimsicalstitch.com's Instagram account. Visit instagram.com/whimsicalstitch to see a library of stitched samples for select #whimsicalwednesday and #smallspacesunday stitch diagrams.

Click on image to see on whimsicalstitch.com's Instagram account. Visit instagram.com/whimsicalstitch to see a library of stitched samples for select #whimsicalwednesday and #smallspacesunday stitch diagrams.

Today’s stitch comes from one of my very first Stitch Guides (Lemons by Annie O’Brien Gonzales) and uses Kreinik Fine Braid (size 8) on 13-mesh. I concocted this stitch to fill rather large window panes, all the while staying true to my general approach of open stitches and lightweight metallics for windows.

Sidebar: If you want to kill more time (and hey, why not, it’s not like your boss is looking over your shoulder since you’re working from home), take a trip in the wayback machine to read about my (literal) discovery of open stitches for windows. (It also happens to come with two of my favorite window stitches.)

The path for this stitch is similar to blackwork. I call it a modified back stitch. Simply follow the outline of the pattern using back stitches. A traditional backstitch goes from left to right (or right to left)…repeatedly. With a modified back stitch, you alternate between left to right or right to left or up to down or down to up, depending on the pattern. When you get to an edge of the area, weave your thread through the threads on the back of the canvas to return to an open area and begin again. It’s also helpful to complete some solid stitching in the area so you have other places to bury the threads. In the stitched sample, I buried threads in the shaded window pane (white and light blue) and the green leaves.

This stitch will make a beautiful sky in the far background or water with 2-3 plies of Silk Floss (Soie d’Alger, Soie Cristale, Splendor, Needlepoint Inc Silk, etc) or a lightweight metallic (Kreinik Fine Braid, Kreinik Very Fine Braid, Petite Silk Lame, Bijoux, Soie Perle, etc)

This stitch diagram, along with all other #whimsicalwednesday and #smallspacesunday stitch diagrams, can also be found on a Pinterest board here.

Be sure to follow whimsicalstitch.com on FacebookPinterestInstagram, and Twitter.

If you like what you see on this blog, want to learn some very creative decorative stitches, and how to put them all together, whimsicalstitch.com has a book for you! Mary’s Whimsical Stitches is a contemporary how-to collection of more than 250 stitches for stitchers regardless of skill level. The book includes updated and sequenced diagrams from this blog, all-new stitches, and a chapter on the basics of needlepoint. For more information, visit here.

whimsicalstitch.com also sells Stitch Guides and Stitch Concepts for Melissa Shirley Designs, Zecca DesignsSandra Gilmore, Purple Palm, Maggie, and Penny MacLeod, and many more. Click here to see the newest guides and click here to see the entire collection.

I hope you have the perfect spot for this stitch! Please enjoy! Have a wonderful #whimsicalwednesday!

A Note about Diagrams
I use color in diagrams to make them as clear as possible.  The primary function of different colored lines is to illustrate a stitch sequence.  For example, layering of colors demonstrates you add them in that order.  They can also provide ideas on how to integrate additional threads (one line for each color).  Or, you can use the same thread for all color lines.  That's where I encourage you to use your imagination for the space you are stitching!
Silver Lining

I’ve been bogged down in recreating a Stitch Guide for a customer and it hasn’t been fun (for a myriad of technical reasons). Yet there is a silver lining…today’s stitch! I woulda bet money I had already posted this and you woulda been so rich if you had taken that bet!

Click on image to see on whimsicalstitch.com's Pinterest account. Visit pinterest.com/whimsicalstitch/whimsicalwednesday for a library of all #whimsicalwednesday and #smallspacesunday stitch diagrams.

Click on image to see on whimsicalstitch.com's Pinterest account. Visit pinterest.com/whimsicalstitch/whimsicalwednesday for a library of all #whimsicalwednesday and #smallspacesunday stitch diagrams.

Click on image to see on whimsicalstitch.com's Instagram account. Visit instagram.com/whimsicalstitch to see a library of stitched samples for select #whimsicalwednesday and #smallspacesunday stitch diagrams.

Click on image to see on whimsicalstitch.com's Instagram account. Visit instagram.com/whimsicalstitch to see a library of stitched samples for select #whimsicalwednesday and #smallspacesunday stitch diagrams.

The stitched sample is a sail from Rooftops, a beautiful piece by Emma Williams. It uses six plies of City Needlework Silk (black lines) and Fyre Werks (yellow lines) on 13-mesh.

This is a double-needler. I recommend preparing two separate needles with the threads. Add the base thread first (yellow line), park the needle off to the side, and cover it with the top threads (black lines). Park that needle on the side and repeat the sequence on the next horizontal column. Always complete the two steps for an entire horizontal column before you proceed to the next column of stitches.

I recommend the double needle technique for many layered stitches. Bringing a threaded needle up from below a pre-existing thread runs the risk of tangles, shredding of either or both threads, and mistakes. In this case, every hole for the threads on top (black lines) is clearly visible.

This is a great all-purpose stitch. I love to use it on roofs and floors with Elegance or Subtlety (black lines) and a contrasting color in the same thread for the yellow lines. Don’t forget to flip it 90° if that makes more sense for the architectural element. I think this could make a really interesting stitch for a Christmas tree with a lightweight metallic (yellow lines) and silk floss (black lines. It would have to be a larger tree, but I think that could be very interesting. And, as always, this will be a great application for clothing. Consider using a Very Velvet (yellow lines) covered with a silk floss (black lines) for an interesting matte on matte look.

This stitch diagram, along with all other #whimsicalwednesday and #smallspacesunday stitch diagrams, can also be found on a Pinterest board here.

Be sure to follow whimsicalstitch.com on FacebookPinterestInstagram, and Twitter.

If you like what you see on this blog, want to learn some very creative decorative stitches, and how to put them all together, whimsicalstitch.com has a book for you! Mary’s Whimsical Stitches is a contemporary how-to collection of more than 250 stitches for stitchers regardless of skill level. The book includes updated and sequenced diagrams from this blog, all-new stitches, and a chapter on the basics of needlepoint. For more information, visit here.

whimsicalstitch.com also sells Stitch Guides and Stitch Concepts for Melissa Shirley Designs, Zecca DesignsSandra Gilmore, Purple Palm, Maggie, and Penny MacLeod, and many more. Click here to see the newest guides and click here to see the entire collection.

I hope you have the perfect spot for this stitch! Please enjoy! Have a wonderful #whimsicalwednesday!

A Note about Diagrams
I use color in diagrams to make them as clear as possible.  The primary function of different colored lines is to illustrate a stitch sequence.  For example, layering of colors demonstrates you add them in that order.  They can also provide ideas on how to integrate additional threads (one line for each color).  Or, you can use the same thread for all color lines.  That's where I encourage you to use your imagination for the space you are stitching!