Just Right

I confess I have a formula for windows. Open stitch? Check. Small stitch? Check. Lightweight metallic? Check. Well, two out of three of those “rules" apply to today’s stitch.

Click on image to see on whimsicalstitch.com's Pinterest account. Visit pinterest.com/whimsicalstitch/whimsicalwednesday for a library of all #whimsicalwednesday and #smallspacesunday stitch diagrams.

Click on image to see on whimsicalstitch.com's Pinterest account. Visit pinterest.com/whimsicalstitch/whimsicalwednesday for a library of all #whimsicalwednesday and #smallspacesunday stitch diagrams.

Click on image to see on whimsicalstitch.com's Instagram account. Visit instagram.com/whimsicalstitch to see a library of stitched samples for select #whimsicalwednesday and #smallspacesunday stitch diagrams.

Click on image to see on whimsicalstitch.com's Instagram account. Visit instagram.com/whimsicalstitch to see a library of stitched samples for select #whimsicalwednesday and #smallspacesunday stitch diagrams.

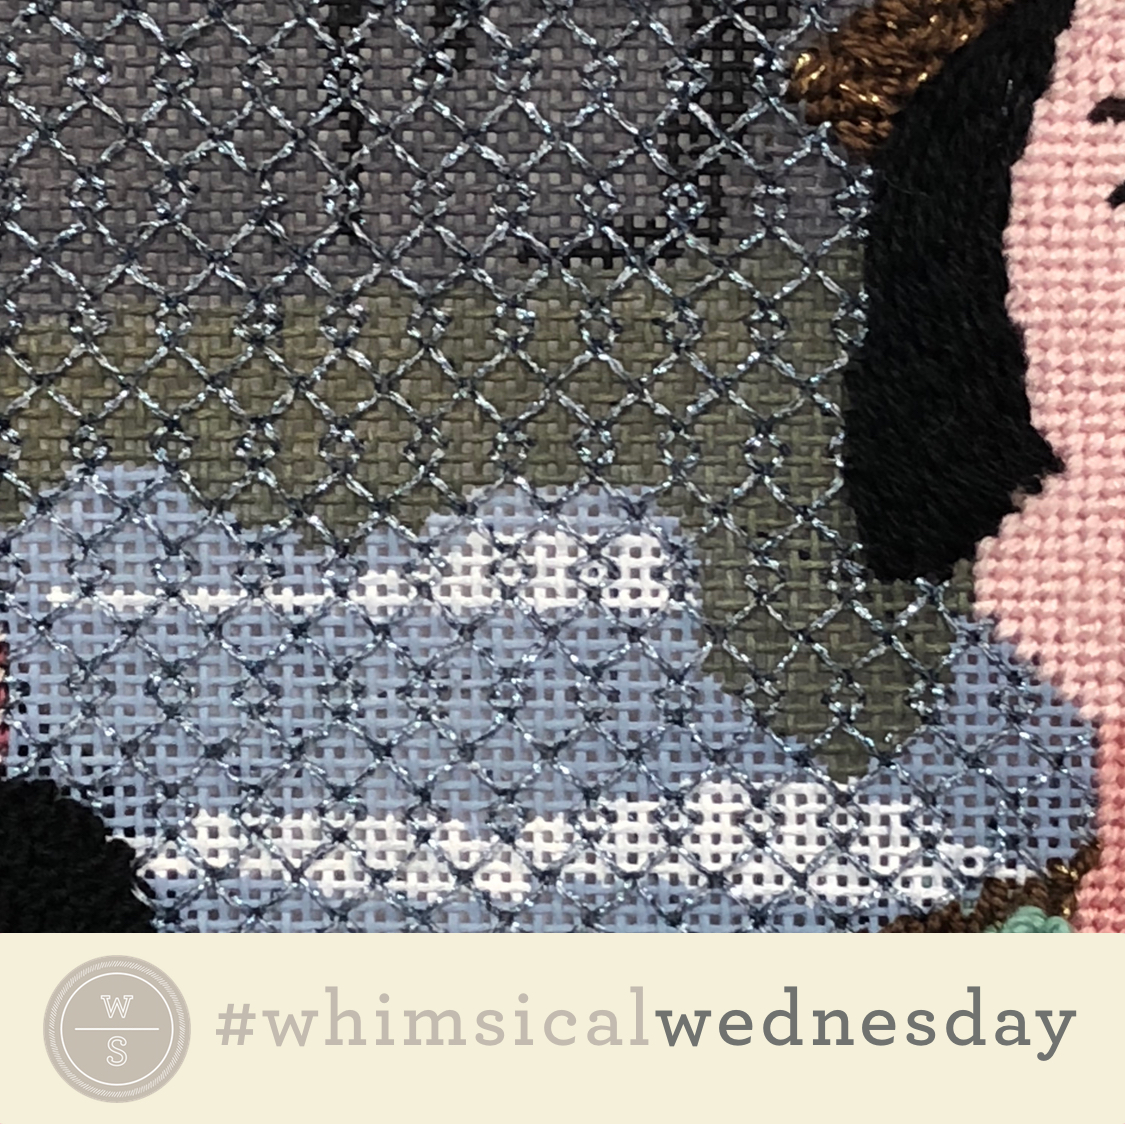
Today’s stitch comes from one of my very first Stitch Guides (Lemons by Annie O’Brien Gonzales) and uses Kreinik Fine Braid (size 8) on 13-mesh. I concocted this stitch to fill rather large window panes, all the while staying true to my general approach of open stitches and lightweight metallics for windows.

Sidebar: If you want to kill more time (and hey, why not, it’s not like your boss is looking over your shoulder since you’re working from home), take a trip in the wayback machine to read about my (literal) discovery of open stitches for windows. (It also happens to come with two of my favorite window stitches.)

The path for this stitch is similar to blackwork. I call it a modified back stitch. Simply follow the outline of the pattern using back stitches. A traditional backstitch goes from left to right (or right to left)…repeatedly. With a modified back stitch, you alternate between left to right or right to left or up to down or down to up, depending on the pattern. When you get to an edge of the area, weave your thread through the threads on the back of the canvas to return to an open area and begin again. It’s also helpful to complete some solid stitching in the area so you have other places to bury the threads. In the stitched sample, I buried threads in the shaded window pane (white and light blue) and the green leaves.

This stitch will make a beautiful sky in the far background or water with 2-3 plies of Silk Floss (Soie d’Alger, Soie Cristale, Splendor, Needlepoint Inc Silk, etc) or a lightweight metallic (Kreinik Fine Braid, Kreinik Very Fine Braid, Petite Silk Lame, Bijoux, Soie Perle, etc)

This stitch diagram, along with all other #whimsicalwednesday and #smallspacesunday stitch diagrams, can also be found on a Pinterest board here.

Be sure to follow whimsicalstitch.com on FacebookPinterestInstagram, and Twitter.

If you like what you see on this blog, want to learn some very creative decorative stitches, and how to put them all together, whimsicalstitch.com has a book for you! Mary’s Whimsical Stitches is a contemporary how-to collection of more than 250 stitches for stitchers regardless of skill level. The book includes updated and sequenced diagrams from this blog, all-new stitches, and a chapter on the basics of needlepoint. For more information, visit here.

whimsicalstitch.com also sells Stitch Guides and Stitch Concepts for Melissa Shirley Designs, Zecca DesignsSandra Gilmore, Purple Palm, Maggie, and Penny MacLeod, and many more. Click here to see the newest guides and click here to see the entire collection.

I hope you have the perfect spot for this stitch! Please enjoy! Have a wonderful #whimsicalwednesday!

A Note about Diagrams
I use color in diagrams to make them as clear as possible.  The primary function of different colored lines is to illustrate a stitch sequence.  For example, layering of colors demonstrates you add them in that order.  They can also provide ideas on how to integrate additional threads (one line for each color).  Or, you can use the same thread for all color lines.  That's where I encourage you to use your imagination for the space you are stitching!

Less is More

There were a couple false starts on the checked background of a personal piece I’m working on. I have a library full of 4X4 square stitches, so this should have been easy, right? Nope. Simply because I didn’t need a fancy stitch because the background needed to be in the…wait for it…background.

Click on image to see on whimsicalstitch.com's Pinterest account. Visit pinterest.com/whimsicalstitch/whimsicalwednesday for a library of all #whimsicalwednesday and #smallspacesunday stitch diagrams.

Click on image to see on whimsicalstitch.com's Pinterest account. Visit pinterest.com/whimsicalstitch/whimsicalwednesday for a library of all #whimsicalwednesday and #smallspacesunday stitch diagrams.

Click on image to see on whimsicalstitch.com's Instagram account. Visit instagram.com/whimsicalstitch to see a library of stitched samples for select #whimsicalwednesday and #smallspacesunday stitch diagrams.

Click on image to see on whimsicalstitch.com's Instagram account. Visit instagram.com/whimsicalstitch to see a library of stitched samples for select #whimsicalwednesday and #smallspacesunday stitch diagrams.

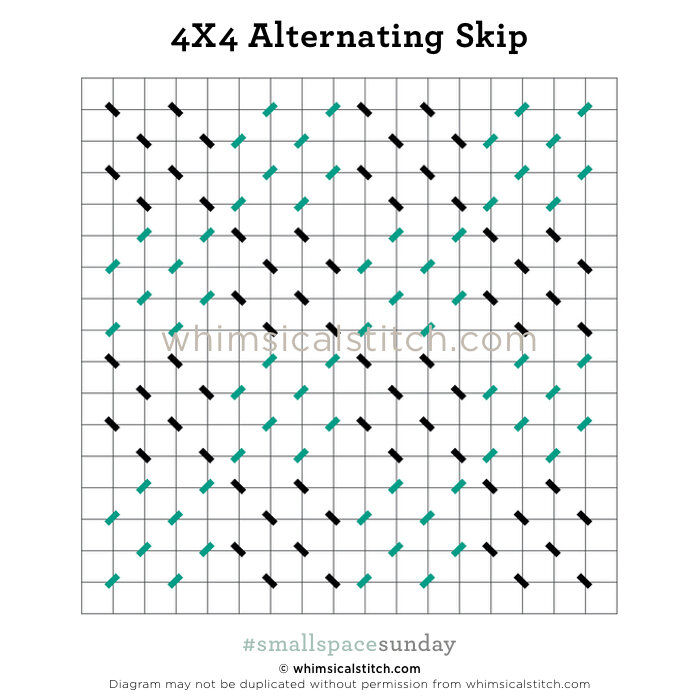
The stitched sample uses two strands of Floche (black lines) and Neon Rays+ (turquoise lines) on 18-mesh. Since the checked pattern is two different colors, I am not filling the emerging and empty 2X2 intersections.

This is another universal stitch for both large and small areas alike…and they don’t always have to be painted squares. I’m looking forward to using this on a grassy plain (without beads) or mountainside, mixing an overdyed silk floss with a single strand silk, such as Pepper Pot or Vineyard Silk, for kicks. It will make great wallpaper with Soie D’Alger and Petite Silk Lame. Consider using a single thread, such as a lightweight Kreinik for both directions of the stitch, for a small to medium size window. If I was using this stitch on a solid colored area, I would use threads with two different finishes and then fill that intersection with a single bead over two holes on the vertical.

This stitch is infinitely scalable. Consider it for checked patterns of various sizes. Or simply use one direction of this for one color in a checked pattern and a more full coverage stitch for the second square.

This stitch diagram, along with all other #whimsicalwednesday and #smallspacesunday stitch diagrams, can also be found on a Pinterest board here.

Be sure to follow whimsicalstitch.com on FacebookPinterestInstagram, and Twitter.

If you like what you see on this blog, want to learn some very creative decorative stitches, and how to put them all together, whimsicalstitch.com has a book for you! Mary’s Whimsical Stitches is a contemporary how-to collection of more than 250 stitches for stitchers regardless of skill level. The book includes updated and sequenced diagrams from this blog, all-new stitches, and a chapter on the basics of needlepoint. For more information, visit here.

whimsicalstitch.com also sells Stitch Guides and Stitch Concepts for Melissa Shirley Designs, Zecca DesignsSandra Gilmore, Purple Palm, Maggie, and Penny MacLeod, and many more. Click here to see the newest guides and click here to see the entire collection.

I hope you have the perfect spot for this stitch! Please enjoy! Have a wonderful #whimsicalwednesday!

A Note about Diagrams
I use color in diagrams to make them as clear as possible.  The primary function of different colored lines is to illustrate a stitch sequence.  For example, layering of colors demonstrates you add them in that order.  They can also provide ideas on how to integrate additional threads (one line for each color).  Or, you can use the same thread for all color lines.  That's where I encourage you to use your imagination for the space you are stitching!

Waiting for my Close Up

Today’s stitch is itching to get into a Stitch Concept. It came to me as a result of writing procrastination with a trip down the pinterest.com rabbit hole.

Click on image to see on whimsicalstitch.com's Pinterest account. Visit pinterest.com/whimsicalstitch/whimsicalwednesday for a library of all #whimsicalwednesday and #smallspacesunday stitch diagrams.

Click on image to see on whimsicalstitch.com's Pinterest account. Visit pinterest.com/whimsicalstitch/whimsicalwednesday for a library of all #whimsicalwednesday and #smallspacesunday stitch diagrams.

Click on image to see on whimsicalstitch.com's Instagram account. Visit instagram.com/whimsicalstitch to see a library of stitched samples for select #whimsicalwednesday and #smallspacesunday stitch diagrams.

Click on image to see on whimsicalstitch.com's Instagram account. Visit instagram.com/whimsicalstitch to see a library of stitched samples for select #whimsicalwednesday and #smallspacesunday stitch diagrams.

The stitched sample is me playing with four plies of Simply Shaker cotton floss on 18-mesh.

This stitch will get its close up and soon. There are many ways this stitch can play. My first thought is a wall and/or background on a still life with a single strand silk such as Elegance or Soie Perlee. Another idea that popped into my head is using this as a glass stitch with a lightweight Kreinik, Bijoux, or Petite Silk Lame on a (very) large glass vase or window. It will work on clothing where you want to accentuate the height and any glorious painted shading, such as pants or a long coat, with a single strand silk such as Vineyard Silk or Pepper Pot Silk.

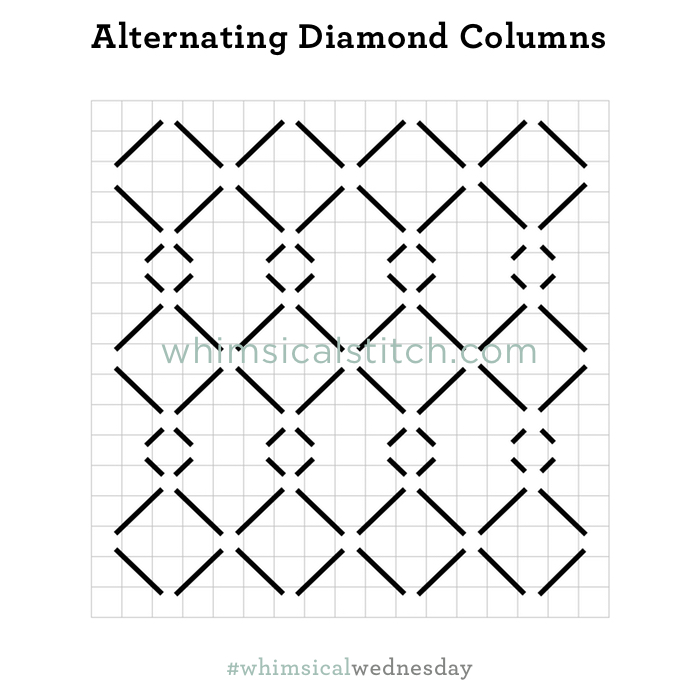
I will also strongly consider alternating columns with two threads, whether they are different finishes or colors will completely depend on the piece. And, before you ask, the columns can be either horizontal or vertical.

Today’s stitch is also unique as I included sequence numbers to give you an idea of how I navigated the open canvas. I started in an upper corner and used a modified backstitch to create the rectangles and connectors, always backtracking over immediately prior stitches (except when turning a corner). You can follow this path on the horizontal OR vertical axis.

This stitch diagram, along with all other #whimsicalwednesday and #smallspacesunday stitch diagrams, can also be found on a Pinterest board here.

Be sure to follow whimsicalstitch.com on FacebookPinterestInstagram, and Twitter.

If you like what you see on this blog, want to learn some very creative decorative stitches, and how to put them all together, whimsicalstitch.com sells Stitch Guides and Stitch Concepts for Melissa Shirley Designs, Zecca DesignsSandra Gilmore, Purple Palm, Maggie, and Patience Brewster, and many more. Click here to see the newest guides and click here to see the entire collection.

I hope you have the perfect spot for this stitch! Enjoy!  Happy #smallspacesunday!

A Note about Diagrams
I use color in diagrams to make them as clear as possible. The primary function of different colored lines is to illustrate a stitch sequence. For example, layering of colors demonstrates you add them in that order. They can also provide ideas on how to integrate additional threads (one line for each color). Or, you can use the same thread for all color lines. That's where I encourage you to use your imagination for the space you are stitching!

I May Have a Diamond Problem

I swear I did not set out to regale you with diamond stitches this month, but here we are…another diamond stitch.

Click on image to see on whimsicalstitch.com's Pinterest account. Visit pinterest.com/whimsicalstitch/whimsicalwednesday for a library of all #whimsicalwednesday and #smallspacesunday stitch diagrams.

Click on image to see on whimsicalstitch.com's Pinterest account. Visit pinterest.com/whimsicalstitch/whimsicalwednesday for a library of all #whimsicalwednesday and #smallspacesunday stitch diagrams.

Click on image to see on whimsicalstitch.com's Instagram account. Visit instagram.com/whimsicalstitch to see a library of stitched samples for select #whimsicalwednesday and #smallspacesunday stitch diagrams.

Click on image to see on whimsicalstitch.com's Instagram account. Visit instagram.com/whimsicalstitch to see a library of stitched samples for select #whimsicalwednesday and #smallspacesunday stitch diagrams.

Today's stitch comes from the window behind the ladies who are lunching in Edith, Ethel, & Ezra (from an embellishment event earlier this year). The stitched sample uses Kreinik Metallics Very Fine Braid (#4) on 18-mesh.

I am a true believer in open stitches in a single metallic color for windows. My typical window stitch is smaller; the most common ones I use are Reverse Basketweave, Darning, and a bunch of variations on Alicia’s Lace. Today’s stitch’s larger size reflects the window’s larger size and, in my opinion, works really well.

This stitch would also make a great open background on a small holiday ornament. It would be cute to alternate the columns between a matte and a metallic thread. Extending the window theme, it would work well as many other architectural elements, such as a walkway (with a cotton or silk perle) or a roof (with Rainbow Linen or Lorikeet). I think it would also make wonderful water with a Kreinik Metallic, Treasure Braid, or Petite Silk Lame.

If you want use it for clothing, consider dressing it up a little by adding a bead (or beads) or an Upright Cross to the center of the larger diamond.

This stitch diagram, along with all other #whimsicalwednesday and #smallspacesunday stitch diagrams, can also be found on a Pinterest board here.

Be sure to follow whimsicalstitch.com on FacebookPinterestInstagram, and Twitter.

If you like what you see on this blog, want to learn some very creative decorative stitches, and how to put them all together, whimsicalstitch.com sells Stitch Guides and Stitch Concepts for Melissa Shirley Designs, Zecca DesignsPatience Brewster, and many more. Click here to see the newest guides and click here to see the entire collection.

I hope you have the perfect spot for this stitch!  Please enjoy!  

A Note about Diagrams
I use color in diagrams to make them as clear as possible.  The primary function of different colored lines is to illustrate a stitch sequence.  For example, layering of colors demonstrates you add them in that order.  They can also provide ideas on how to integrate additional threads (one line for each color).  Or, you can use the same thread for all color lines.  That's where I encourage you to use your imagination for the space you are stitching!