Starting Small

I’m back! And starting with a cute little something something that reminds me that sometimes what you are looking for is right in front of you.

Click on image to see on whimsicalstitch.com's Pinterest account. Visit pinterest.com/whimsicalstitch/whimsicalwednesday for a library of all #whimsicalwednesday and #smallspacesunday stitch diagrams.

Click on image to see on whimsicalstitch.com's Pinterest account. Visit pinterest.com/whimsicalstitch/whimsicalwednesday for a library of all #whimsicalwednesday and #smallspacesunday stitch diagrams.

Click on image to see on whimsicalstitch.com's Instagram account. Visit instagram.com/whimsicalstitch to see a library of stitched samples for select #whimsicalwednesday and #smallspacesunday stitch diagrams.

Click on image to see on whimsicalstitch.com's Instagram account. Visit instagram.com/whimsicalstitch to see a library of stitched samples for select #whimsicalwednesday and #smallspacesunday stitch diagrams.

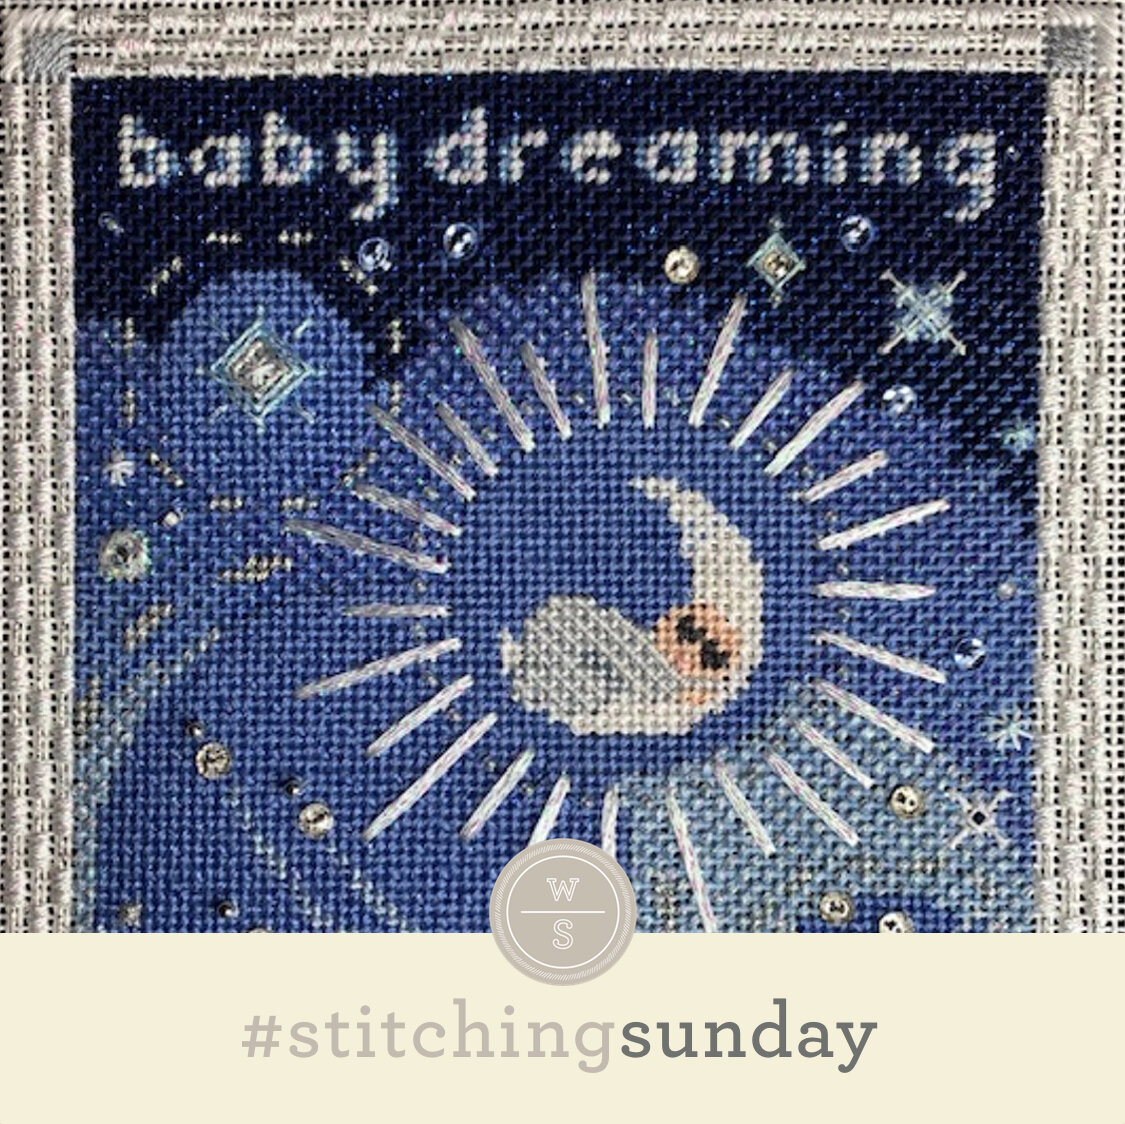
The stitched sample is one of the many adorable buckets from Pippin’s Sand Buckets from an embellishment event I did last February. (Ah, the good old days of traveling outside of your living room and wearing makeup.) It uses Soie d’Alger and Neon Rays on 13-mesh.

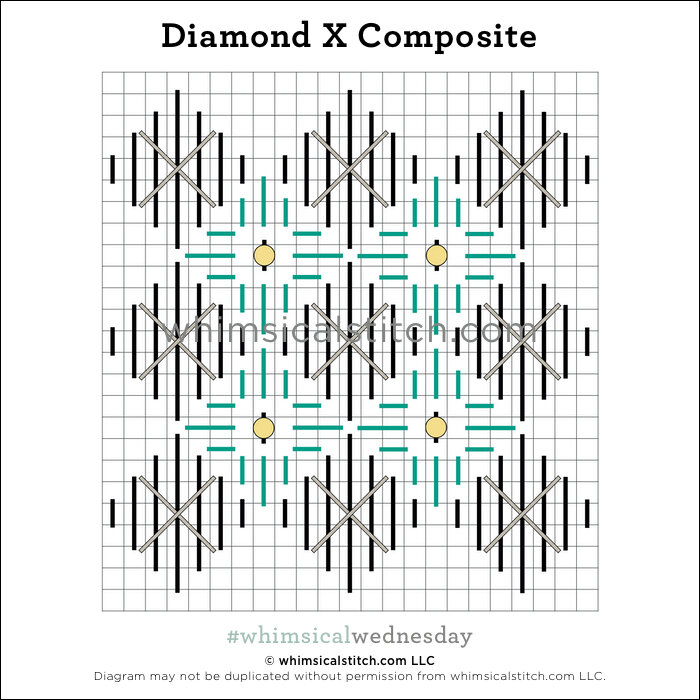
I love me my Pippin collage canvases. The colors and the themes just make me smile. They’re a (good) challenge because they use mostly small stitches. I wanted to do something new (for me), but I thought I was tapped out until I remembered I’ve been able to transform favorite stitches by simply skipping a row. And, voila, we have a “new” stitch.

This is a great all-purpose small stitch, perfect for almost all clothing. I would love to see an overdyed wool and solid wool for a sweater or pants. I’m using this for some architectural accents (with two metallics) for Big Ben on a current project I’m working on. It will also make a cute little tree trunk with two shades of Vineyard Silk.

This stitch diagram, along with all other #whimsicalwednesday and #smallspacesunday stitch diagrams, can also be found on a Pinterest board here.

Be sure to follow whimsicalstitch.com on FacebookPinterestInstagram, and Twitter.

If you like what you see on this blog, want to learn some very creative decorative stitches, and how to put them all together, whimsicalstitch.com has a book for you! Mary’s Whimsical Stitches is a contemporary how-to collection of more than 250 stitches for stitchers regardless of skill level. The book includes updated and sequenced diagrams from this blog, all-new stitches, and a chapter on the basics of needlepoint. For more information, visit here.

whimsicalstitch.com also sells Stitch Guides and Stitch Concepts for Melissa Shirley Designs, Zecca DesignsSandra Gilmore, Purple Palm, Maggie, and Penny MacLeod, and many more. Click here to see the newest guides and click here to see the entire collection.

I hope you have the perfect spot for this stitch! Please enjoy! Have a wonderful #whimsicalwednesday!

A Note about Diagrams
I use color in diagrams to make them as clear as possible.  The primary function of different colored lines is to illustrate a stitch sequence.  For example, layering of colors demonstrates you add them in that order.  They can also provide ideas on how to integrate additional threads (one line for each color).  Or, you can use the same thread for all color lines.  That's where I encourage you to use your imagination for the space you are stitching!

Well, Hello.

I’ve had today’s stitch in the queue for a bit and I’m so excited it’s finally here! It literally* fills 7/8 of a canvas and brings interest, elegance, and a whole lotta yellow to life. (* Please read that phrase in Chris Traeger’s voice for full impact.)

Click on image to see on whimsicalstitch.com's Pinterest account. Visit pinterest.com/whimsicalstitch/whimsicalwednesday for a library of all #whimsicalwednesday and #smallspacesunday stitch diagrams.

Click on image to see on whimsicalstitch.com's Pinterest account. Visit pinterest.com/whimsicalstitch/whimsicalwednesday for a library of all #whimsicalwednesday and #smallspacesunday stitch diagrams.

Click on image to see on whimsicalstitch.com's Instagram account. Visit instagram.com/whimsicalstitch to see a library of stitched samples for select #whimsicalwednesday and #smallspacesunday stitch diagrams.

Click on image to see on whimsicalstitch.com's Instagram account. Visit instagram.com/whimsicalstitch to see a library of stitched samples for select #whimsicalwednesday and #smallspacesunday stitch diagrams.

The stitch is composed of two distinct diamond patterns, each eight rows high in the center. The stitched sample uses Vineyard Silk (black lines), Sparkle Rays (turquoise lines), Crystal Braid (gray lines), and Sundance Beads (yellow circles) on 13-mesh. It’s a retired Melissa Shirley Lemon canvas.

This dramatic stitch calls for a large space for full impact. I’m thinking Santa’s coat with silk floss (black lines), Neon Rays (turquoise lines), Kreinik Metallics (gray lines) and Sundance Beads (yellow circles). I can also see it as a tree with overdyed perle cotton (black lines), Petite Silk Lame (gray lines), solid silk floss (such as Splendor or Soie d’Alger), and a Smyrna Cross (in lieu of a bead) in a contrasting color to mimic fruit or a small flower.

This stitch diagram, along with all other #whimsicalwednesday and #smallspacesunday stitch diagrams, can also be found on a Pinterest board here.

Be sure to follow whimsicalstitch.com on FacebookPinterestInstagram, and Twitter.

If you like what you see on this blog, want to learn some very creative decorative stitches, and how to put them all together, whimsicalstitch.com has a book for you! Mary’s Whimsical Stitches is a contemporary how-to collection of more than 250 stitches for stitchers regardless of skill level. The book includes updated and sequenced diagrams from this blog, all-new stitches, and a chapter on the basics of needlepoint. For more information, visit here.

whimsicalstitch.com also sells Stitch Guides and Stitch Concepts for Melissa Shirley Designs, Zecca DesignsSandra Gilmore, Purple Palm, Maggie, and Penny MacLeod, and many more. Click here to see the newest guides and click here to see the entire collection.

I hope you have the perfect spot for this stitch! Please enjoy! Have a wonderful #whimsicalwednesday!

A Note about Diagrams
I use color in diagrams to make them as clear as possible.  The primary function of different colored lines is to illustrate a stitch sequence.  For example, layering of colors demonstrates you add them in that order.  They can also provide ideas on how to integrate additional threads (one line for each color).  Or, you can use the same thread for all color lines.  That's where I encourage you to use your imagination for the space you are stitching!

Just Right

I confess I have a formula for windows. Open stitch? Check. Small stitch? Check. Lightweight metallic? Check. Well, two out of three of those “rules" apply to today’s stitch.

Click on image to see on whimsicalstitch.com's Pinterest account. Visit pinterest.com/whimsicalstitch/whimsicalwednesday for a library of all #whimsicalwednesday and #smallspacesunday stitch diagrams.

Click on image to see on whimsicalstitch.com's Pinterest account. Visit pinterest.com/whimsicalstitch/whimsicalwednesday for a library of all #whimsicalwednesday and #smallspacesunday stitch diagrams.

Click on image to see on whimsicalstitch.com's Instagram account. Visit instagram.com/whimsicalstitch to see a library of stitched samples for select #whimsicalwednesday and #smallspacesunday stitch diagrams.

Click on image to see on whimsicalstitch.com's Instagram account. Visit instagram.com/whimsicalstitch to see a library of stitched samples for select #whimsicalwednesday and #smallspacesunday stitch diagrams.

Today’s stitch comes from one of my very first Stitch Guides (Lemons by Annie O’Brien Gonzales) and uses Kreinik Fine Braid (size 8) on 13-mesh. I concocted this stitch to fill rather large window panes, all the while staying true to my general approach of open stitches and lightweight metallics for windows.

Sidebar: If you want to kill more time (and hey, why not, it’s not like your boss is looking over your shoulder since you’re working from home), take a trip in the wayback machine to read about my (literal) discovery of open stitches for windows. (It also happens to come with two of my favorite window stitches.)

The path for this stitch is similar to blackwork. I call it a modified back stitch. Simply follow the outline of the pattern using back stitches. A traditional backstitch goes from left to right (or right to left)…repeatedly. With a modified back stitch, you alternate between left to right or right to left or up to down or down to up, depending on the pattern. When you get to an edge of the area, weave your thread through the threads on the back of the canvas to return to an open area and begin again. It’s also helpful to complete some solid stitching in the area so you have other places to bury the threads. In the stitched sample, I buried threads in the shaded window pane (white and light blue) and the green leaves.

This stitch will make a beautiful sky in the far background or water with 2-3 plies of Silk Floss (Soie d’Alger, Soie Cristale, Splendor, Needlepoint Inc Silk, etc) or a lightweight metallic (Kreinik Fine Braid, Kreinik Very Fine Braid, Petite Silk Lame, Bijoux, Soie Perle, etc)

This stitch diagram, along with all other #whimsicalwednesday and #smallspacesunday stitch diagrams, can also be found on a Pinterest board here.

Be sure to follow whimsicalstitch.com on FacebookPinterestInstagram, and Twitter.

If you like what you see on this blog, want to learn some very creative decorative stitches, and how to put them all together, whimsicalstitch.com has a book for you! Mary’s Whimsical Stitches is a contemporary how-to collection of more than 250 stitches for stitchers regardless of skill level. The book includes updated and sequenced diagrams from this blog, all-new stitches, and a chapter on the basics of needlepoint. For more information, visit here.

whimsicalstitch.com also sells Stitch Guides and Stitch Concepts for Melissa Shirley Designs, Zecca DesignsSandra Gilmore, Purple Palm, Maggie, and Penny MacLeod, and many more. Click here to see the newest guides and click here to see the entire collection.

I hope you have the perfect spot for this stitch! Please enjoy! Have a wonderful #whimsicalwednesday!

A Note about Diagrams
I use color in diagrams to make them as clear as possible.  The primary function of different colored lines is to illustrate a stitch sequence.  For example, layering of colors demonstrates you add them in that order.  They can also provide ideas on how to integrate additional threads (one line for each color).  Or, you can use the same thread for all color lines.  That's where I encourage you to use your imagination for the space you are stitching!

Silver Lining

I’ve been bogged down in recreating a Stitch Guide for a customer and it hasn’t been fun (for a myriad of technical reasons). Yet there is a silver lining…today’s stitch! I woulda bet money I had already posted this and you woulda been so rich if you had taken that bet!

Click on image to see on whimsicalstitch.com's Pinterest account. Visit pinterest.com/whimsicalstitch/whimsicalwednesday for a library of all #whimsicalwednesday and #smallspacesunday stitch diagrams.

Click on image to see on whimsicalstitch.com's Pinterest account. Visit pinterest.com/whimsicalstitch/whimsicalwednesday for a library of all #whimsicalwednesday and #smallspacesunday stitch diagrams.

Click on image to see on whimsicalstitch.com's Instagram account. Visit instagram.com/whimsicalstitch to see a library of stitched samples for select #whimsicalwednesday and #smallspacesunday stitch diagrams.

Click on image to see on whimsicalstitch.com's Instagram account. Visit instagram.com/whimsicalstitch to see a library of stitched samples for select #whimsicalwednesday and #smallspacesunday stitch diagrams.

The stitched sample is a sail from Rooftops, a beautiful piece by Emma Williams. It uses six plies of City Needlework Silk (black lines) and Fyre Werks (yellow lines) on 13-mesh.

This is a double-needler. I recommend preparing two separate needles with the threads. Add the base thread first (yellow line), park the needle off to the side, and cover it with the top threads (black lines). Park that needle on the side and repeat the sequence on the next horizontal column. Always complete the two steps for an entire horizontal column before you proceed to the next column of stitches.

I recommend the double needle technique for many layered stitches. Bringing a threaded needle up from below a pre-existing thread runs the risk of tangles, shredding of either or both threads, and mistakes. In this case, every hole for the threads on top (black lines) is clearly visible.

This is a great all-purpose stitch. I love to use it on roofs and floors with Elegance or Subtlety (black lines) and a contrasting color in the same thread for the yellow lines. Don’t forget to flip it 90° if that makes more sense for the architectural element. I think this could make a really interesting stitch for a Christmas tree with a lightweight metallic (yellow lines) and silk floss (black lines. It would have to be a larger tree, but I think that could be very interesting. And, as always, this will be a great application for clothing. Consider using a Very Velvet (yellow lines) covered with a silk floss (black lines) for an interesting matte on matte look.

This stitch diagram, along with all other #whimsicalwednesday and #smallspacesunday stitch diagrams, can also be found on a Pinterest board here.

Be sure to follow whimsicalstitch.com on FacebookPinterestInstagram, and Twitter.

If you like what you see on this blog, want to learn some very creative decorative stitches, and how to put them all together, whimsicalstitch.com has a book for you! Mary’s Whimsical Stitches is a contemporary how-to collection of more than 250 stitches for stitchers regardless of skill level. The book includes updated and sequenced diagrams from this blog, all-new stitches, and a chapter on the basics of needlepoint. For more information, visit here.

whimsicalstitch.com also sells Stitch Guides and Stitch Concepts for Melissa Shirley Designs, Zecca DesignsSandra Gilmore, Purple Palm, Maggie, and Penny MacLeod, and many more. Click here to see the newest guides and click here to see the entire collection.

I hope you have the perfect spot for this stitch! Please enjoy! Have a wonderful #whimsicalwednesday!

A Note about Diagrams
I use color in diagrams to make them as clear as possible.  The primary function of different colored lines is to illustrate a stitch sequence.  For example, layering of colors demonstrates you add them in that order.  They can also provide ideas on how to integrate additional threads (one line for each color).  Or, you can use the same thread for all color lines.  That's where I encourage you to use your imagination for the space you are stitching!

Just in Time

I stumbled across today’s stitch just in time for today. Translation: I stumbled across this stitch yesterday. Talk about great timing!

Click on image to see on whimsicalstitch.com's Pinterest account. Visit pinterest.com/whimsicalstitch/whimsicalwednesday for a library of all #whimsicalwednesday and #smallspacesunday stitch diagrams.

Click on image to see on whimsicalstitch.com's Pinterest account. Visit pinterest.com/whimsicalstitch/whimsicalwednesday for a library of all #whimsicalwednesday and #smallspacesunday stitch diagrams.

Click on image to see on whimsicalstitch.com's Instagram account. Visit instagram.com/whimsicalstitch to see a library of stitched samples for select #whimsicalwednesday and #smallspacesunday stitch diagrams.

Click on image to see on whimsicalstitch.com's Instagram account. Visit instagram.com/whimsicalstitch to see a library of stitched samples for select #whimsicalwednesday and #smallspacesunday stitch diagrams.

It’s nothing more than pairs of horizontal straight stitches with a small leaf in between. However, the sequence is a little different. The oh so lovely stitcher who shared the stitch with me mentioned a couple of caveats. First, begin at the bottom of the area to be stitched and stitch it in horizontal columns. Do a pair of straight stitches, add the leaf, and repeat across the horizontal axis. As you travel up the canvas, subsequent rows will cover the top of the leaves.

The stitched sample is a large field of grass and uses one strand of Sea Grass on 13-mesh canvas. The diagram uses two colors to provide clarity but only one color of Sea Grass was used.

Clearly, this will make a great stitch for large and generally flat spaces such as grass, ground cover, or a roof. It will also make a beautiful wallpaper with two colors of silk floss. Flip it 90° for a long and tall area, such as pants or a chimney. I recommend Pepper Pot Silk (black lines) and a metallic that lays flat, such as Flair or Fyre Werks (turquoise lines), for the pants.

This stitch diagram, along with all other #whimsicalwednesday and #smallspacesunday stitch diagrams, can also be found on a Pinterest board here.

Be sure to follow whimsicalstitch.com on FacebookPinterestInstagram, and Twitter.

If you like what you see on this blog, want to learn some very creative decorative stitches, and how to put them all together, whimsicalstitch.com has a book for you! Mary’s Whimsical Stitches is a contemporary how-to collection of more than 250 stitches for stitchers regardless of skill level. The book includes updated and sequenced diagrams from this blog, all-new stitches, and a chapter on the basics of needlepoint. For more information, visit here.

whimsicalstitch.com also sells Stitch Guides and Stitch Concepts for Melissa Shirley Designs, Zecca DesignsSandra Gilmore, Purple Palm, Maggie, and Penny MacLeod, and many more. Click here to see the newest guides and click here to see the entire collection.

I hope you have the perfect spot for this stitch! Please enjoy! Have a wonderful #whimsicalwednesday!

A Note about Diagrams
I use color in diagrams to make them as clear as possible.  The primary function of different colored lines is to illustrate a stitch sequence.  For example, layering of colors demonstrates you add them in that order.  They can also provide ideas on how to integrate additional threads (one line for each color).  Or, you can use the same thread for all color lines.  That's where I encourage you to use your imagination for the space you are stitching!

Hello May!

Happy May to us! Many of us may still be stuck inside but that doesn’t mean we can’t visit the outdoors. Today’s stitch is a fun little leaf stitch that makes me smile.

Click on image to see on whimsicalstitch.com's Pinterest account. Visit pinterest.com/whimsicalstitch/whimsicalwednesday for a library of all #whimsicalwednesday and #smallspacesunday stitch diagrams.

Click on image to see on whimsicalstitch.com's Pinterest account. Visit pinterest.com/whimsicalstitch/whimsicalwednesday for a library of all #whimsicalwednesday and #smallspacesunday stitch diagrams.

Click on image to see on whimsicalstitch.com's Instagram account. Visit instagram.com/whimsicalstitch to see a library of stitched samples for select #whimsicalwednesday and #smallspacesunday stitch diagrams.

Click on image to see on whimsicalstitch.com's Instagram account. Visit instagram.com/whimsicalstitch to see a library of stitched samples for select #whimsicalwednesday and #smallspacesunday stitch diagrams.

The stitched sample uses a single strand of DMC Floche (black lines) and a single strand of Soy Luster (turquoise lines). I used it for a large swath of grass in front of the pumpkins in Pumpkin Lane from Melissa Shirley. You may notice that I did not stitch the red dots behind the grass. That was purposeful as there were other flowers that I wanted to gather (intentional pun) more attention.

As with most leaf stitches, you can point this is whatever direction you want to create the look you are going for. Point the tips downward for a completely different look on a largish tree. I would love to see two shades of green Straw Silk in that application. I’m also toying with the idea of using this for the wings on a chicken with a silk floss (black lines) and a Petite Silk Lame (turquoise lines).

This stitch diagram, along with all other #whimsicalwednesday and #smallspacesunday stitch diagrams, can also be found on a Pinterest board here.

Be sure to follow whimsicalstitch.com on FacebookPinterestInstagram, and Twitter.

If you like what you see on this blog, want to learn some very creative decorative stitches, and how to put them all together, whimsicalstitch.com has a book for you! Mary’s Whimsical Stitches is a contemporary how-to collection of more than 250 stitches for stitchers regardless of skill level. The book includes updated and sequenced diagrams from this blog, all-new stitches, and a chapter on the basics of needlepoint. For more information, visit here.

whimsicalstitch.com also sells Stitch Guides and Stitch Concepts for Melissa Shirley Designs, Zecca DesignsSandra Gilmore, Purple Palm, Maggie, and Penny MacLeod, and many more. Click here to see the newest guides and click here to see the entire collection.

I hope you have the perfect spot for this stitch! Please enjoy! Have a wonderful #whimsicalwednesday!

A Note about Diagrams
I use color in diagrams to make them as clear as possible.  The primary function of different colored lines is to illustrate a stitch sequence.  For example, layering of colors demonstrates you add them in that order.  They can also provide ideas on how to integrate additional threads (one line for each color).  Or, you can use the same thread for all color lines.  That's where I encourage you to use your imagination for the space you are stitching!

Let There Be White

On the off chance you didn’t know, I adore tramme stitches. Today’s variation is a great way to add more subtle direction.

Click on image to see on whimsicalstitch.com's Pinterest account. Visit pinterest.com/whimsicalstitch/whimsicalwednesday for a library of all #whimsicalwednesday and #smallspacesunday stitch diagrams.

Click on image to see on whimsicalstitch.com's Pinterest account. Visit pinterest.com/whimsicalstitch/whimsicalwednesday for a library of all #whimsicalwednesday and #smallspacesunday stitch diagrams.

Click on image to see on whimsicalstitch.com's Instagram account. Visit instagram.com/whimsicalstitch to see a library of stitched samples for select #whimsicalwednesday and #smallspacesunday stitch diagrams.

Click on image to see on whimsicalstitch.com's Instagram account. Visit instagram.com/whimsicalstitch to see a library of stitched samples for select #whimsicalwednesday and #smallspacesunday stitch diagrams.

Most of the tramme stitches I’ve shared with you have been horizontal or vertical with cute accent stitches. Today’s tramme uses diagonal base threads with long accent stitches. The accent stitches provide the subtle angle of the stitch.

The stitched sample is the stomach of a flying puffin (naturally), hence the use of a whole lotta white threads. The base threads (black lines) are Kreinik 1/16” ribbon. The gray lines are Petite Silk Lame and the aqua lines are Soie D'Alger. I acknowledge you may not be able to distinguish between the Petite Silk Lame and the Soie on the stitched sample but I promise they are distinct on the actual canvas.

The most difficult part of this stitch is the first step (black lines). If one of these diagonal lines is off by even a single canvas thread, it will screw up the remainder of the stitch. My recommendation is to start small and work up to the longer diagonal stitches.

An easy way to accomplish this is to add your first short diagonal stitch in a corner. For this example, start in the upper left corner from the left edge to the top edge. Double and triple-check that your first diagonal stitch travels along a perfect 45° diagonal path. After it is complete, count across four rows to the right, bring your thread up from behind the canvas at that point and return it four rows below the left-hand side of the prior diagonal stitch. Count down four rows, bring the thread up from behind the canvas and return it four rows to the right of the prior stitch on the top edge.

Select members of the needlepoint police may offer a more complex way to ensure that your threads are wrapped around the edges versus an ever so slight resulting from my technique. I do the first step of most of my tramme stitches in this manner, especially for large areas, in order to minimize the use of the thread and make this go as quickly as possible. It is a matter of personal preference. I find this counting method effective and easy.

I stumbled across this stitch for a roof with a similar angle. The angle was reinforced with painted lines at that angle (in a different color). That is where the idea emerged to use two different color threads for the straight stitches.

This stitch diagram, along with all other #whimsicalwednesday and #smallspacesunday stitch diagrams, can also be found on a Pinterest board here.

Be sure to follow whimsicalstitch.com on FacebookPinterestInstagram, and Twitter.

If you like what you see on this blog, want to learn some very creative decorative stitches, and how to put them all together, whimsicalstitch.com has a book for you! Mary’s Whimsical Stitches is a contemporary how-to collection of more than 250 stitches for stitchers regardless of skill level. The book includes updated and sequenced diagrams from this blog, all-new stitches, and a chapter on the basics of needlepoint. For more information, visit here.

whimsicalstitch.com also sells Stitch Guides and Stitch Concepts for Melissa Shirley Designs, Zecca DesignsSandra Gilmore, Purple Palm, Maggie, and Penny MacLeod, and many more. Click here to see the newest guides and click here to see the entire collection.

I hope you have the perfect spot for this stitch! Please enjoy! Have a wonderful #whimsicalwednesday!

A Note about Diagrams
I use color in diagrams to make them as clear as possible.  The primary function of different colored lines is to illustrate a stitch sequence.  For example, the layering of colors demonstrates you add them in that order.  They can also provide ideas on how to integrate additional threads (one line for each color).  Or, you can use the same thread for all color lines.  That's where I encourage you to use your imagination for the space you are stitching!

Zoom!

I attended my first virtual needlepoint class this weekend and learned a boatload of new things about Zoom video conferencing (literally our link to the outside world these days) and a darling new stitch! Both will be invaluable going forward.

Click on image to see on whimsicalstitch.com's Pinterest account. Visit pinterest.com/whimsicalstitch/whimsicalwednesday for a library of all #whimsicalwednesday and #smallspacesunday stitch diagrams.

Click on image to see on whimsicalstitch.com's Pinterest account. Visit pinterest.com/whimsicalstitch/whimsicalwednesday for a library of all #whimsicalwednesday and #smallspacesunday stitch diagrams.

Click on image to see on whimsicalstitch.com's Instagram account. Visit instagram.com/whimsicalstitch to see a library of stitched samples for select #whimsicalwednesday and #smallspacesunday stitch diagrams.

Click on image to see on whimsicalstitch.com's Instagram account. Visit instagram.com/whimsicalstitch to see a library of stitched samples for select #whimsicalwednesday and #smallspacesunday stitch diagrams.

The stitch is from Ruth Schmuff’s new project, Fashion by Zecca. The stitched sample is from the background of the border and uses three plies of Soie (gray lines) and Petite Silk Lame (turquoise lines).

A couple things to note before you begin. The blocks of vertical stitches include five stitches five rows high. The blocks of horizontal stitches include four stitches six rows wide. I’m not gonna lie; I may have rolled my eyes (ever so gently) when Ruth said to stitch all of the stitches in one direction before you stitch the second group of stitches (horizontal blocks first followed by vertical blocks). Wellllll, I jumped ahead to finish an area for today’s blog post and, yes, confirmed Ruth was correct. Your head gets into a pattern of five over five, five over five, etc. Flipping back and forth took some getting used to. There was a whole lot of “Wait, what?” when I would miss a cue.

This stitch will make a fantastic architectural stitch, including wallpaper, house wall, roof, or flooring. For roofs or floors, I would audition wools for the gray lines and a slightly heavier matte thread, such as Vineyard Silk, for the Cross Stitches (turquoise lines). For walls, I would use threads similar to the ones in the stitched sample.

A couple of variations flicking around in my head are stitching one direction of stitches in a different thread, whether that is a different color, finish, or both. Consider changing the Cross Stitch to beads. Consider adding three tent stitches in the center of each empty row between the blocks to give the stitch slightly more coverage.

I’m not going to lie…I wasn’t quite sure what to expect in a virtual class. I participated in enough hilariously awkward video conferences during my corporate years to be wary. Well, it was anything but awkward. Sure, there were some endearing ceiling shots but it was nice to be able to connect with a lovely group of stitchers from across the country. We all learned through live demos, show and tell (from across the country), Q&A, and a few oops. All in all, a great stitching weekend in my pj’s at my dining room table.

This stitch diagram, along with all other #whimsicalwednesday and #smallspacesunday stitch diagrams, can also be found on a Pinterest board here.

Be sure to follow whimsicalstitch.com on FacebookPinterestInstagram, and Twitter.

If you like what you see on this blog, want to learn some very creative decorative stitches, and how to put them all together, whimsicalstitch.com has a book for you! Mary’s Whimsical Stitches is a contemporary how-to collection of more than 250 stitches for stitchers regardless of skill level. The book includes updated and sequenced diagrams from this blog, all-new stitches, and a chapter on the basics of needlepoint. For more information, visit here.

whimsicalstitch.com also sells Stitch Guides and Stitch Concepts for Melissa Shirley Designs, Zecca DesignsSandra Gilmore, Purple Palm, Maggie, and Penny MacLeod, and many more. Click here to see the newest guides and click here to see the entire collection.

I hope you have the perfect spot for this stitch! Please enjoy! Have a wonderful #whimsicalwednesday!

A Note about Diagrams
I use color in diagrams to make them as clear as possible.  The primary function of different colored lines is to illustrate a stitch sequence.  For example, layering of colors demonstrates you add them in that order.  They can also provide ideas on how to integrate additional threads (one line for each color).  Or, you can use the same thread for all color lines.  That's where I encourage you to use your imagination for the space you are stitching!

Groundhog Day

Today’s stitch is an homage to our own never-ending cycle of Groundhog Days.

Click on image to see on whimsicalstitch.com's Instagram account. Visit instagram.com/whimsicalstitch to see a library of stitched samples for select #whimsicalwednesday and #smallspacesunday stitch diagrams.

Click on image to see on whimsicalstitch.com's Instagram account. Visit instagram.com/whimsicalstitch to see a library of stitched samples for select #whimsicalwednesday and #smallspacesunday stitch diagrams.

Click on image to see on whimsicalstitch.com's Pinterest account. Visit pinterest.com/whimsicalstitch/whimsicalwednesday for a library of all #whimsicalwednesday and #smallspacesunday stitch diagrams.

Click on image to see on whimsicalstitch.com's Pinterest account. Visit pinterest.com/whimsicalstitch/whimsicalwednesday for a library of all #whimsicalwednesday and #smallspacesunday stitch diagrams.

The Groundhog Stitch is more of a concept than a specific stitch. The stitched sample is upfront because it is one example of a Groundhog Stitch. Any repeated element can be used.

The gold circles in the stitched sample were painted on the canvas. I asked my student to add additional circles in a contrasting color to fill the area. Since the gold circles were not placed in a specific pattern, the blue circles were added in random spots as well. The gold circles use gold Fyre Werks; the blue circles use blue Petite Silk Lame. The stitched sample is a work in progress; more blue circles will be added.

In my opinion, this concept works best for larger areas, including (but not limited to) skies, backgrounds, clothing, curtains (as in the stitched sample), water. I think you get the idea. It doesn’t matter if the area is painted in a solid color or a shaded area.

I’ve seen variations of this stitch using leaves, Upright Tied Crosses, and eyelet stitches. So, clearly, the variations are limitless.

This stitch diagram, along with all other #whimsicalwednesday and #smallspacesunday stitch diagrams, can also be found on a Pinterest board here.

Be sure to follow whimsicalstitch.com on FacebookPinterestInstagram, and Twitter.

If you like what you see on this blog, want to learn some very creative decorative stitches, and how to put them all together, whimsicalstitch.com has a book for you! Mary’s Whimsical Stitches is a contemporary how-to collection of more than 250 stitches for stitchers regardless of skill level. The book includes updated and sequenced diagrams from this blog, all-new stitches, and a chapter on the basics of needlepoint. For more information, visit here. My favorite needlepoint retailers that carry the book can be found here.

whimsicalstitch.com also sells Stitch Guides and Stitch Concepts for Melissa Shirley Designs, Zecca DesignsSandra Gilmore, Purple Palm, Maggie, and Penny MacLeod, and many more. Click here to see the newest guides and click here to see the entire collection.

I hope you have the perfect spot for this stitch! Please enjoy! Have a wonderful #whimsicalwednesday!

A Note about Diagrams
I use color in diagrams to make them as clear as possible.  The primary function of different colored lines is to illustrate a stitch sequence.  For example, layering of colors demonstrates you add them in that order.  They can also provide ideas on how to integrate additional threads (one line for each color).  Or, you can use the same thread for all color lines.  That's where I encourage you to use your imagination for the space you are stitching!

Happy #stitchingsunday

Welcome to the first #stitchingsunday featuring stitches from my book. The inaugural post features the Tramme stitch from one of my very first blog posts and one of my favorite go-to stitches.

Click on image to see on whimsicalstitch.com's Instagram account. Visit instagram.com/whimsicalstitch to see a library of stitched samples for select #whimsicalwednesday and #smallspacesunday stitch diagrams.

Click on image to see on whimsicalstitch.com's Instagram account. Visit instagram.com/whimsicalstitch to see a library of stitched samples for select #whimsicalwednesday and #smallspacesunday stitch diagrams.

Click on image to see on whimsicalstitch.com's Pinterest account. Visit pinterest.com/whimsicalstitch/whimsicalwednesday for a library of all #whimsicalwednesday and #smallspacesunday stitch diagrams.

Click on image to see on whimsicalstitch.com's Pinterest account. Visit pinterest.com/whimsicalstitch/whimsicalwednesday for a library of all #whimsicalwednesday and #smallspacesunday stitch diagrams.

Today’s stitched sample is an oh so sweet baby pillow from Abigail Cecile, featuring the Tramme stitch as a border. The stitcher used Kreinik Metallics for the base threads (black lines) and Sparkle Rays for the accent threads (aqua lines). Visit the original blog post here for more insight on how to navigate burying the threads as well as a little history on tramme stitches. The stitch can be found on page 147 in my book.

This stitch diagram, along with all other #whimsicalwednesday and #smallspacesunday stitch diagrams, can also be found on a Pinterest board here.

Be sure to follow whimsicalstitch.com on FacebookPinterestInstagram, and Twitter.

If you like what you see on this blog, want to learn some very creative decorative stitches, and how to put them all together, whimsicalstitch.com has a book for you! Mary’s Whimsical Stitches is a contemporary how-to collection of more than 250 stitches for stitchers regardless of skill level. The book includes updated and sequenced diagrams from this blog, all-new stitches, and a chapter on the basics of needlepoint. For more information, visit here. Retailers carrying the book can be found here.

whimsicalstitch.com also sells Stitch Guides and Stitch Concepts for Melissa Shirley Designs, Zecca DesignsSandra Gilmore, Purple Palm, Maggie, and Penny MacLeod, and many more. Click here to see the newest guides and click here to see the entire collection.

I hope you have the perfect spot for this stitch! Happy #stitchingsunday!

A Note about Diagrams
I use color in diagrams to make them as clear as possible. The primary function of different colored lines is to illustrate a stitch sequence. For example, layering of colors demonstrates you add them in that order. They can also provide ideas on how to integrate additional threads (one line for each color). Or, you can use the same thread for all color lines. That's where I encourage you to use your imagination for the space you are stitching!