Keeping Santa Warm & Dry

As promised, today’s #stitchingsunday introduces you to the very smartly dressed Santa from my tree. Today’s stitch is from a forever ago blog post and is also included on page 203 of my first book.

Click image to see #whimsicalwednesday and #smallspacesunday Stitched Sample Gallery on Instagram.

Click image to see the whimsicalstitch Stitch Library on pinterest.com. Includes all #whimsicalwednesday and #smallspacesunday stitch diagrams.

Today’s stitched sample is a Santa roll-up from my early days of decorative stitching. The stitched sample uses Neon Rays (black lines) and Flair (yellow lines). The original blog post presents this same stitch on the horizontal, so it’s kinda fun to see the different looks. It’s a fantastic small space stitch. I talk a little about how to navigate the extra bulk this stitch can add, which can be a great feature for certain stitch areas.

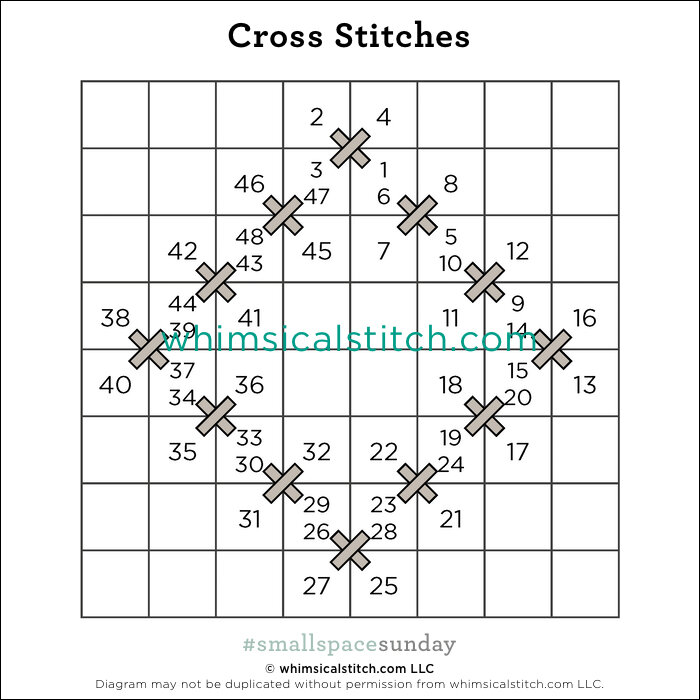
This stitch diagram, along with all other #whimsicalwednesday and #smallspacesunday stitch diagrams, can also be found on a Pinterest board here.

Be sure to follow whimsicalstitch.com on FacebookPinterestInstagram, and Twitter.

If you like what you see on this blog, want to learn some very creative decorative stitches, and how to put them all together, whimsicalstitch.com has a book for you! Mary’s Whimsical Stitches is a contemporary how-to collection of more than 250 stitches for stitchers regardless of skill level. The book includes updated and sequenced diagrams from this blog, all-new stitches, and a chapter on the basics of needlepoint. For more information, visit here. Retailers carrying the book can be found here.

whimsicalstitch.com also sells Stitch Guides and Stitch Concepts for Melissa Shirley Designs, Zecca DesignsSandra Gilmore, Purple Palm, Maggie, and Penny MacLeod, and many more. Click here to see the newest guides and click here to see the entire collection.

I hope you have the perfect spot for this stitch! Happy #stitchingsunday!

A Note about Diagrams
I use color in diagrams to make them as clear as possible. The primary function of different colored lines is to illustrate a stitch sequence. For example, layering of colors demonstrates you add them in that order. They can also provide ideas on how to integrate additional threads (one line for each color). Or, you can use the same thread for all color lines. That's where I encourage you to use your imagination for the space you are stitching!

Happy #smallstitchingsunday

Sometimes simple and small is the best way to go. Today’s #stitchingsunday is a shout-out to some of my favorite small stitches.

Click on image to see on whimsicalstitch.com's Instagram account. Visit instagram.com/whimsicalstitch to see a library of stitched samples for select #whimsicalwednesday and #smallspacesunday stitch diagrams.

Click on image to see on whimsicalstitch.com's Instagram account. Visit instagram.com/whimsicalstitch to see a library of stitched samples for select #whimsicalwednesday and #smallspacesunday stitch diagrams.

Click on image to see on whimsicalstitch.com's Pinterest account. Visit pinterest.com/whimsicalstitch/whimsicalwednesday for a library of all #whimsicalwednesday and #smallspacesunday stitch diagrams.

Click on image to see on whimsicalstitch.com's Pinterest account. Visit pinterest.com/whimsicalstitch/whimsicalwednesday for a library of all #whimsicalwednesday and #smallspacesunday stitch diagrams.

 
Click on image to see on whimsicalstitch.com's Pinterest account. Visit pinterest.com/whimsicalstitch/whimsicalwednesday for a library of all #whimsicalwednesday and #smallspacesunday stitch diagrams.

Click on image to see on whimsicalstitch.com's Pinterest account. Visit pinterest.com/whimsicalstitch/whimsicalwednesday for a library of all #whimsicalwednesday and #smallspacesunday stitch diagrams.

Click on image to see on whimsicalstitch.com's Pinterest account. Visit pinterest.com/whimsicalstitch/whimsicalwednesday for a library of all #whimsicalwednesday and #smallspacesunday stitch diagrams.

Click on image to see on whimsicalstitch.com's Pinterest account. Visit pinterest.com/whimsicalstitch/whimsicalwednesday for a library of all #whimsicalwednesday and #smallspacesunday stitch diagrams.

By the end of the day lately, I’m tapped out. Several of my works-in-progress are large, exquisite, and honestly, too much at the moment. I turned to a small canvas I had in my stash to get me through this week. (Also, loving Perry Mason and the Watchmen on HBO. Not necessarily perfect stitch TV*, but easy stitches make it easier to do both at the same time.)

The canvas is an adorable eyeglass case (on 13M) I picked up a few months ago. The letters are stitched in Cross Stitches, a trick I picked up from a fellow needlepoint junkie, with silver Fyre Werks. The advantage of a Cross Stitch, instead of a French Knot, Tent Stitch, or bead is that a Cross Stitch covers all four sides of an intersection, making the lines created by the stitches (in any direction) smooth and uninterrupted.

The background is nothing more than what I call Plain Needlepoint, but more commonly known as Basketweave, in Vineyard Silk and Pepper Pot Silk. I considered and discarded cuter and more complex stitches because I wanted the attention to go to the letters and the glasses. In addition, I didn’t want to do that much compensating around the same letters and glasses.

And, last but not least, the lenses are covered in Reverse Basketweave with a size 8 Kreinik Metallic to ensure the canvas shows through, as it would do through glasses.

These stitch diagrams, along with all other #whimsicalwednesday and #smallspacesunday stitch diagrams, can also be found on a Pinterest board here.

Be sure to follow whimsicalstitch.com on FacebookPinterestInstagram, and Twitter.

If you like what you see on this blog, want to learn some very creative decorative stitches, and how to put them all together, whimsicalstitch.com has a book for you! Mary’s Whimsical Stitches is a contemporary how-to collection of more than 250 stitches for stitchers regardless of skill level. The book includes updated and sequenced diagrams from this blog, all-new stitches, and a chapter on the basics of needlepoint. For more information, visit here. Retailers carrying the book can be found here.

whimsicalstitch.com also sells Stitch Guides and Stitch Concepts for Melissa Shirley Designs, Zecca DesignsSandra Gilmore, Purple Palm, Maggie, and Penny MacLeod, and many more. Click here to see the newest guides and click here to see the entire collection.

There’s a time and place for everything and sometimes it needs to be simple. I anticipate I will finish this tonight while I watch the Perry Mason finale. I’m confident you have the perfect spots for any of these stitches. Happy #stitchingsunday!

*Stitch TV = any programming that you can watch and comprehend while stitching. I prefer it to not be completely vacuous; I’m also not a fan of overly harsh reality TV. My favorite Stitch TV includes binging on old series I already know and love (Justified, I’m looking at you), easy comedies (Parks & Rec, anyone?), Great British Bake Off (who doesn’t love an English accent with their sweets?), and sports (or what is passing as sports TV these days).

A Note about Diagrams
I use color in diagrams to make them as clear as possible. The primary function of different colored lines is to illustrate a stitch sequence. For example, layering of colors demonstrates you add them in that order. They can also provide ideas on how to integrate additional threads (one line for each color). Or, you can use the same thread for all color lines. That's where I encourage you to use your imagination for the space you are stitching!

Happy #stitchingsunday

Welcome to the first #stitchingsunday featuring stitches from my book. The inaugural post features the Tramme stitch from one of my very first blog posts and one of my favorite go-to stitches.

Click on image to see on whimsicalstitch.com's Instagram account. Visit instagram.com/whimsicalstitch to see a library of stitched samples for select #whimsicalwednesday and #smallspacesunday stitch diagrams.

Click on image to see on whimsicalstitch.com's Instagram account. Visit instagram.com/whimsicalstitch to see a library of stitched samples for select #whimsicalwednesday and #smallspacesunday stitch diagrams.

Click on image to see on whimsicalstitch.com's Pinterest account. Visit pinterest.com/whimsicalstitch/whimsicalwednesday for a library of all #whimsicalwednesday and #smallspacesunday stitch diagrams.

Click on image to see on whimsicalstitch.com's Pinterest account. Visit pinterest.com/whimsicalstitch/whimsicalwednesday for a library of all #whimsicalwednesday and #smallspacesunday stitch diagrams.

Today’s stitched sample is an oh so sweet baby pillow from Abigail Cecile, featuring the Tramme stitch as a border. The stitcher used Kreinik Metallics for the base threads (black lines) and Sparkle Rays for the accent threads (aqua lines). Visit the original blog post here for more insight on how to navigate burying the threads as well as a little history on tramme stitches. The stitch can be found on page 147 in my book.

This stitch diagram, along with all other #whimsicalwednesday and #smallspacesunday stitch diagrams, can also be found on a Pinterest board here.

Be sure to follow whimsicalstitch.com on FacebookPinterestInstagram, and Twitter.

If you like what you see on this blog, want to learn some very creative decorative stitches, and how to put them all together, whimsicalstitch.com has a book for you! Mary’s Whimsical Stitches is a contemporary how-to collection of more than 250 stitches for stitchers regardless of skill level. The book includes updated and sequenced diagrams from this blog, all-new stitches, and a chapter on the basics of needlepoint. For more information, visit here. Retailers carrying the book can be found here.

whimsicalstitch.com also sells Stitch Guides and Stitch Concepts for Melissa Shirley Designs, Zecca DesignsSandra Gilmore, Purple Palm, Maggie, and Penny MacLeod, and many more. Click here to see the newest guides and click here to see the entire collection.

I hope you have the perfect spot for this stitch! Happy #stitchingsunday!

A Note about Diagrams
I use color in diagrams to make them as clear as possible. The primary function of different colored lines is to illustrate a stitch sequence. For example, layering of colors demonstrates you add them in that order. They can also provide ideas on how to integrate additional threads (one line for each color). Or, you can use the same thread for all color lines. That's where I encourage you to use your imagination for the space you are stitching!

Talking to Myself

I’m talking to myself (and to inanimate objects) a lot more than usual these days. And I think this cat is telling me how pleased it is with the choice of stitch and threads we used for its fur.

Click on image to see on whimsicalstitch.com's Pinterest account. Visit pinterest.com/whimsicalstitch/whimsicalwednesday for a library of all #whimsicalwednesday and #smallspacesunday stitch diagrams.

Click on image to see on whimsicalstitch.com's Pinterest account. Visit pinterest.com/whimsicalstitch/whimsicalwednesday for a library of all #whimsicalwednesday and #smallspacesunday stitch diagrams.

Click on image to see on whimsicalstitch.com's Instagram account. Visit instagram.com/whimsicalstitch to see a library of stitched samples for select #whimsicalwednesday and #smallspacesunday stitch diagrams.

Click on image to see on whimsicalstitch.com's Instagram account. Visit instagram.com/whimsicalstitch to see a library of stitched samples for select #whimsicalwednesday and #smallspacesunday stitch diagrams.

The stitch uses Glisten (gray lines) and Fyre Werks (turquoise lines) on a cat’s face from Este MacLeod’s Snowy. I flipped the stitch 90° for the legs (not shown).

As you may know, I’m a fan of plain needlepoint for all faces…human, animal, or otherwise. (This is needlepoint; we know there are faces other than human or animal.) However, this cat screamed for something more than basketweave as it was an abstract cat and a focal point for the project.

This stitch is great for clothing, as it adds direction and interest to an area. It will make a very handsome coat or pants, using Very Velvet (gray lines) and Flair (turquoise lines) in vertical columns. Vertical columns would also lend themselves very well for a tree trunk with two shades of Rainbow Linen (one shade for gray lines and a second shade for the turquoise lines). It would also make a wonderful border around any needlepoint piece.

This stitch diagram, along with all other #whimsicalwednesday and #smallspacesunday stitch diagrams, can also be found on a Pinterest board here.

Be sure to follow whimsicalstitch.com on FacebookPinterestInstagram, and Twitter.

If you like what you see on this blog, want to learn some very creative decorative stitches, and how to put them all together, whimsicalstitch.com has a book for you! Mary’s Whimsical Stitches is a contemporary how-to collection of more than 250 stitches for stitchers regardless of skill level. The book includes updated and sequenced diagrams from this blog, all-new stitches, and a chapter on the basics of needlepoint. For more information, visit here. My favorite needlepoint retailers that carry the book can be found here.

whimsicalstitch.com also sells Stitch Guides and Stitch Concepts for Melissa Shirley Designs, Zecca DesignsSandra Gilmore, Purple Palm, Maggie, and Penny MacLeod, and many more. Click here to see the newest guides and click here to see the entire collection.

I hope you have the perfect spot for this stitch! Please enjoy! Have a wonderful #whimsicalwednesday!

A Note about Diagrams
I use color in diagrams to make them as clear as possible.  The primary function of different colored lines is to illustrate a stitch sequence.  For example, layering of colors demonstrates you add them in that order.  They can also provide ideas on how to integrate additional threads (one line for each color).  Or, you can use the same thread for all color lines.  That's where I encourage you to use your imagination for the space you are stitching!

Randomness

As I mentioned, I truly love borders and often have gone out of my way to include them in projects. However, borders don't always need to be pieces of art on their own.  There are so many everyday stitches that serve as great borders, as they can fill large and small spaces alike.  The first example is the tried and true Reverse Basketweave.

The beauty of a "simple" border stitch is there is no need to worry about the corners, as I've discussed in a few posts this month.  The pattern will carry through the border.  Another great example is the Diagonal T stitch.

Both of these stitches are subtle borders that are easy to stitch.  They are also scalable to almost any size border.

Also, just a friendly reminder that virtually any square or rectangular stitch is a great basis for a border.   The first example is the Smyrna Cross.

You could revisit any of the square stitches I shared with you in January.  They can be repurposed into borders, as already illustrated by the Split Square border earlier this month. Another example is the Tied Crosses.

Or the Whimsy Squares for a border over three rows.

And last, but certainly not the least, is the Diamond Border.  

I think you get the idea by now.  :)

These stitch diagrams, along with other #whimsicalwednesday and #smallspacesunday stitch diagrams, can also be found on www.pinterest.com/whimsicalstitch/whimsicalwednesday.  

Be sure to follow whimsicalstitch.com on FacebookPinterestInstagram, and Twitter.

If you like what you see on this blog, want to learn some very creative decorative stitches, and how to put them all together, whimsicalstitch.com sells stitch guides for seasonal Melissa Shirley designs.  21 guides are currently available and more are in the pipeline.

I hope you enjoyed the month of borders!  It was fun for me to do and there are some borders I now can't wait to add to some current projects!

Beetle Border

This week covers a border six rows wide (unintended pun).   It's the skinny version of the Beetle Stitch.

Just as I took a stitch designed for columns (or a border) and exploded it into a background, here I took what I traditionally use as a background stitch and repurposed it as a border.

Beetle Border.jpg

Since this is a straight stitch, the pattern is self contained in each column, meaning you stitch from upper corner to lower corner.  You create mitered corners to make a clean transition from vertical to horizontal columns.  The bright turquoise line in the diagram illustrates the mitered corner, the diagonal seam that joins the left border with the bottom border.  

In the example, the border is six rows wide (or tall, depending on direction).  This means the full pattern begins on the sixth row.  Rows 1-5 (in the corners) are used to create the diagonal seam illustrated above.   

I recommend that your horizontal columns match, meaning they have the exact same pattern on the same rows.  The same goes for your vertical columns.  Once you lay in the pattern for the first column of each direction, the pattern is set.  For this stitch, there's no rule of what stitch to start with...start with the sequence that makes you comfortable.  Just make a note (in the way that works best for you) illustrating what row and what length stitch you started with so you can match it in the other corresponding column.

The stitched sample on Instagram illustrates a Beetle border with brightly metallic contrasting threads, specifically Flair and Shimmer Ribbon.   

This stitch diagram, along with other #whimsicalwednesday and #smallspacesunday stitch diagrams, can also be found on www.pinterest.com/whimsicalstitch/whimsicalwednesday.  

Be sure to follow whimsicalstitch.com on FacebookPinterestInstagram, and Twitter.

If you like what you see on this blog, want to learn some very creative decorative stitches, and how to put them all together, whimsicalstitch.com sells stitch guides for seasonal Melissa Shirley designs.  21 guides are currently available and more are in the pipeline.

Enjoy!

Go Wide!

This week moves to a slightly wider border, specifically five rows wide.  

My go-to recommendation for borders this size is my 5X5 standard, the Split Square.  Here, you alternate directions to create a column.

The bright green and yellow corner is a safeguard for you.  By doing the four corners of the overall border separate from the overall border stitch, you avoid heartbreak if the row count (either horizontally or vertically or both) isn't divisible by five*.

This means each of the four columns (two horizontal and two vertical) of the border are separate items.  I recommend you start each vertical column at the top and compensate at the bottom just above the corner.  For each horizontal column, start at the left and compensate on the right hand side.

* It's lovely to think that any of us will take the time to count out the rows, both on the horizontal and the vertical.  Typically (and honestly), I do not have the patience because I am so excited to be starting a new stitch or I am so over the piece that I just want to be done with it.  

Case in point (and confession time):  The perfectly matched border on my Red Cottage pillow was a freak of nature.  I didn't count.  I just started doing it without even thinking.  I was very, very lucky.  Remember, handpainted canvases are just that...handpainted.  There will be variations between individual canvases of the same design.  Sometimes that is a single row.  And a single row in either direction would have changed that border completely.  Hence, my advice for doing corners differently than the primary border stitch.

The diagram above is colored for clarity.  You can mix colors, as illustrated, or use different threads with the same color value.  Regardless of color, I typically use a matte thread for the two rectangles, such as Vineyard Silk or Silk & Ivory, along with a metallic thread for the center row.   The center stitch of the center row is a way to add an accent, whether it is a bead or a different color thread.  Doing the center row in one color and type thread provides a far less dramatic look.   

These stitch diagrams, along with other #whimsicalwednesday and #smallspacesunday stitch diagrams, can also be found on www.pinterest.com/whimsicalstitch/whimsicalwednesday.  

Be sure to follow whimsicalstitch.com on FacebookPinterestInstagram, and Twitter.

If you like what you see on this blog, want to learn some very creative decorative stitches, and how to put them all together, whimsicalstitch.com sells stitch guides for seasonal Melissa Shirley designs.  20 guides are currently available and more are in the pipeline.

Enjoy!