A Big Small Stitch

Today’s stitch doesn’t look like much from a distance but it certainly packs a surprising little punch of interest up close.

Click image to see the whimsicalstitch.com Stitch Library on pinterest.com. Includes all #whimsicalwednesday and #smallspacesunday stitch diagrams.

Click image to see #whimsicalwednesday and #smallspacesunday Stitched Sample Gallery on Instagram.

The stitch is nothing more than diagonal paths of diagonal stitches over three with tent stitch accents on either side of where the stitches over three rows meet. That’s it…nothing more.

The stitched sample is me playing with Petite Silk Lame (for all of the lines in the diagram) on 18M. I followed the diagonal path adding a stitch over three rows and the two tent stitches on either side at the bottom of the stitch over three rows and….repeat. I do not recommend doing it across the horizontal or vertical as the threads will be visible between the diagonal columns.

I don’t typically love overtly diagonal stitches, but this one is just so sweet. This stitch will be integrated into an upcoming project for a small-ish body of water with two hues of blue metallic (either a size 8 Kreinik or Petite Silk Lame). It also makes a great roof for a Christmas stocking with Straw Silk. It will also play well for a is the

Click on image to see the whimsicalstitch.com Stitch Library on pinterest.com. Includes all #whimsicalwednesday and #smallspacesunday stitch diagrams.

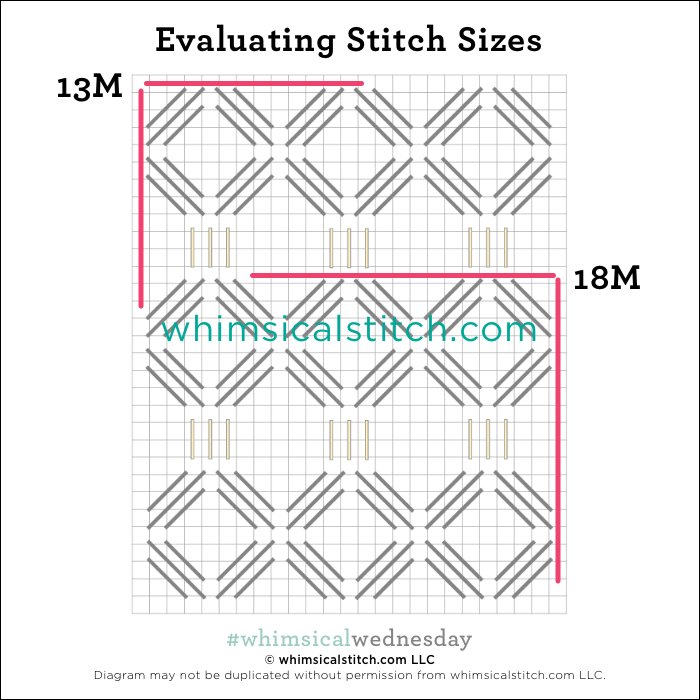
Just a reminder about how to evaluate stitches for size on your project.

As you are auditioning stitches (from any stitch source), count the number of canvas threads on the diagram that match your mesh size. And there you have what an inch of the stitch will look like. Evaluate that against the area where you plan to use the stitch and make your final decision. If you start integrating this step into your stitch selection process, you may be surprised at how many stitches you think are large are much smaller than you realize. (Or, in today’s case, the stitch is much larger than it looks.)

By (sometimes) including this step in my own process, I find I am now integrating much longer stitches than I ever thought I would. I used to think a stitch six rows long was super big. I have very much changed my tune, which has helped me expand my creativity, especially for large-space stitches.

Today’s stitch diagram, along with all other #whimsicalwednesday and #smallspacesunday stitch diagrams, can also be found on a Pinterest board here. Be sure to follow whimsicalstitch.com on FacebookPinterestInstagram, and Twitter.

If you like what you see on this blog, there's more. Mary’s Whimsical Stitches is a series of three books offering contemporary how-to collections of more than 250 stitches (in each volume) for all stitchers, regardless of skill level. All books include updated and sequenced diagrams from this blog plus a collection of all-new stitches from private lessons and other class projects. Visit here to find a needlepoint retailer that carries my books.

New to needlepoint or looking for a refresher? Please download a handy how-to guide covering basic needlepoint stitches and stitch compensation techniques along with new top-line information on needlepoint materials and tools, how to handle threads, and other helpful needlepoint resources.

whimsicalstitch.com also sells Stitch Guides and Stitch Concepts for Melissa Shirley Designs, Zecca DesignsSandra Gilmore, Purple Palm, Maggie, and Penny MacLeod, and many more. Click here to see the newest guides and click here to see the entire collection.

I hope you have the perfect spot for this stitch! Please enjoy! Have a wonderful #whimsicalwednesday!

A Note about Diagrams
I use color in diagrams to make them as clear as possible.  The primary function of different colored lines is to illustrate a stitch sequence.  For example, the layering of colors demonstrates you add them in that order.  They can also provide ideas on integrating additional threads (one line for each color).  Or, you can use the same thread for all color lines.  That's where I encourage you to use your imagination for the space you are stitching!

What If?

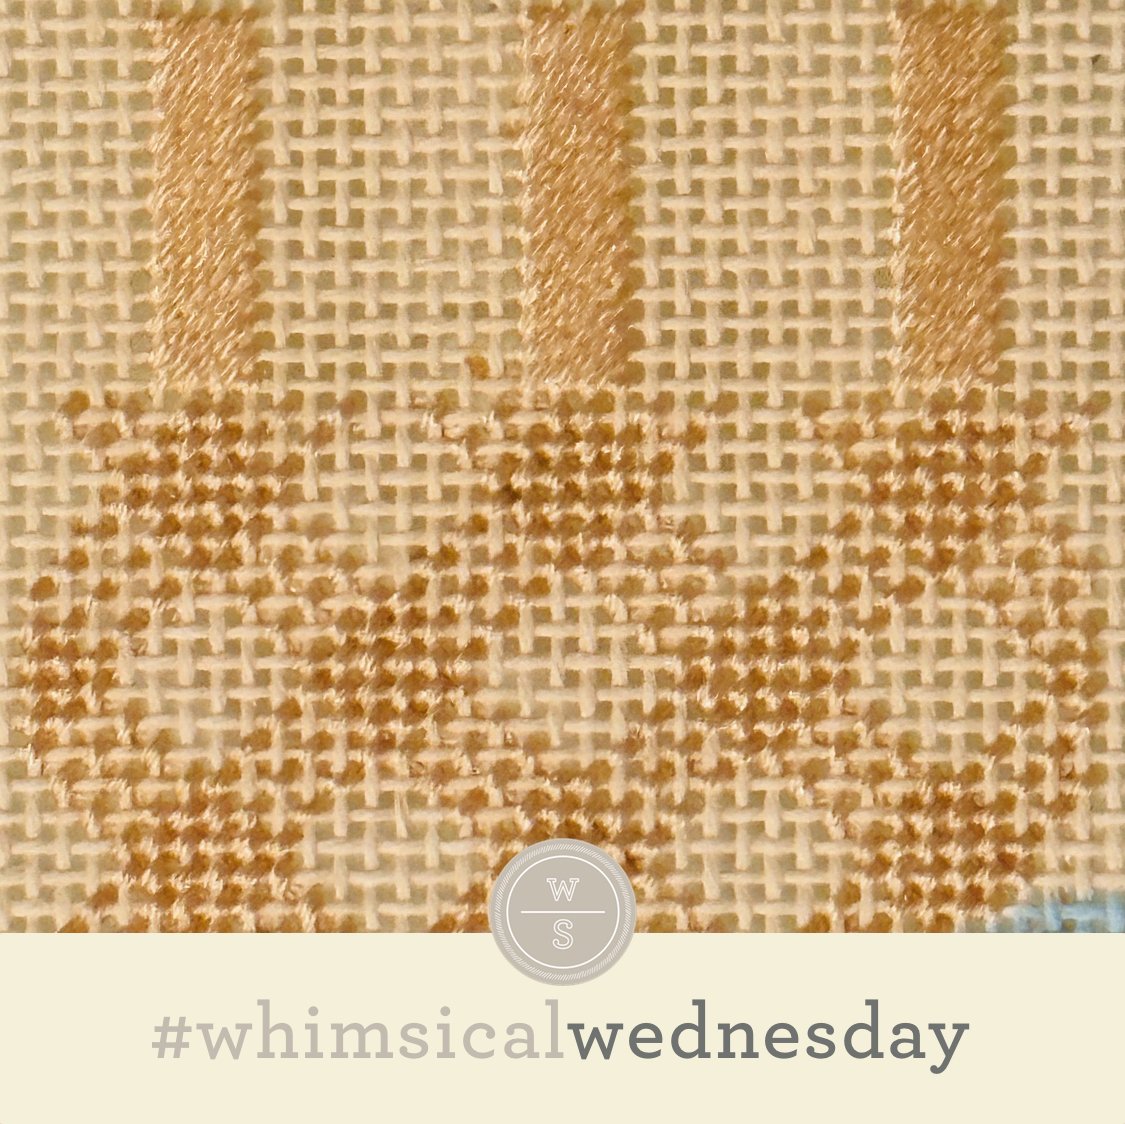
I change my mind a lot…even when I’m thisclose to being done with a Stitch Concept. In this case, I’m really glad I stitched the answer to the nagging question, “What would happen if I stitched only half a gingham?”

Click image to see the whimsicalstitch.com Stitch Library on pinterest.com. Includes all #whimsicalwednesday and #smallspacesunday stitch diagrams.

Click image to see #whimsicalwednesday and #smallspacesunday Stitched Sample Gallery on Instagram.

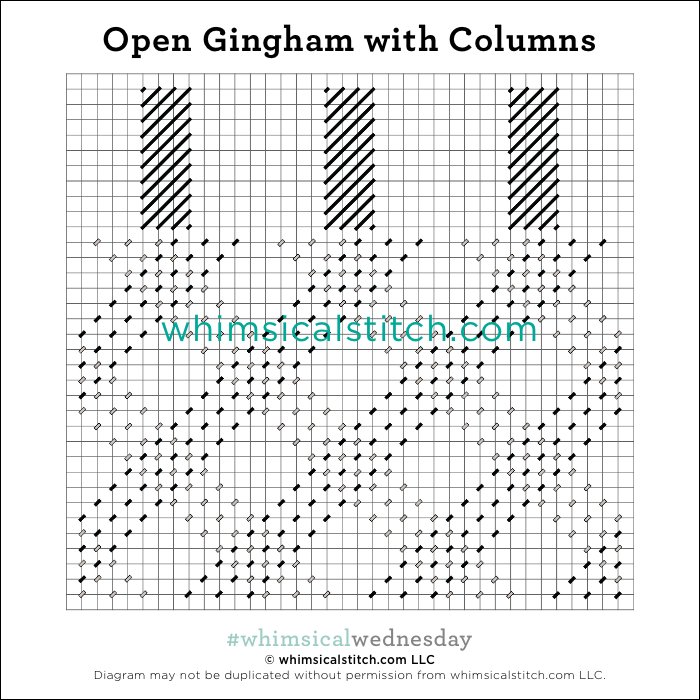
Well, I love it! But first, a little about the diagram and the stitched sample. The diagram uses two colors in the open gingham area to help distinguish the two steps I use to create a gingham pattern. The stitched sample uses a single color of Soie D'Alger for the entire open gingham area. (I used two plies for the satin columns and three for the open gingham.) The pattern was created for a tabletop (open gingham) and a wall above it (satin columns).

This is the same gingham pattern from page 160 of book 3. However, I only stitched one color for both of the steps. The first step is to add three rows of tent stitches, following a diagonal path from upper right to lower left, leaving an empty row between the rows (tent stitches in black lines). Skip seven rows and repeat. When complete, return across the canvas from the upper left to lower right with the same pattern in the opposite direction.

The star of this show is the open gingham. It will make a great background for an ornament in virtually any of your favorite solid-color threads. I’m looking forward to using it on an otherwise simple shirt with a single strand silk (Vineyard. Silk or Pepper Pot Silk) or Elegance (a silk perle) to add some surprising and subtle interest. I’m also toying with using it for a larger window with a Petite Silk Lame or Kreinik Metallics Very Fine Braid #4.

Click on image to see the whimsicalstitch.com Stitch Library on pinterest.com. Includes all #whimsicalwednesday and #smallspacesunday stitch diagrams.

Just a reminder about how to evaluate stitches for size on your project.

As you are auditioning stitches (from any stitch source), count the number of canvas threads on the diagram that match your mesh size. And there you have what an inch of the stitch will look like. Evaluate that against the area where you plan to use the stitch and make your final decision. If you start integrating this step into your stitch selection process, you may be surprised at how many stitches you think are large are much smaller than you realize. (Or, in today’s case, the stitch is much larger than it looks.)

By (sometimes) including this step in my own process, I find I am now integrating much longer stitches than I ever thought I would. I used to think a stitch six rows long was super big. I have very much changed my tune, which has helped me expand my creativity, especially for large-space stitches.

Today’s stitch diagram, along with all other #whimsicalwednesday and #smallspacesunday stitch diagrams, can also be found on a Pinterest board here. Be sure to follow whimsicalstitch.com on FacebookPinterestInstagram, and Twitter.

If you like what you see on this blog, there's more. Mary’s Whimsical Stitches is a series of three books offering contemporary how-to collections of more than 250 stitches (in each volume) for all stitchers, regardless of skill level. All books include updated and sequenced diagrams from this blog plus a collection of all-new stitches from private lessons and other class projects. Visit here to find a needlepoint retailer that carries my books.

New to needlepoint or looking for a refresher? Please download a handy how-to guide covering basic needlepoint stitches and stitch compensation techniques along with new top-line information on needlepoint materials and tools, how to handle threads, and other helpful needlepoint resources.

whimsicalstitch.com also sells Stitch Guides and Stitch Concepts for Melissa Shirley Designs, Zecca DesignsSandra Gilmore, Purple Palm, Maggie, and Penny MacLeod, and many more. Click here to see the newest guides and click here to see the entire collection.

I hope you have the perfect spot for this stitch! Please enjoy! Have a wonderful #whimsicalwednesday!

A Note about Diagrams
I use color in diagrams to make them as clear as possible.  The primary function of different colored lines is to illustrate a stitch sequence.  For example, the layering of colors demonstrates you add them in that order.  They can also provide ideas on integrating additional threads (one line for each color).  Or, you can use the same thread for all color lines.  That's where I encourage you to use your imagination for the space you are stitching!

Candy Corn Impasse Resolved!

Whether you love or loathe candy corn, today’s stitched sample is a piece of candy corn ALL can love!

Click image to see the whimsicalstitch.com Stitch Library on pinterest.com. Includes all #whimsicalwednesday and #smallspacesunday stitch diagrams.

Click image to see #whimsicalwednesday and #smallspacesunday Stitched Sample Gallery on Instagram.

Truth be told, I was mesmerized by today’s stitch when it traveled through my Instagram feed. It looks like a simple alternating scotch stitch but is much more. The primary elements trails of diagonal scotch (the black lines from the lower left to the upper right). The space between those trails is filled with 3X3 squares (Scotch stitches) and groups of stitches over 1-2-1-2-1 rows. That last element is what, in my opinion, makes this stitch so interesting. Thank you to Hillary (@hifimakes on Instagram) for introducing me to this stitch and for today’s stitched sample.

The stitched sample is a darling candy corn ornament from Burnett and Bradley ornament. Hillary used Silk Lame 18 on 18M for the each of the three panels. (She used the same thread for all of the lines in the diagram as well.)

This interesting full-coverage stitch will work well for tree greenery with an overdyed silk floss. Clothing is another obvious choice. Create a warm sweater or jacket with wool (black lines) and a mild metallic such as Silk Lame (yellow lines). I also suspect it will make an interesting roof on a rustic cottage with two shades of Rainbow Linen.

Click on image to see the whimsicalstitch.com Stitch Library on pinterest.com. Includes all #whimsicalwednesday and #smallspacesunday stitch diagrams.

Just a reminder about how to evaluate stitches for size on your project.

As you are auditioning stitches (from any stitch source), count the number of canvas threads on the diagram that match your mesh size. And there you have what an inch of the stitch will look like. Evaluate that against the area where you plan to use the stitch and make your final decision. If you start integrating this step into your stitch selection process, you may be surprised at how many stitches you think are large are much smaller than you realize. (Or, in today’s case, the stitch is much larger than it looks.)

By (sometimes) including this step in my own process, I find I am now integrating much longer stitches than I ever thought I would. I used to think a stitch six rows long was super big. I have very much changed my tune, which has helped me expand my creativity, especially for large-space stitches.

Today’s stitch diagram, along with all other #whimsicalwednesday and #smallspacesunday stitch diagrams, can also be found on a Pinterest board here. Be sure to follow whimsicalstitch.com on FacebookPinterestInstagram, and Twitter.

If you like what you see on this blog, there's more. Mary’s Whimsical Stitches is a series of three books offering contemporary how-to collections of more than 250 stitches (in each volume) for all stitchers, regardless of skill level. All books include updated and sequenced diagrams from this blog plus a collection of all-new stitches from private lessons and other class projects. Visit here to find a needlepoint retailer that carries my books.

New to needlepoint or looking for a refresher? Please download a handy how-to guide covering basic needlepoint stitches and stitch compensation techniques along with new top-line information on needlepoint materials and tools, how to handle threads, and other helpful needlepoint resources.

whimsicalstitch.com also sells Stitch Guides and Stitch Concepts for Melissa Shirley Designs, Zecca DesignsSandra Gilmore, Purple Palm, Maggie, and Penny MacLeod, and many more. Click here to see the newest guides and click here to see the entire collection.

I hope you have the perfect spot for this stitch! Please enjoy! Have a wonderful #whimsicalwednesday!

A Note about Diagrams
I use color in diagrams to make them as clear as possible.  The primary function of different colored lines is to illustrate a stitch sequence.  For example, the layering of colors demonstrates you add them in that order.  They can also provide ideas on integrating additional threads (one line for each color).  Or, you can use the same thread for all color lines.  That's where I encourage you to use your imagination for the space you are stitching!

A Journey

Arriving at today’s stitch was a journey and, as far as I’m concerned, worth it.

Click image to see the whimsicalstitch.com Stitch Library on pinterest.com. Includes all #whimsicalwednesday and #smallspacesunday stitch diagrams.

Click image to see #whimsicalwednesday and #smallspacesunday Stitched Sample Gallery on Instagram.

Today’s stitch inspiration comes from a geometric wallpaper pattern. The stitched sample is me playing with red Fyre Werks (black lines) and size 8 gold Kreinik (turquoise lines) on 18M. I minimized visible threads by using a modified back stitch that followed the shape of a diamond or the horizontal path of the turquoise lines. Full disclosure: the compensation required for the stitched sample eliminated some of the pairs of the turquoise tent stitches, so pay careful attention to the diagram for the full effect.

Two metallics with distinct finishes are always a winning combination in my book. I’m looking forward to using this stitch for sheet metal, as shown above! I plan to replace the gold Kreinik with a red Kreinik or Petite Silk Lame. Two related metallic shades, such as Kreinik or Treasure Braid, will combine to make gorgeous water.

Flipping the stitched sample a simple 90° creates all kinds of opportunities. Using a matte thread such as Vineyard Silk for the black lines and a substantial metallic like Silk Lame 18 or size 12 Kreinik will make gorgeous clothing or a background. I also want to play with Rainbow Linen for the black lines and some Straw Silk for the turquoise lines for a tree trunk.


Click on image to see the whimsicalstitch.com Stitch Library on pinterest.com. Includes all #whimsicalwednesday and #smallspacesunday stitch diagrams.

Just a reminder about how to evaluate stitches for size on your project.

As you are auditioning stitches (from any stitch source), count the number of canvas threads on the diagram that match your mesh size. And there you have what an inch of the stitch will look like. Evaluate that against the area where you plan to use the stitch and make your final decision. If you start integrating this step into your stitch selection process, you may be surprised at how many stitches you think are large are much smaller than you realize.

By (sometimes) including this step in my own process, I find I am now integrating much longer stitches than I ever thought I would. I used to think a stitch six rows long was super big. I have very much changed my tune, which has helped me expand my creativity, especially for large space stitches.

Today’s stitch diagram, along with all other #whimsicalwednesday and #smallspacesunday stitch diagrams, can also be found on a Pinterest board here. Be sure to follow whimsicalstitch.com on FacebookPinterestInstagram, and Twitter.

If you like what you see on this blog, there's more. Mary’s Whimsical Stitches is a series of three books offering contemporary how-to collections of more than 250 stitches (in each volume) for all stitchers, regardless of skill level. All books include updated and sequenced diagrams from this blog plus a collection of all-new stitches from private lessons and other class projects. Visit here to find a needlepoint retailer that carries my books.

New to needlepoint or looking for a refresher? Please download a handy how-to guide covering basic needlepoint stitches and stitch compensation techniques along with new top-line information on needlepoint materials and tools, how to handle threads, and other helpful needlepoint resources.

whimsicalstitch.com also sells Stitch Guides and Stitch Concepts for Melissa Shirley Designs, Zecca DesignsSandra Gilmore, Purple Palm, Maggie, and Penny MacLeod, and many more. Click here to see the newest guides and click here to see the entire collection.

I hope you have the perfect spot for this stitch! Please enjoy! Have a wonderful #whimsicalwednesday!

A Note about Diagrams
I use color in diagrams to make them as clear as possible.  The primary function of different colored lines is to illustrate a stitch sequence.  For example, the layering of colors demonstrates you add them in that order.  They can also provide ideas on integrating additional threads (one line for each color).  Or, you can use the same thread for all color lines.  That's where I encourage you to use your imagination for the space you are stitching!

Scaling New Heights

I talk a lot about scalable stitches in this blog. And today’s stitch is one such example.

Click on image to see on whimsicalstitch.com's Pinterest account. Visit pinterest.com/whimsicalstitch/whimsicalwednesday for a library of all #whimsicalwednesday and #smallspacesunday stitch diagrams.

Click on image to see on whimsicalstitch.com's Pinterest account. Visit pinterest.com/whimsicalstitch/whimsicalwednesday for a library of all #whimsicalwednesday and #smallspacesunday stitch diagrams.

Click on image to see on whimsicalstitch.com's Instagram account. Visit instagram.com/whimsicalstitch to see a library of stitched samples for select #whimsicalwednesday and #smallspacesunday stitch diagrams.

Click on image to see on whimsicalstitch.com's Instagram account. Visit instagram.com/whimsicalstitch to see a library of stitched samples for select #whimsicalwednesday and #smallspacesunday stitch diagrams.

Today’s stitch is a taller and far more subtle version of this stitch from 2017. The stitched sample is a background stitch for one of Debbie Mumm’s pots from a club I worked on several years ago. It uses Elegance and Flair, like every other background in the series. (The six projects from the club are here, here, here, here, here, and here.)

And here is where the height of the stitch makes a difference. While I used the same threads in all six backgrounds, I used six different stitches. All of the backgrounds are open stitches (in varying degrees), so I needed more white space between the stitches and that is why this stitch is so tall.

Between the layered X and the three cute accents on top, this stitch also has the added benefit of texture. I love tall stitches to enhance the height of a tall area, such as pants, chimneys, or tree trunks. The added texture makes those areas all the more interesting, in my opinion. Pants would look great with a combination of Pepper Pot Silk (black lines) and Neon Rays (gray lines). I would stitch a chimney in silk floss (black lines) and a very subtle metallic, such as Glisten (gray lines). Frankly, it would look just as elegant if you used the Glisten for the X’s with the silk floss on top. A perfect combo for a tree trunk is Rainbow Linen (black lines) with Bella Lusso or Burmilana as the accents (gray lines).

These stitch diagrams, along with all other #whimsicalwednesday and #smallspacesunday stitch diagrams, can also be found on a Pinterest board here.

Be sure to follow whimsicalstitch.com on FacebookPinterestInstagram, and Twitter.

IIf you like what you see on this blog, there's more: Mary’s Whimsical Stitches Volume 1 is a contemporary how-to collection of more than 250 stitches for stitchers regardless of skill level. The book includes updated and sequenced diagrams from this blog, all-new stitches, and a chapter on the basics of needlepoint; Mary’s Whimsical Stitches Volume 2 features chapters on Balanced, Beading, Diagonal, Layered, Oblique, Small, and Straight stitches.

Also, you can download The Essentials, a free guide covering basic needlepoint stitches and stitch compensation techniques along with new top-line information on needlepoint materials and tools, how to handle threads, and other helpful needlepoint resources.

whimsicalstitch.com also sells Stitch Guides and Stitch Concepts for Melissa Shirley Designs, Zecca DesignsSandra Gilmore, Purple Palm, Maggie, and Penny MacLeod, and many more. Click here to see the newest guides and click here to see the entire collection.

I hope you have the perfect spot for this stitch! Please enjoy! Have a wonderful #whimsicalwednesday!

A Note about Diagrams
I use color in diagrams to make them as clear as possible.  The primary function of different colored lines is to illustrate a stitch sequence.  For example, layering of colors demonstrates you add them in that order.  They can also provide ideas on how to integrate additional threads (one line for each color).  Or, you can use the same thread for all color lines.  That's where I encourage you to use your imagination for the space you are stitching!