Catch a Wave

Today’s stitch was shared with me by one of my favorite stitchers. One of the many reasons I like it is that I would have never come up with it alone.

Click the image to see the whimsicalstitch.com Stitch Library on pinterest.com. Includes all #whimsicalwednesday and #smallspacesunday stitch diagrams.

Click the image to see #whimsicalwednesday and #smallspacesunday Stitched Sample Gallery on Instagram.

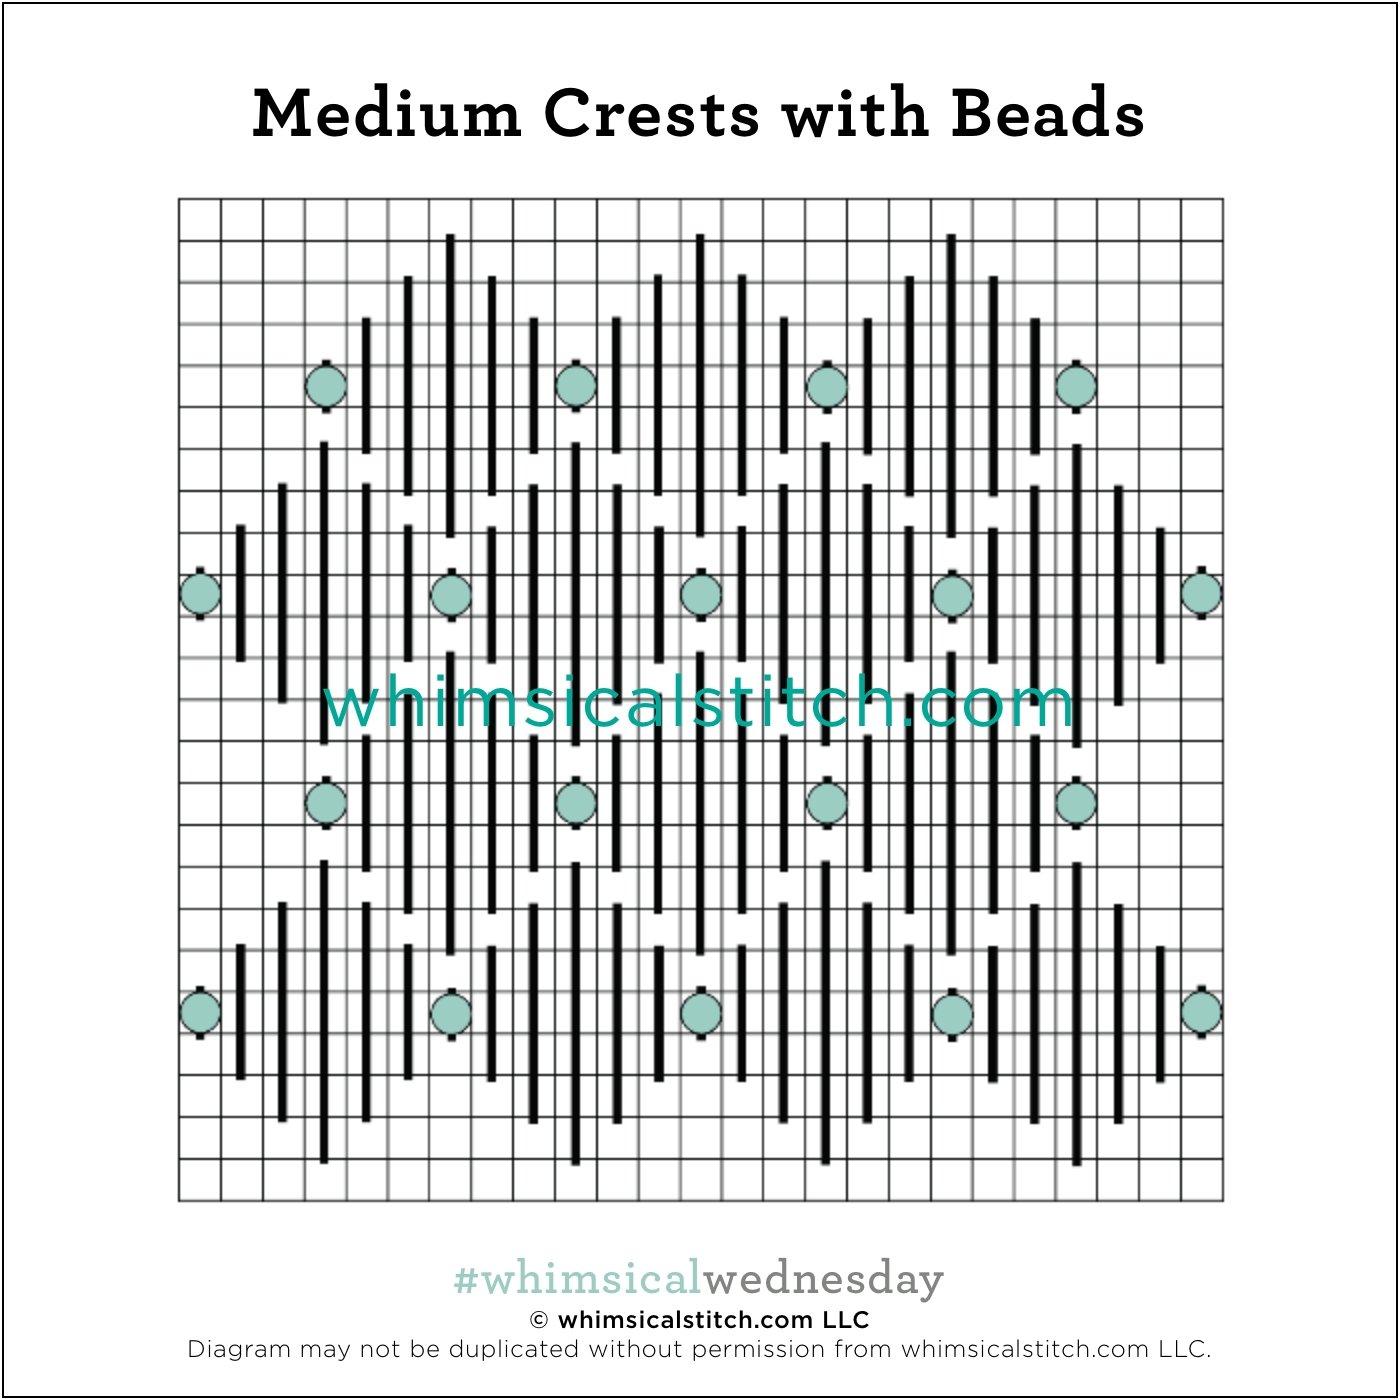
A background using a single color of silk floss with different ply counts for individual steps.

It took me a minute (or more) to catch that two stitches share holes with the group of stitches above, so don’t miss that nuance. (And a hat tip to those of you who saw that from the beginning). The stitched sample is five plies of Mandarin Floss (black lines) and two plies of Soie d’Alger (yellow lines). I like the contrast of the weights between the two losses.

Tangent: I learned that trick long ago when I couldn’t find a matching metallic to use as a contrasting thread in a background. My solution was to use different ply counts of the same thread for the two threads. The photo on the right illustrates how that turned out. (It is the Crown Stitch with Accents from page 220 of book 2.)

Back to today’s stitch. It adds subtle direction to an area. It will work well for water with two shades of blue or turquoise Petite Silk Lame. I also look forward to using it for a roof with a solid silk floss for the black lines and an overdyed silk floss for the yellow lines.

It is also scalable by simply changing the height of the black lines. My instinct tells me not to stitch them any shorter than three rows tall so the yellow lines don’t overwhelm the scale, but I want to noodle it a bit.

There is a lot to play with here, and I’m looking forward to it.

Click on image to see the whimsicalstitch.com Stitch Library on pinterest.com. Includes all #whimsicalwednesday and #smallspacesunday stitch diagrams.

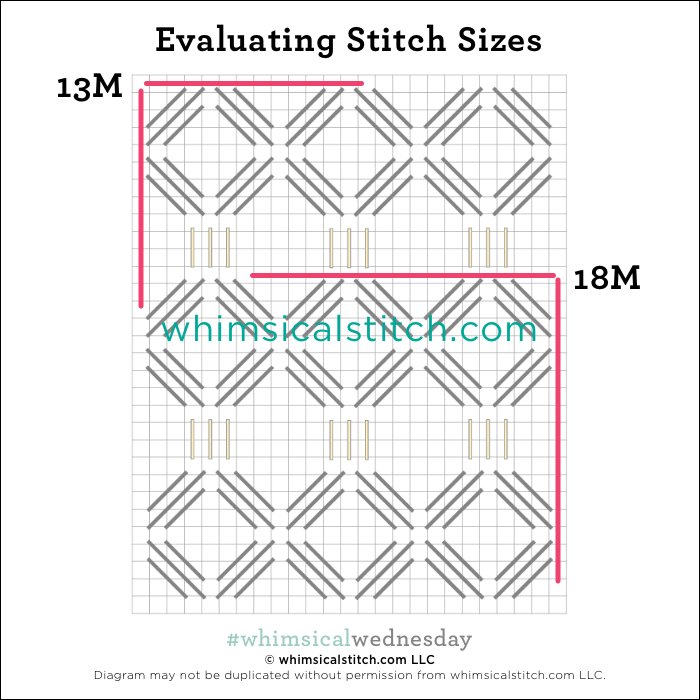
As you are auditioning stitches (from any stitch source), count the number of canvas threads on the diagram that match your mesh size. And there you have what an inch of the stitch will look like. Evaluate that against the area where you plan to use the stitch and make your final decision. If you start integrating this step into your stitch selection process, you may be surprised at how many stitches you think are large are much smaller than you realize.

By (sometimes) including this step in my own process, I find I am now integrating much longer stitches than I ever thought I would. I used to think a stitch six rows long was super big. I have very much changed my tune, which has helped me expand my creativity, especially for large-space stitches.

Today’s stitch diagram, along with all other #whimsicalwednesday and #smallspacesunday stitch diagrams, can also be found on a Pinterest board here. Be sure to follow whimsicalstitch.com on FacebookPinterestInstagram, and Twitter.

If you like what you see on this blog, there's more. Mary’s Whimsical Stitches is a series of four books offering contemporary how-to collections of more than 200 stitches (in each volume) for all stitchers, regardless of skill level. All books include updated and sequenced diagrams from this blog, plus a collection of all-new stitches from private lessons and other class projects. Visit here to find a needlepoint retailer that carries my books.

New to needlepoint or looking for a refresher? Please download a handy how-to guide covering basic needlepoint stitches and stitch compensation techniques along with new top-line information on needlepoint materials and tools, how to handle threads, and other helpful needlepoint resources.

whimsicalstitch.com also sells Stitch Guides and Stitch Concepts for Melissa Shirley Designs, Zecca DesignsSandra Gilmore, Purple Palm, Maggie, and Penny MacLeod, and many more. Click here to see the newest guides and click here to see the entire collection.

I hope you have the perfect spot for this stitch! Please enjoy! Have a wonderful #whimsicalwednesday!

A Note about Diagrams
I use color in diagrams to make them as clear as possible.  The primary function of different colored lines is to illustrate a stitch sequence.  For example, the layering of colors demonstrates you add them in that order.  They can also provide ideas on integrating additional threads (one line for each color).  Or, you can use the same thread for all color lines.  That's where I encourage you to use your imagination for the space you are stitching!

Stash Shame, Part 3

The final pear from the stash shame is a larger variation of one of my long-time favorite stitches, Star Octagon. It still gives me all the feels, and I’m loving the gold metallic contrast in the stitched sample.

Click the image to see the whimsicalstitch.com Stitch Library on pinterest.com. Includes all #whimsicalwednesday and #smallspacesunday stitch diagrams.

Click the image to see #whimsicalwednesday and #smallspacesunday Stitched Sample Gallery on Instagram.

Today’s stitch is another pear from my stash shame. The stitched sample uses a single ply of Floche (black lines) and a size 8 Kreinik (aqua lines). It’s very close to a full coverage stitch, yet still gives us a beautiful peek at the wonderful shading on the pear. As this is a partially stitched sample, you can also see how leaving the Upright Tied Cross out of the stitch offers a brighter view of the shading. Either way is the right way, as far as I am concerned!

The stitch, as diagramed, will be a beautiful dress with silk floss and your favorite metallic, such as Silk Lame or Neon Rays. It will be an elegant addition to the background of a Christmas stocking cuff with Vineyard Silk (black lines) and Kreinik Metallic or Flair (aqua lines). I would use this stitch for a tree or greenery without the Upright Tied Crosses in the center with your favorite overdyed or solid silk floss.

Click on image to see the whimsicalstitch.com Stitch Library on pinterest.com. Includes all #whimsicalwednesday and #smallspacesunday stitch diagrams.

As you are auditioning stitches (from any stitch source), count the number of canvas threads on the diagram that match your mesh size. And there you have what an inch of the stitch will look like. Evaluate that against the area where you plan to use the stitch and make your final decision. If you start integrating this step into your stitch selection process, you may be surprised at how many stitches you think are large are much smaller than you realize.

By (sometimes) including this step in my own process, I find I am now integrating much longer stitches than I ever thought I would. I used to think a stitch six rows long was super big. I have very much changed my tune, which has helped me expand my creativity, especially for large-space stitches.

Today’s stitch diagram, along with all other #whimsicalwednesday and #smallspacesunday stitch diagrams, can also be found on a Pinterest board here. Be sure to follow whimsicalstitch.com on FacebookPinterestInstagram, and Twitter.

If you like what you see on this blog, there's more. Mary’s Whimsical Stitches is a series of four books offering contemporary how-to collections of more than 200 stitches (in each volume) for all stitchers, regardless of skill level. All books include updated and sequenced diagrams from this blog, plus a collection of all-new stitches from private lessons and other class projects. Visit here to find a needlepoint retailer that carries my books.

New to needlepoint or looking for a refresher? Please download a handy how-to guide covering basic needlepoint stitches and stitch compensation techniques along with new top-line information on needlepoint materials and tools, how to handle threads, and other helpful needlepoint resources.

whimsicalstitch.com also sells Stitch Guides and Stitch Concepts for Melissa Shirley Designs, Zecca DesignsSandra Gilmore, Purple Palm, Maggie, and Penny MacLeod, and many more. Click here to see the newest guides and click here to see the entire collection.

I hope you have the perfect spot for this stitch! Please enjoy! Have a wonderful #whimsicalwednesday!

A Note about Diagrams
I use color in diagrams to make them as clear as possible.  The primary function of different colored lines is to illustrate a stitch sequence.  For example, the layering of colors demonstrates you add them in that order.  They can also provide ideas on integrating additional threads (one line for each color).  Or, you can use the same thread for all color lines.  That's where I encourage you to use your imagination for the space you are stitching!

Stash Shame, Part 2

Last week’s wip from my stash is the gift that keeps on giving.

Click the image to see the whimsicalstitch.com Stitch Library on pinterest.com. Includes all #whimsicalwednesday and #smallspacesunday stitch diagrams.

Click the image to see #whimsicalwednesday and #smallspacesunday Stitched Sample Gallery on Instagram.

Today’s stitch is from a cute red pear from last week’s project. The stitched sample uses a single ply of Floche (black lines), a size 4 or a size 8 Kreinik (turquoise lines), and a size 14/15 red seed bead with red beading thread (aqua circles with black lines). Fun fact. I was so confident about this diagram that I thought I could create it from memory on my laptop while away from my office. I got home to find out I was wrong. It wasn’t terribly wrong, but I’m including what I thought it was on the right.

This stitch is another great example of how using solid color threads helps enhance shading. This stitch will add some interest to a beautifully shaded tree, with the beads in random colors of green or even random flower colors, such as yellow, orange, and red. It will also make a fantastic roof for a Victorian house with all the straight lines in a lightweight Kreinik and metallic beads.


Click on image to see the whimsicalstitch.com Stitch Library on pinterest.com. Includes all #whimsicalwednesday and #smallspacesunday stitch diagrams.

As you are auditioning stitches (from any stitch source), count the number of canvas threads on the diagram that match your mesh size. And there you have what an inch of the stitch will look like. Evaluate that against the area where you plan to use the stitch and make your final decision. If you start integrating this step into your stitch selection process, you may be surprised at how many stitches you think are large are much smaller than you realize.

By (sometimes) including this step in my own process, I find I am now integrating much longer stitches than I ever thought I would. I used to think a stitch six rows long was super big. I have very much changed my tune, which has helped me expand my creativity, especially for large-space stitches.

Today’s stitch diagram, along with all other #whimsicalwednesday and #smallspacesunday stitch diagrams, can also be found on a Pinterest board here. Be sure to follow whimsicalstitch.com on FacebookPinterestInstagram, and Twitter.

If you like what you see on this blog, there's more. Mary’s Whimsical Stitches is a series of four books offering contemporary how-to collections of more than 200 stitches (in each volume) for all stitchers, regardless of skill level. All books include updated and sequenced diagrams from this blog, plus a collection of all-new stitches from private lessons and other class projects. Visit here to find a needlepoint retailer that carries my books.

New to needlepoint or looking for a refresher? Please download a handy how-to guide covering basic needlepoint stitches and stitch compensation techniques along with new top-line information on needlepoint materials and tools, how to handle threads, and other helpful needlepoint resources.

whimsicalstitch.com also sells Stitch Guides and Stitch Concepts for Melissa Shirley Designs, Zecca DesignsSandra Gilmore, Purple Palm, Maggie, and Penny MacLeod, and many more. Click here to see the newest guides and click here to see the entire collection.

I hope you have the perfect spot for this stitch! Please enjoy! Have a wonderful #whimsicalwednesday!

A Note about Diagrams
I use color in diagrams to make them as clear as possible.  The primary function of different colored lines is to illustrate a stitch sequence.  For example, the layering of colors demonstrates you add them in that order.  They can also provide ideas on integrating additional threads (one line for each color).  Or, you can use the same thread for all color lines.  That's where I encourage you to use your imagination for the space you are stitching!

A Pear a Day?

While I’m never proud of the size of my wip stash, it serves us well. Today’s stitch is from said stash and a bright little pick-me-up!

Click the image to see the whimsicalstitch.com Stitch Library on pinterest.com. Includes all #whimsicalwednesday and #smallspacesunday stitch diagrams.

Click the image to see #whimsicalwednesday and #smallspacesunday Stitched Sample Gallery on Instagram.

So this wip is old. It is so old that I have a vague memory; this was the piece where I used Floche (black lines) for the first time. The yellow lines are most likely size 8 Kreinik. Even though the leaf and stem are not stitched on this pear, I know the plan for all of the leaves and stems was plain needlepoint, as painted, with a gorgeous variety of Trebizond Silk. (For eagle-eyed readers, this stitch is a simple variation of 3-4-3 Squares from page 9 of book 3.)

Last week I talked about matching stitches and this is a perfect example. (Matching stitches are the same thing as Balanced Stitches in my books.) There is a lovely symmetry here, The addition of an extra stitch (the Upright Tied Crosses) sets it off even more.

It’s a wonderful all-purpose stitch for greenery with two shades of green wool or single-strand silk such as Pepper Pot Silk or Vineyard Silk. It will also make a beautiful cloud with Flair (black lines) and Silk Lame (for the yellow lines). And I think it might work really well for a piece of fruit. :)

Click on image to see the whimsicalstitch.com Stitch Library on pinterest.com. Includes all #whimsicalwednesday and #smallspacesunday stitch diagrams.

As you are auditioning stitches (from any stitch source), count the number of canvas threads on the diagram that match your mesh size. And there you have what an inch of the stitch will look like. Evaluate that against the area where you plan to use the stitch and make your final decision. If you start integrating this step into your stitch selection process, you may be surprised at how many stitches you think are large are much smaller than you realize.

By (sometimes) including this step in my own process, I find I am now integrating much longer stitches than I ever thought I would. I used to think a stitch six rows long was super big. I have very much changed my tune, which has helped me expand my creativity, especially for large-space stitches.

Today’s stitch diagram, along with all other #whimsicalwednesday and #smallspacesunday stitch diagrams, can also be found on a Pinterest board here. Be sure to follow whimsicalstitch.com on FacebookPinterestInstagram, and Twitter.

If you like what you see on this blog, there's more. Mary’s Whimsical Stitches is a series of four books offering contemporary how-to collections of more than 200 stitches (in each volume) for all stitchers, regardless of skill level. All books include updated and sequenced diagrams from this blog, plus a collection of all-new stitches from private lessons and other class projects. Visit here to find a needlepoint retailer that carries my books.

New to needlepoint or looking for a refresher? Please download a handy how-to guide covering basic needlepoint stitches and stitch compensation techniques along with new top-line information on needlepoint materials and tools, how to handle threads, and other helpful needlepoint resources.

whimsicalstitch.com also sells Stitch Guides and Stitch Concepts for Melissa Shirley Designs, Zecca DesignsSandra Gilmore, Purple Palm, Maggie, and Penny MacLeod, and many more. Click here to see the newest guides and click here to see the entire collection.

I hope you have the perfect spot for this stitch! Please enjoy! Have a wonderful #whimsicalwednesday!

A Note about Diagrams
I use color in diagrams to make them as clear as possible.  The primary function of different colored lines is to illustrate a stitch sequence.  For example, the layering of colors demonstrates you add them in that order.  They can also provide ideas on integrating additional threads (one line for each color).  Or, you can use the same thread for all color lines.  That's where I encourage you to use your imagination for the space you are stitching!

Boo!

Today’s stitch is a fun twist on one of my favorite woven stitches.

Click the image to see the whimsicalstitch.com Stitch Library on pinterest.com. Includes all #whimsicalwednesday and #smallspacesunday stitch diagrams.

Click the image to see #whimsicalwednesday and #smallspacesunday Stitched Sample Gallery on Instagram.

Click the image to see #whimsicalwednesday and #smallspacesunday Stitched Sample Gallery on Instagram.

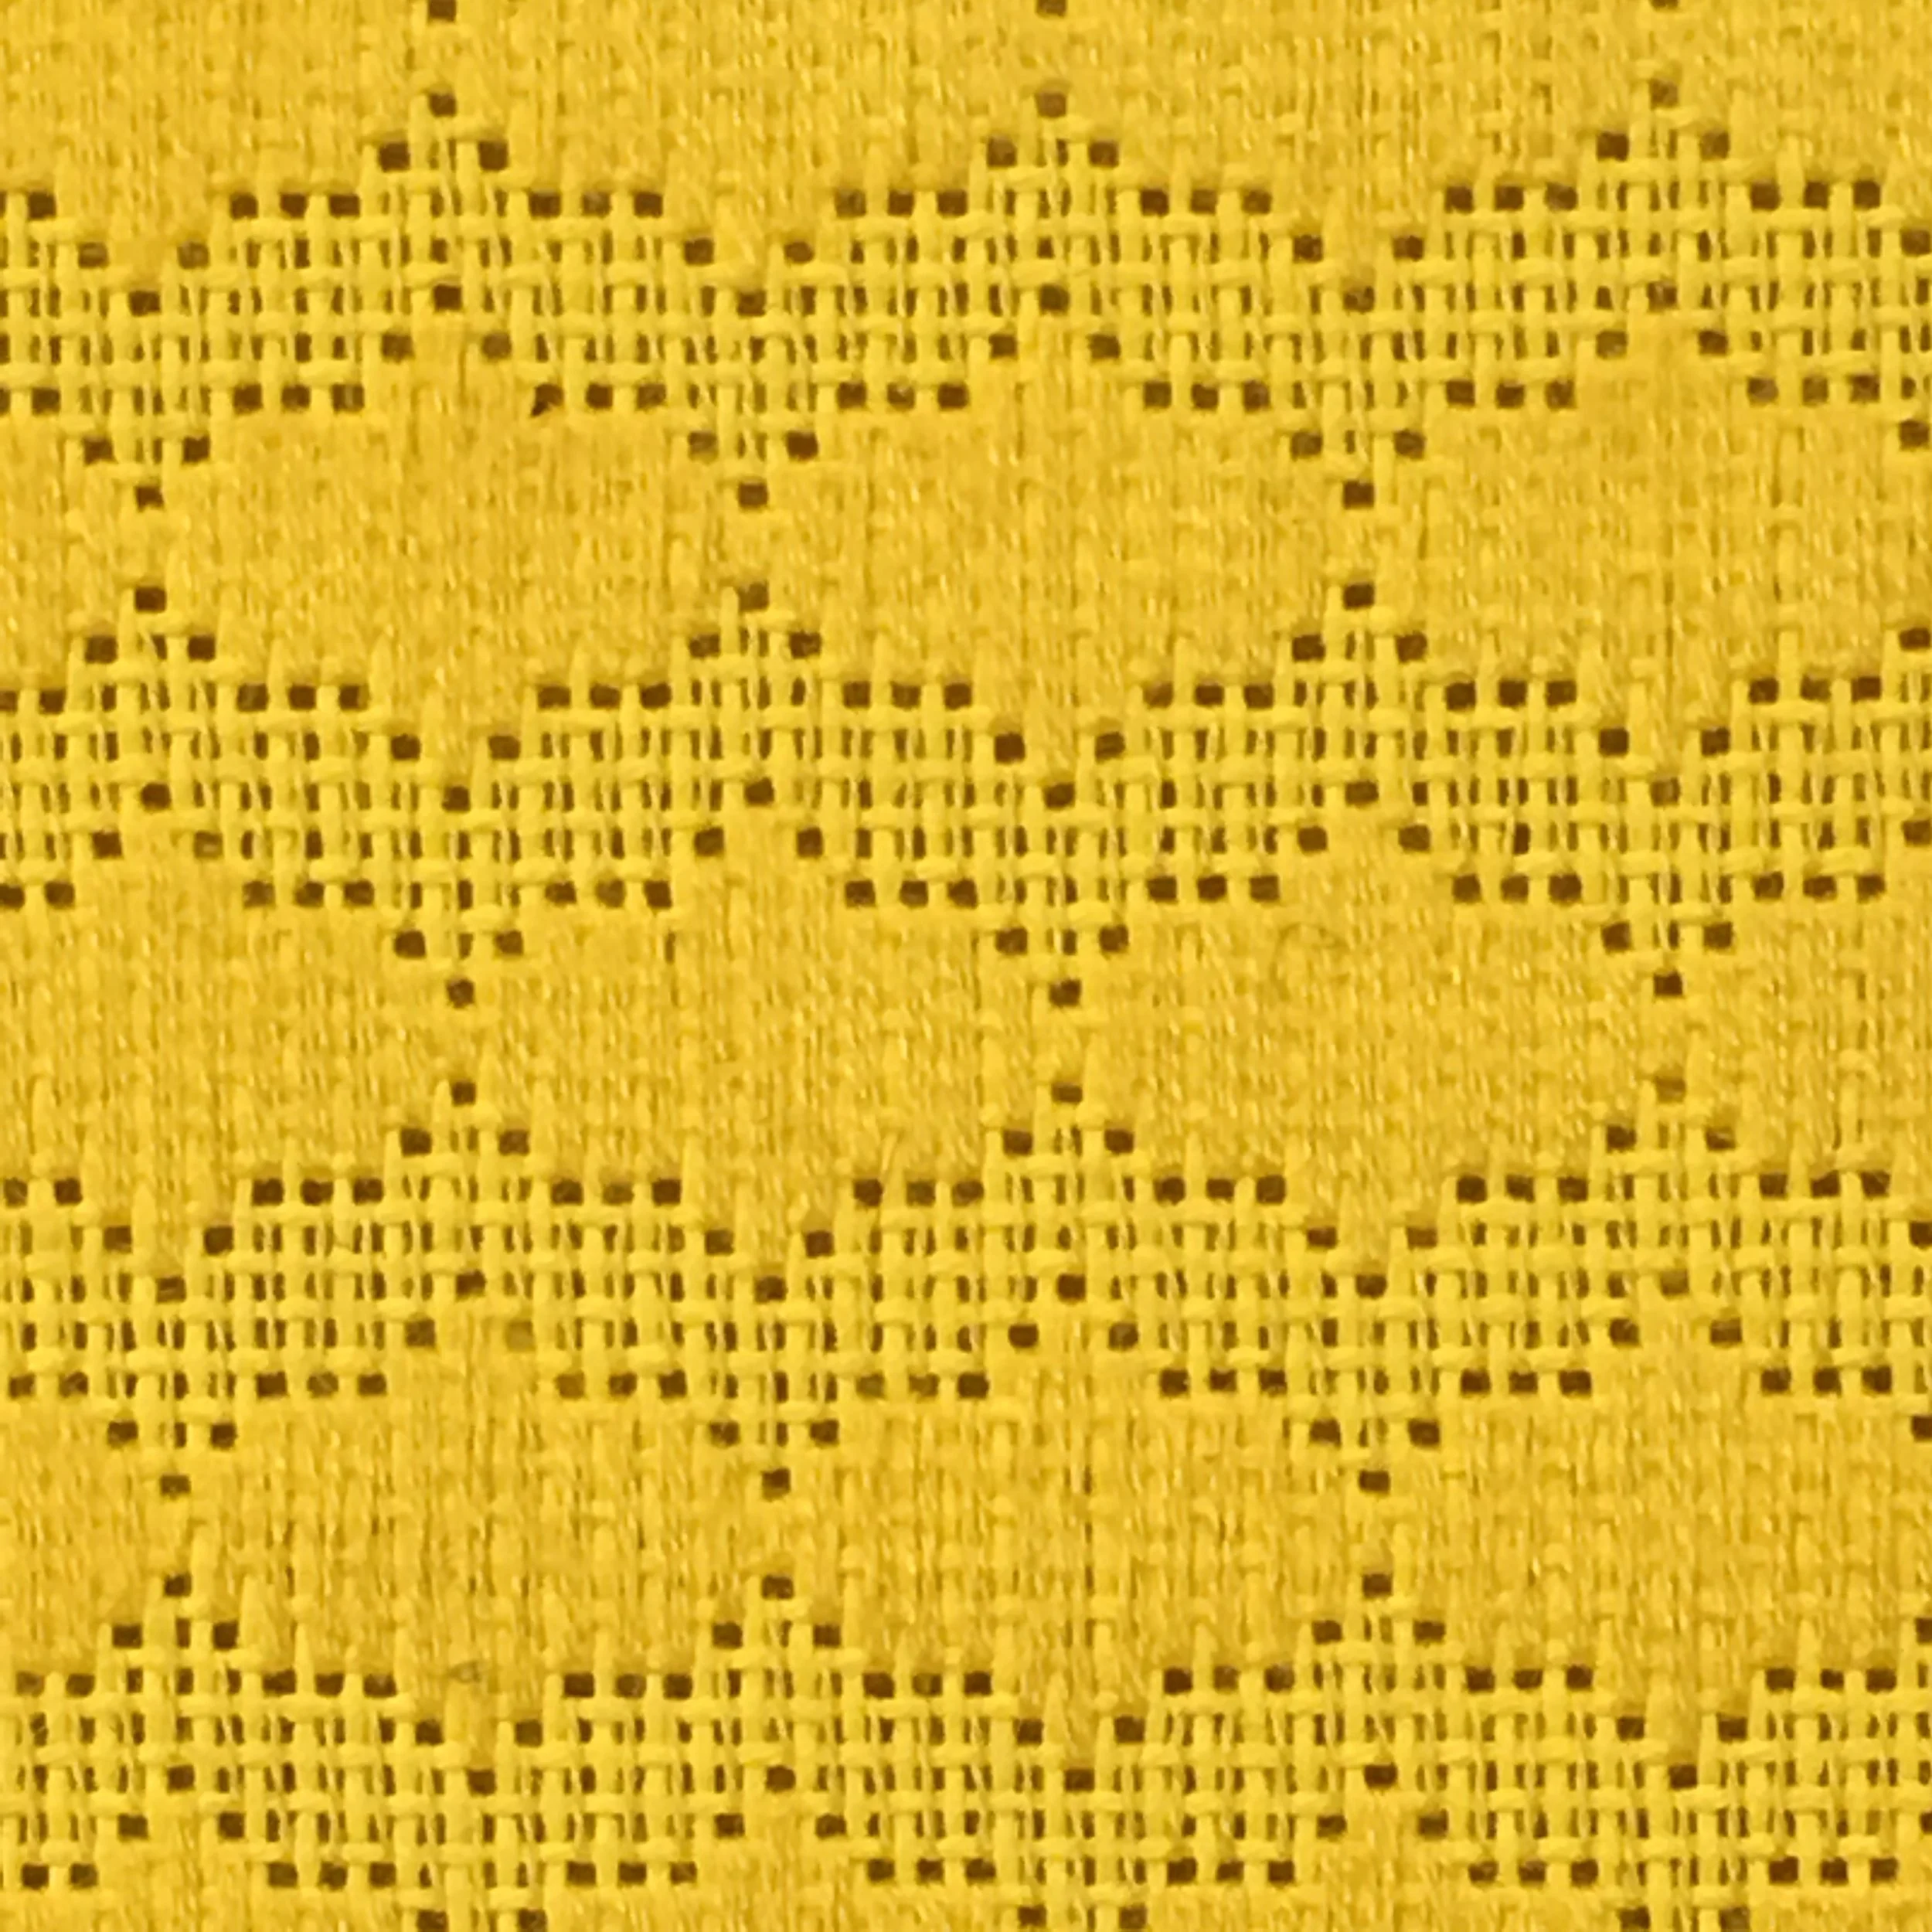
The stitched sample is a tabletop using size 12 Finca Perle Cotton on 18M.

I prefer what I call matching stitches, which typically means there’s a mirror image of the repeated pattern. Using the inspiration for this stitch as an example, three vertical lines are the same size for every three horizontal lines (the repeated pattern). I realized I needed to start venturing out of this matchy-matchy pattern, and here we are. (Perhaps I haven’t strayed too far, but I hope you understand the distinction.)

I look forward to using this as a pathway with overdyed silk floss. Flip it 90° and it will make a really interesting tree trunk with Bella Lusso or Burmilana. You can dress it up by adding a contrasting thread (color, finish, or both) for the vertical lines. I love the thought of silk floss for the horizontal lines and a Kreinik Metallic for the vertical lines for a wall or a bedspread.

Click on image to see the whimsicalstitch.com Stitch Library on pinterest.com. Includes all #whimsicalwednesday and #smallspacesunday stitch diagrams.

As you are auditioning stitches (from any stitch source), count the number of canvas threads on the diagram that match your mesh size. And there you have what an inch of the stitch will look like. Evaluate that against the area where you plan to use the stitch and make your final decision. If you start integrating this step into your stitch selection process, you may be surprised at how many stitches you think are large are much smaller than you realize.

By (sometimes) including this step in my own process, I find I am now integrating much longer stitches than I ever thought I would. I used to think a stitch six rows long was super big. I have very much changed my tune, which has helped me expand my creativity, especially for large-space stitches.

Today’s stitch diagram, along with all other #whimsicalwednesday and #smallspacesunday stitch diagrams, can also be found on a Pinterest board here. Be sure to follow whimsicalstitch.com on FacebookPinterestInstagram, and Twitter.

If you like what you see on this blog, there's more. Mary’s Whimsical Stitches is a series of four books offering contemporary how-to collections of more than 200 stitches (in each volume) for all stitchers, regardless of skill level. All books include updated and sequenced diagrams from this blog, plus a collection of all-new stitches from private lessons and other class projects. Visit here to find a needlepoint retailer that carries my books.

New to needlepoint or looking for a refresher? Please download a handy how-to guide covering basic needlepoint stitches and stitch compensation techniques along with new top-line information on needlepoint materials and tools, how to handle threads, and other helpful needlepoint resources.

whimsicalstitch.com also sells Stitch Guides and Stitch Concepts for Melissa Shirley Designs, Zecca DesignsSandra Gilmore, Purple Palm, Maggie, and Penny MacLeod, and many more. Click here to see the newest guides and click here to see the entire collection.

I hope you have the perfect spot for this stitch! Please enjoy! Have a wonderful #whimsicalwednesday!

A Note about Diagrams
I use color in diagrams to make them as clear as possible.  The primary function of different colored lines is to illustrate a stitch sequence.  For example, the layering of colors demonstrates you add them in that order.  They can also provide ideas on integrating additional threads (one line for each color).  Or, you can use the same thread for all color lines.  That's where I encourage you to use your imagination for the space you are stitching!
My Dowager Countess Moment

“What is a weekend?” is one of my favorite lines from my favorite character on Downton Abbey. My local version is “What is a Wednesday?” Sorry for the delay, but here I am!

Click on image to see on whimsicalstitch.com's Pinterest account. Visit pinterest.com/whimsicalstitch/whimsicalwednesday for a library of all #whimsicalwednesday and #smallspacesunday stitch diagrams.

Click on image to see on whimsicalstitch.com's Pinterest account. Visit pinterest.com/whimsicalstitch/whimsicalwednesday for a library of all #whimsicalwednesday and #smallspacesunday stitch diagrams.

Click on image to see on whimsicalstitch.com's Instagram account. Visit instagram.com/whimsicalstitch to see a library of stitched samples for select #whimsicalwednesday and #smallspacesunday stitch diagrams.

Click on image to see on whimsicalstitch.com's Instagram account. Visit instagram.com/whimsicalstitch to see a library of stitched samples for select #whimsicalwednesday and #smallspacesunday stitch diagrams.

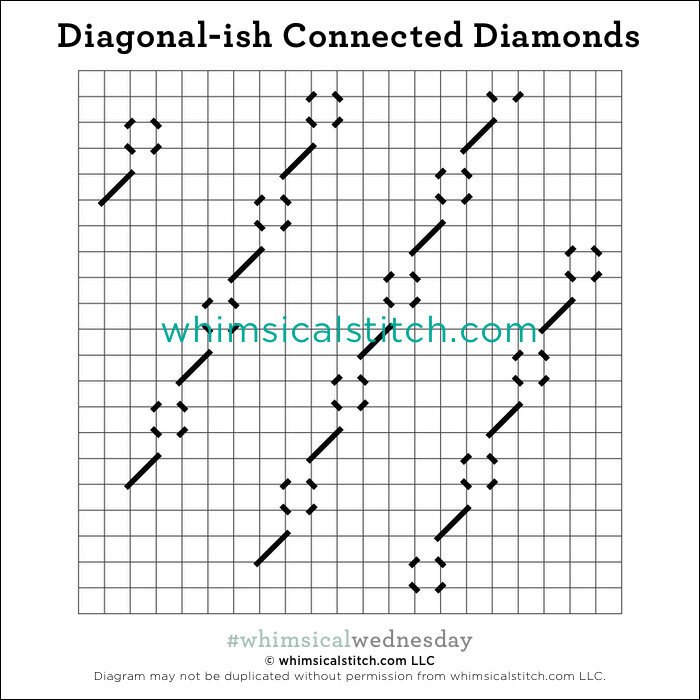
The stitched sample is a sky on a medium-sized piece with size 12 Finca Perle. Technically, it’s a small stitch but the area between the diagonal-ish columns requires a larger area for the pattern to fully kick in. I selected this stitch because I wanted the sky to have some motion and drama (hence the angle) but wanted to keep the beautiful painting underneath visible.

This stitch is a good way to add direction to water, a pathway, a wall, or a patch of snow (say at the toe of a stocking). For water, you may want to alternate the columns between two metallics to add even more dimension. Consider using a solid metallic and an overdyed ThreadWorx metallic to make it interesting. For snow, my go-to thread is Flair as it absorbs the color under it, making the stitch even more interesting. And my last (kind of crazy) idea is to replace the tiny diamond between the diagonal stitches with a single bead over two rows on the vertical.

This stitch diagram, along with all other #whimsicalwednesday and #smallspacesunday stitch diagrams, can also be found on a Pinterest board here. Be sure to follow whimsicalstitch.com on FacebookPinterestInstagram, and Twitter.

If you like what you see on this blog, want to learn some very creative decorative stitches, and how to put them all together, whimsicalstitch.com has books (!) for you! Mary’s Whimsical Stitches Volume 1 is a contemporary how-to collection of more than 250 stitches for stitchers regardless of skill level. The book includes updated and sequenced diagrams from this blog, all-new stitches, and a chapter on the basics of needlepoint. For more information, visit here. Volume 2 debuts in January 2021.

whimsicalstitch.com also sells Stitch Guides and Stitch Concepts for Melissa Shirley Designs, Zecca DesignsSandra Gilmore, Purple Palm, Maggie, and Penny MacLeod, and many more. Click here to see the newest guides and click here to see the entire collection.

I hope you have the perfect spot for this stitch! Please enjoy! Have a wonderful #whimsicalwednesday!

A Note about Diagrams
I use color in diagrams to make them as clear as possible.  The primary function of different colored lines is to illustrate a stitch sequence.  For example, layering of colors demonstrates you add them in that order.  They can also provide ideas on how to integrate additional threads (one line for each color).  Or, you can use the same thread for all color lines.  That's where I encourage you to use your imagination for the space you are stitching!
Are We There Yet?

I started with an idea about alternating directions of stitches over two rows and one…and did not land where I thought I would. But, I kinda dig where I did land.

Click on image to see on whimsicalstitch.com's Pinterest account. Visit pinterest.com/whimsicalstitch/whimsicalwednesday for a library of all #whimsicalwednesday and #smallspacesunday stitch diagrams.

Click on image to see on whimsicalstitch.com's Pinterest account. Visit pinterest.com/whimsicalstitch/whimsicalwednesday for a library of all #whimsicalwednesday and #smallspacesunday stitch diagrams.

Click on image to see on whimsicalstitch.com's Instagram account. Visit instagram.com/whimsicalstitch to see a library of stitched samples for select #whimsicalwednesday and #smallspacesunday stitch diagrams.

Click on image to see on whimsicalstitch.com's Instagram account. Visit instagram.com/whimsicalstitch to see a library of stitched samples for select #whimsicalwednesday and #smallspacesunday stitch diagrams.

The stitched sample is me playing with size 12 Finca Perle (black lines) and Flair (yellow lines) on 13M. Changing the direction of the stitches over one in the same group of stitches is something I haven’t seen before and I see myself doing this again. (This does not mean it has never been done; I simply haven’t stumbled across it yet.)

Clothing, sampler, and sky/wall/background are the first areas that pop into my head for this stitch. For a lighter look (similar to the stitched sample), I recommend 2-4 plies of silk floss for the black lines and a lightweight metallic (such as Petite Silk Lame or Kreinik size 4 or 8) for the yellow lines. For a more dramatic look, consider using two metallics such as Crystal Braid (black lines) and Frosty Rays (yellow lines). When I use two metallics in a stitch, I make every effort to make sure they have unique finishes. For example, I’ll mix Kreinik with Flair but not with Crystal Braid.

Don’t overlook the fact that this stitch, like most stitches, is scalable. I’m already planning on using a smaller version for a cute pillow I had no idea what to do with until now.

This stitch diagram, along with all other #whimsicalwednesday and #smallspacesunday stitch diagrams, can also be found on a Pinterest board here. Be sure to follow whimsicalstitch.com on FacebookPinterestInstagram, and Twitter.

If you like what you see on this blog, want to learn some very creative decorative stitches, and how to put them all together, whimsicalstitch.com has books (!) for you! Mary’s Whimsical Stitches Volume 1 is a contemporary how-to collection of more than 250 stitches for stitchers regardless of skill level. The book includes updated and sequenced diagrams from this blog, all-new stitches, and a chapter on the basics of needlepoint. For more information, visit here. Volume 2 will debuts in January 2021.

whimsicalstitch.com also sells Stitch Guides and Stitch Concepts for Melissa Shirley Designs, Zecca DesignsSandra Gilmore, Purple Palm, Maggie, and Penny MacLeod, and many more. Click here to see the newest guides and click here to see the entire collection.

I hope you have the perfect spot for this stitch! Please enjoy! Have a wonderful #whimsicalwednesday!

A Note about Diagrams
I use color in diagrams to make them as clear as possible.  The primary function of different colored lines is to illustrate a stitch sequence.  For example, layering of colors demonstrates you add them in that order.  They can also provide ideas on how to integrate additional threads (one line for each color).  Or, you can use the same thread for all color lines.  That's where I encourage you to use your imagination for the space you are stitching!