It's a Three-Fer!

I had a lot of fun with a recent Stitch Concept (that will be posted on the web site very soon) because I was bound and determined to find unique things to do in the too many to count bands and borders (wide and not always very tall) that wasn’t a Satin Stitch. I think I did better than all right.

Click on image to see on whimsicalstitch.com's Pinterest account. Visit pinterest.com/whimsicalstitch/whimsicalwednesday for a library of all #whimsicalwednesday and #smallspacesunday stitch diagrams.

Click on image to see on whimsicalstitch.com's Pinterest account. Visit pinterest.com/whimsicalstitch/whimsicalwednesday for a library of all #whimsicalwednesday and #smallspacesunday stitch diagrams.

Click on image to see on whimsicalstitch.com's Instagram account. Visit instagram.com/whimsicalstitch to see a library of stitched samples for select #whimsicalwednesday and #smallspacesunday stitch diagrams.

Click on image to see on whimsicalstitch.com's Instagram account. Visit instagram.com/whimsicalstitch to see a library of stitched samples for select #whimsicalwednesday and #smallspacesunday stitch diagrams.

Click on image to see on whimsicalstitch.com's Pinterest account. Visit pinterest.com/whimsicalstitch/whimsicalwednesday for a library of all #whimsicalwednesday and #smallspacesunday stitch diagrams.

Click on image to see on whimsicalstitch.com's Pinterest account. Visit pinterest.com/whimsicalstitch/whimsicalwednesday for a library of all #whimsicalwednesday and #smallspacesunday stitch diagrams.

Click on image to see on whimsicalstitch.com's Pinterest account. Visit pinterest.com/whimsicalstitch/whimsicalwednesday for a library of all #whimsicalwednesday and #smallspacesunday stitch diagrams.

Click on image to see on whimsicalstitch.com's Pinterest account. Visit pinterest.com/whimsicalstitch/whimsicalwednesday for a library of all #whimsicalwednesday and #smallspacesunday stitch diagrams.

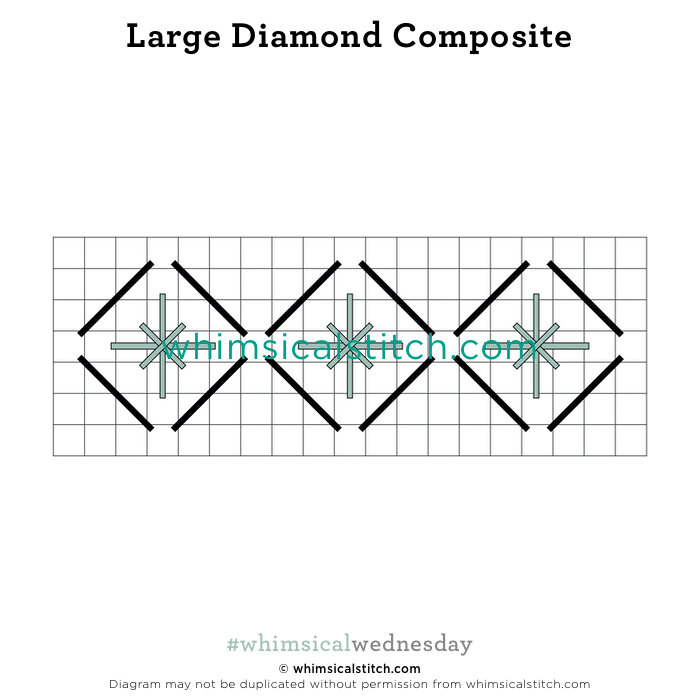
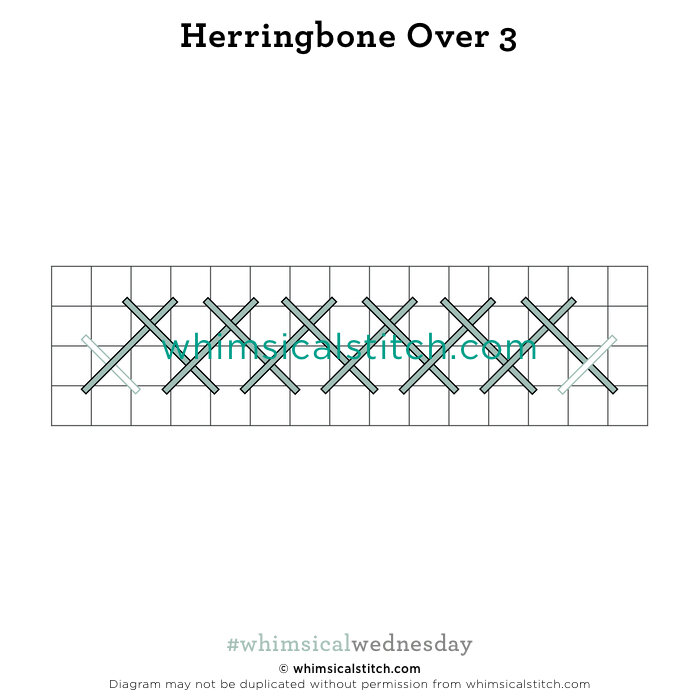
Starting clockwise from upper left, we have a border six rows tall (Large Diamond Composite), seven rows tall (Split Offset Stripes), and three rows tall (Herringbone over 3), and the ubiquitous stitched samples. The stitched samples are (from the top) over six, seven, and three rows (at the bottom). The over six sample uses Petite Silk Lame (black lines) and Needlepoint Inc Silk Floss (aqua liens). The center stitched sample uses two shades of Petite Sparkle Rays. The bottom stitched sample uses Neon Rays. (All are from the same project on 18-mesh).

All of these stitches are scaleable, though the diamond stitch will work best on borders with an even-numbered height. The student was really happy with the Neon Rays for the Herringbone because it was so smooth and filled the area well. My personal favorite was the offset stripes. It mimicked the canvas painting (always a win) but what I really liked about it was the contrasting colors. I would do this again the minute an opportunity presents itself.

These stitch diagrams, along with all other #whimsicalwednesday and #smallspacesunday stitch diagrams, can also be found on a Pinterest board here.

Be sure to follow whimsicalstitch.com on FacebookPinterestInstagram, and Twitter.

If you like what you see on this blog, want to learn some very creative decorative stitches, and how to put them all together, whimsicalstitch.com has a book for you! Mary’s Whimsical Stitches is a contemporary how-to collection of more than 250 stitches for stitchers regardless of skill level. The book includes updated and sequenced diagrams from this blog, all-new stitches, and a chapter on the basics of needlepoint. For more information, visit here.

whimsicalstitch.com also sells Stitch Guides and Stitch Concepts for Melissa Shirley Designs, Zecca DesignsSandra Gilmore, Purple Palm, Maggie, and Penny MacLeod, and many more. Click here to see the newest guides and click here to see the entire collection.

I hope you have the perfect spot for this stitch! Please enjoy! Have a wonderful #whimsicalwednesday!

A Note about Diagrams
I use color in diagrams to make them as clear as possible.  The primary function of different colored lines is to illustrate a stitch sequence.  For example, layering of colors demonstrates you add them in that order.  They can also provide ideas on how to integrate additional threads (one line for each color).  Or, you can use the same thread for all color lines.  That's where I encourage you to use your imagination for the space you are stitching!

Hello October

Today’s stitch is a very, very close cousin of a stitch I discussed in July. It’s a good example of how the direction and heavier threads make a substantial difference in very similar stitches.

Click on image to see on whimsicalstitch.com's Pinterest account. Visit pinterest.com/whimsicalstitch/whimsicalwednesday for a library of all #whimsicalwednesday and #smallspacesunday stitch diagrams.

Click on image to see on whimsicalstitch.com's Pinterest account. Visit pinterest.com/whimsicalstitch/whimsicalwednesday for a library of all #whimsicalwednesday and #smallspacesunday stitch diagrams.

Click on image to see on whimsicalstitch.com's Instagram account. Visit instagram.com/whimsicalstitch to see a library of stitched samples for select #whimsicalwednesday and #smallspacesunday stitch diagrams.

Click on image to see on whimsicalstitch.com's Instagram account. Visit instagram.com/whimsicalstitch to see a library of stitched samples for select #whimsicalwednesday and #smallspacesunday stitch diagrams.

The stitched sample is from the very burly chest of one of the Beach Boys, a recently added Stitch Concept. It uses all white threads, specifically Kreinik Medium Braid (#16) (gray lines), Petite Sparkle Rays (aqua lines), and Flair (black lines) on 18-mesh. I really enjoy Flair’s unique ability to absorb whatever color is painted underneath it, so the beautiful shading shows through. The larger Kreinik braid provides puffiness to each of the beetles on top of it.

Flip this stitch 90° for a choppy water, using a Kreinik Tapestry Braid (#12), Flair, and Petite Silk Lame. It will make beautiful clothing with a rich Petite Very Velvet (gray lines), Silk Lame (aqua lines), and a Kreinik Braid (#12 or #16) (black lines). For a smoother look on clothing, use a Kreinik 1/16” ribbon (gray lines) with a silk floss (such as Soie D’Alger, Planet Earth Silk, or Splendor) for the aqua lines and Flair (black lines). And, for goodness sake, don’t forget to have fun with colors. Consider using a different color for the gray to add a little surprise.

This stitch diagram, along with all other #whimsicalwednesday and #smallspacesunday stitch diagrams, can also be found on a Pinterest board here. Be sure to follow whimsicalstitch.com on FacebookPinterestInstagram, and Twitter.

If you like what you see on this blog, want to learn some very creative decorative stitches, and how to put them all together, whimsicalstitch.com sells Stitch Guides and Stitch Concepts for Melissa Shirley Designs, Zecca DesignsSandra Gilmore, Purple Palm, Maggie, and Penny MacLeod, and many more. Click here to see the newest guides and click here to see the entire collection.

I hope you have the perfect spot for this stitch! Please enjoy! Have a wonderful #whimsicalwednesday!

A Note about Diagrams
I use color in diagrams to make them as clear as possible.  The primary function of different colored lines is to illustrate a stitch sequence.  For example, layering of colors demonstrates you add them in that order.  They can also provide ideas on how to integrate additional threads (one line for each color).  Or, you can use the same thread for all color lines.  That's where I encourage you to use your imagination for the space you are stitching!The

Start Small

I'm not going to lie...composite stitches used to intimidate me greatly.  I have a few great books on the subject and would read them with wonder.  "How did they think of this?  How did they see this?"

I can't speak for those teachers but I realized at a recent teaching event to "start small."  I knew what I wanted for a Santa hat, but a. didn't have those books nearby and b. would have been mortified pulling out a book.  So I punted.

I started with a group of one of my favorite stitches.  And then I proceeded to stare at the sheet for a minute, knowing I wanted space.  So I added an accent.  And then I was off to the races by simply repeating this pattern, creating this framework.  

Hungarian Core.jpg
Click on image to see on whimsicalstitch.com's Pinterest account. Visit pinterest.com/whimsicalstitch/whimsicalwednesday for a library of all #whimsicalwednesday and #smallspacesunday stitch diagrams.

Click on image to see on whimsicalstitch.com's Pinterest account. Visit pinterest.com/whimsicalstitch/whimsicalwednesday for a library of all #whimsicalwednesday and #smallspacesunday stitch diagrams.

Click on image to see on whimsicalstitch.com's Instagram account. Visit instagram.com/whimsicalstitch to see a library of stitched samples for select #whimsicalwednesday and #smallspacesunday stitch diagrams.

Click on image to see on whimsicalstitch.com's Instagram account. Visit instagram.com/whimsicalstitch to see a library of stitched samples for select #whimsicalwednesday and #smallspacesunday stitch diagrams.

Personally, I loved the initial framework but wanted more.  So more was added including beads and a metallic accent with the final stitch for the Santa hat below.  It combines so many wonderful things that are perfect for the holidays.

Click on image to see on whimsicalstitch.com's Pinterest account. Visit pinterest.com/whimsicalstitch/whimsicalwednesday for a library of all #whimsicalwednesday and #smallspacesunday stitch diagrams.

Click on image to see on whimsicalstitch.com's Pinterest account. Visit pinterest.com/whimsicalstitch/whimsicalwednesday for a library of all #whimsicalwednesday and #smallspacesunday stitch diagrams.

Click on image to see on whimsicalstitch.com's Instagram account. Visit instagram.com/whimsicalstitch to see a library of stitched samples for select #whimsicalwednesday and #smallspacesunday stitch diagrams.

Click on image to see on whimsicalstitch.com's Instagram account. Visit instagram.com/whimsicalstitch to see a library of stitched samples for select #whimsicalwednesday and #smallspacesunday stitch diagrams.

This stitch would work well for most areas where you want to draw attention.  It would make great clothing, large flower, even water.  It would also make very interesting greenery, with or without the bead.  It really depends on how much attention an area deserves.  Thread choices would be dictated by area.  You could combine some wonderful metallics, such as ThreadWorx Kreinik with 1-2 solid colored metallics for a wonderful water.  Greenery could include Lorikeet, Very Velvet, and/or Silk Straw.  Have fun with it!

This stitch diagram, along with all other #whimsicalwednesday and #smallspacesunday stitch diagrams, can also be found on a Pinterest board here.

Be sure to follow whimsicalstitch.com on FacebookPinterestInstagram, and Twitter.

If you like what you see on this blog, want to learn some very creative decorative stitches, and how to put them all together, whimsicalstitch.com sells stitch guides and stitch concepts for Melissa Shirley Designs, Zecca Designs, and Patience Brewster. 47 guides are currently available and more are in the works!

I hope you have the perfect spot for this stitch! Enjoy!

X's and O's

I love stitching snow.  The variety of stitches we can use are virtually limitless.  I can't think of a needlepoint artist who doesn't add some sort of secondary color, whether it is gray or blue, to add depth and nuance to the snow.

And those additional colors are exactly why I favor open stitches.  The shading is so beautiful and subtle I don't want to cover it up.  Today's stitch honors that objective and is for a snowman you want to stand out.

Add the base threads (gray lines) first, and follow up with the accent threads (green and yellow lines).  

With most tramme stitches I previously shared with you on this site, I used a matte thread for the base (typically Very Velvet or a heavy Pearl Cotton).  On the stitched sample on Instagram for this stitch, I used all shiny threads.  The base thread is Petite Sparkle Rays.  The green accent thread is Crystal Braid and the yellow accent thread is Shimmer Ribbon.  

When using threads with the same finish, take a moment to make sure they are distinguishable from each other.  As an example, Neon Ray would not work with either Neon Rays + or Shimmer Ribbon as the finishes are too similar.  If you are using contrasting colors, have fun with the colors!  Finish matters less in that scenario.

This stitch diagram, along with all other #whimsicalwednesday and #smallspacesunday stitch diagrams, can also be found on a Pinterest board here.

Be sure to follow whimsicalstitch.com on FacebookPinterestInstagram, and Twitter.

If you like what you see on this blog, want to learn some very creative decorative stitches, and how to put them all together, whimsicalstitch.com sells stitch guides for Melissa Shirley and Zecca Designs.  27 guides are currently available and more are in the pipeline.

Enjoy!