Cold Weather Requires Full Coverage

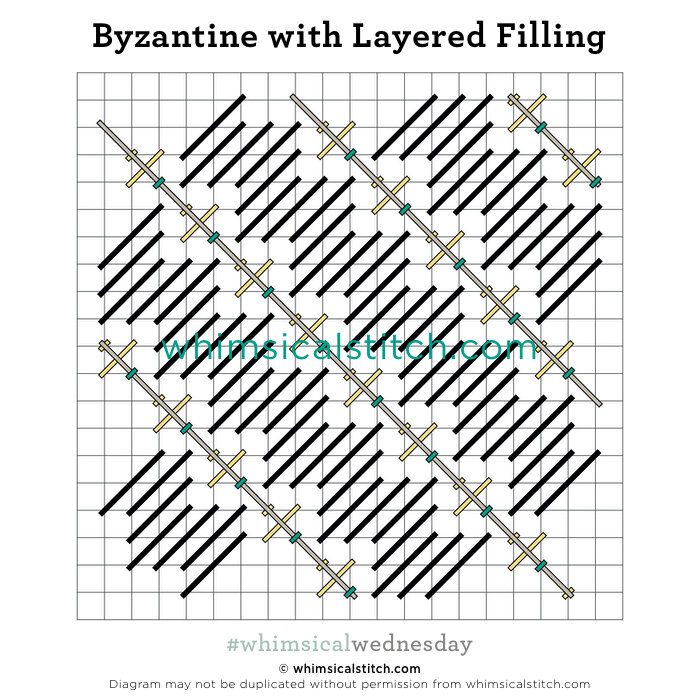
It’s a bleak 30-45 seconds between waking up and getting the heat turned on these days, even here in So. Cal. So I think I need to extend my streak of full coverage stitches so I can get warm over here.

Click on image to see on whimsicalstitch.com's Pinterest account. Visit pinterest.com/whimsicalstitch/whimsicalwednesday for a library of all #whimsicalwednesday and #smallspacesunday stitch diagrams.

Click on image to see on whimsicalstitch.com's Pinterest account. Visit pinterest.com/whimsicalstitch/whimsicalwednesday for a library of all #whimsicalwednesday and #smallspacesunday stitch diagrams.

Click on image to see on whimsicalstitch.com's Instagram account. Visit instagram.com/whimsicalstitch to see a library of stitched samples for select #whimsicalwednesday and #smallspacesunday stitch diagrams.

Click on image to see on whimsicalstitch.com's Instagram account. Visit instagram.com/whimsicalstitch to see a library of stitched samples for select #whimsicalwednesday and #smallspacesunday stitch diagrams.

This is an oldie but goodie and from long before #whimsicalwednesday was a twinkle in my eye. This is so from so long ago, hashtags were still pound signs. And for those of you with a keen eye, Santa is NOT flying. He is part of a tree skirt from our friend Melissa Shirley. Since I stitched the background in same stitch in every panel, some of the Santas look wonky if you don’t look at them as part of the whole skirt. (And I would do it that way all over again.)

The stitched sample uses Very Velvet (black lines), Frosty Rays (yellow lines), size 8 Kreinik Metallic (gray lines), and size 16 Kreinik Metallic (turquoise lines) on 13-mesh. Clearly, it’s a great stitch for clothing. You can lighten it up with silk floss (black lines), Flair (yellow lines), Petite Silk Lame (gray lines), and a Kreinik Metallic (turquoise lines) for trees or a roof. I love the diagonal stitch across the top of the smaller Scotch squares. I think that is a really elegant touch. The stitch sequence is black lines followed by yellow lines. Cover the yellow lines with the gray line and cover the gray lines with the turquoise lines. Someday I would like to see a bead for the turquoise lines. I think that would be a darling doll dress.

This stitch diagram, along with all other #whimsicalwednesday and #smallspacesunday stitch diagrams, can also be found on a Pinterest board here.

Be sure to follow whimsicalstitch.com on FacebookPinterestInstagram, and Twitter.

If you like what you see on this blog, want to learn some very creative decorative stitches, and how to put them all together, whimsicalstitch.com sells Stitch Guides and Stitch Concepts for Melissa Shirley Designs, Zecca DesignsSandra Gilmore, Purple Palm, Maggie, and Penny MacLeod, and many more. Click here to see the newest guides and click here to see the entire collection.

I hope you have the perfect spot for this stitch! Please enjoy! Have a wonderful #whimsicalwednesday!

A Note about Diagrams
I use color in diagrams to make them as clear as possible.  The primary function of different colored lines is to illustrate a stitch sequence.  For example, layering of colors demonstrates you add them in that order.  They can also provide ideas on how to integrate additional threads (one line for each color).  Or, you can use the same thread for all color lines.  That's where I encourage you to use your imagination for the space you are stitching!

Cute Clusters

Today's stitch is a sweet and sassy pop to almost any stitched piece.  

Click on image to see on whimsicalstitch.com's Pinterest account. Visit pinterest.com/whimsicalstitch/whimsicalwednesday for a library of all #whimsicalwednesday and #smallspacesunday stitch diagrams.

Click on image to see on whimsicalstitch.com's Pinterest account. Visit pinterest.com/whimsicalstitch/whimsicalwednesday for a library of all #whimsicalwednesday and #smallspacesunday stitch diagrams.

Click on image to see on whimsicalstitch.com's Instagram account. Visit instagram.com/whimsicalstitch to see a library of stitched samples for select #whimsicalwednesday and #smallspacesunday stitch diagrams.

Click on image to see on whimsicalstitch.com's Instagram account. Visit instagram.com/whimsicalstitch to see a library of stitched samples for select #whimsicalwednesday and #smallspacesunday stitch diagrams.

The stitched sample is the sky from a cute little ocean ornament, using DMC Perle #8 and Frosty Rays.  I am pleasantly surprised at how well this works in a relatively small space.  Just enough of the pattern emerges to make it work. 

I would love to see this as a floor, using a silk floss for the gray lines and a darker gray Silk Lame for the center.  Taking the tile theme one step further, each cluster would make a great roof!  I love strand-able wools for roofs; consider Burmilana, Bella Lusso Merino Wool, or Lorikeet.  My last idea is to use it for a wallpaper.  I'm really fond of size 12 Perle Cotton, especially for 18-mesh.  It is especially great for areas you want to recede into the background. Combining a cute stitch, such as today's, plus a lightweight thread gives you something fun to stitch yet it won't overwhelm the remainder of the project.

This stitch diagram, along with all other #whimsicalwednesday and #smallspacesunday stitch diagrams, can also be found on a Pinterest board here.

Be sure to follow whimsicalstitch.com on FacebookPinterestInstagram, and Twitter.

If you like what you see on this blog, want to learn some very creative decorative stitches, and how to put them all together, whimsicalstitch.com sells Stitch Guides and Stitch Concepts for Melissa Shirley Designs, Zecca Designs, and Patience Brewster. Click here to see the 20 newest guides and click here to see the entire collection.

I hope you have the perfect spot for this stitch!  Please enjoy!

A Note about Diagrams
I use color in diagrams to make them as clear as possible.  The primary function of different colored lines is to illustrate a stitch sequence.  For example, layering of colors demonstrates you add them in that order.  They can also provide ideas on how to integrate additional threads (one line for each color).  Or, you can use the same thread for all color lines.  That's where I encourage you to use your imagination for the space you are stitching!

Boo!

Today's stitch is a full coverage stitch I found in a book forever ago.  I had all but forgotten about it until I pulled out my Halloween decorations.

Click on image to see on whimsicalstitch.com's Pinterest account. Visit pinterest.com/whimsicalstitch/whimsicalwednesday for a library of all #whimsicalwednesday and #smallspacesunday stitch diagrams.

Click on image to see on whimsicalstitch.com's Pinterest account. Visit pinterest.com/whimsicalstitch/whimsicalwednesday for a library of all #whimsicalwednesday and #smallspacesunday stitch diagrams.

Click on image to see on whimsicalstitch.com's Instagram account. Visit instagram.com/whimsicalstitch to see a library of stitched samples for select #whimsicalwednesday and #smallspacesunday stitch diagrams.

Click on image to see on whimsicalstitch.com's Instagram account. Visit instagram.com/whimsicalstitch to see a library of stitched samples for select #whimsicalwednesday and #smallspacesunday stitch diagrams.

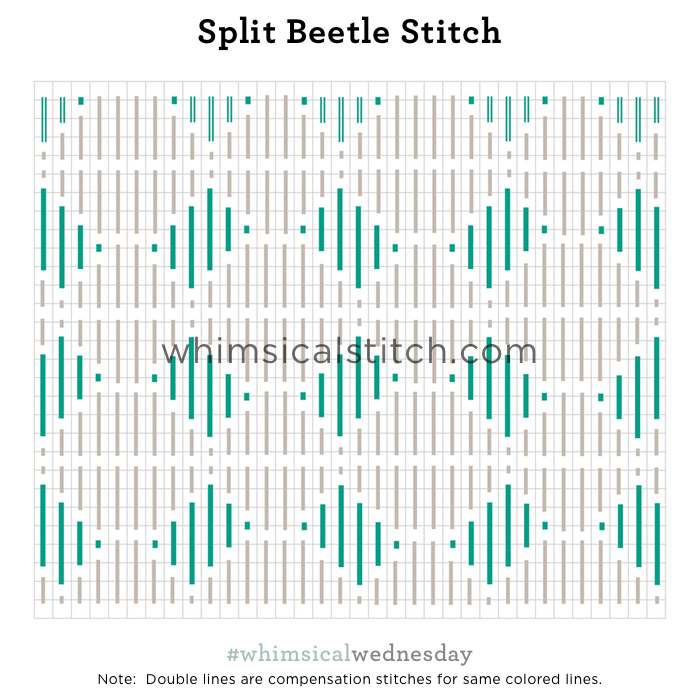
The stitched sample includes DMC Perle Cotton #8 with Flair.  It's a tricky little stitch.  Do NOT overlook the fact the beetles alternate sizes on the horizontal and vertical axises.  I strongly recommend adding the beetles first (gray lines), and fill in the parallelograms (turquoise lines) when you are done with the beetles.

This full coverage stitch will draw attention to a medium- to large-sized space.  It would be a fantastic coat or bag with rich threads such as Pepper Pot Silk, Very Velvet, Soie D'Alger or Gloriana Silk Floss for the beetles.  Combine those with a strong metallic such as Fyre Werks, Kreinik Metallics Medium Braid (#16), Silk Lame, Rachelette, or Frosty Rays.  It would make a wonderful basket or floor with lighter weight matte threads such as DMC Perle, Elegance, Subtlety, or Prescencia.  Combine colors and finishes to get your desired effect.

This stitch diagram, along with all other #whimsicalwednesday and #smallspacesunday stitch diagrams, can also be found on a Pinterest board here.

Be sure to follow whimsicalstitch.com on FacebookPinterestInstagram, and Twitter.

If you like what you see on this blog, want to learn some very creative decorative stitches, and how to put them all together, whimsicalstitch.com sells stitch guides and stitch concepts for Melissa Shirley Designs, Zecca Designs, and Patience Brewster. 48 guides are currently available and more are in the works!

I hope you have the perfect spot for this stitch! Enjoy!

Stolen Stitches

The month of June is dedicated to stolen stitches.  These are stitches I've come across on other people's work that I've "borrowed" and made for us to own!

Today's stitch is probably the only stitch that I could find its root source...one of Ruth Schmuff's wonderful iStitch books.  Essentially, it is a 3X3 diamond.  What I love about what Ruth did was how she offset the center stitch on each side of the diamond.

Click on image to see on whimsicalstitch.com's Pinterest account. Visit pinterest.com/whimsicalstitch/whimsicalwednesday for a library of all #whimsicalwednesday and #smallspacesunday stitch diagrams.

Click on image to see on whimsicalstitch.com's Pinterest account. Visit pinterest.com/whimsicalstitch/whimsicalwednesday for a library of all #whimsicalwednesday and #smallspacesunday stitch diagrams.

Click on image to see on whimsicalstitch.com's Instagram account. Visit instagram.com/whimsicalstitch to see a library of stitched samples for select #whimsicalwednesday and #smallspacesunday stitch diagrams.

Click on image to see on whimsicalstitch.com's Instagram account. Visit instagram.com/whimsicalstitch to see a library of stitched samples for select #whimsicalwednesday and #smallspacesunday stitch diagrams.

A little Upright Cross in each of the intersections makes for a perfect sassy accent.  The stitched sample uses City Needlework Silk and Frosty Rays.  And Scott Church Creative's Easter Duck is ready to rumble!

As with most diamond stitches, there are way too many applications to count so I'm going to ponder thread choices.  I would love to see this in Very Velvet (for the diamond) with a matte accent, such as Rainbow Linen or even Lorikeet, for a coat or roof.  Using Elegance or Pearl Cotton (for the diamond) with a lightweight Kreinik (for the accent) would make a beautiful sky.  This would also make a wonderful water stitch with two metallics, such as Kreinik and Petite Silk Lame.  The possibilities are really quite amazing.

This stitch diagram, along with all other #whimsicalwednesday and #smallspacesunday stitch diagrams, can also be found on a Pinterest board here.

Be sure to follow whimsicalstitch.com on FacebookPinterestInstagram, and Twitter.

If you like what you see on this blog, want to learn some very creative decorative stitches, and how to put them all together, whimsicalstitch.com sells stitch guides and stitch concepts for Melissa Shirley Designs, Zecca Designs, and Patience Brewster. 41 guides are currently available and more are in the pipeline.

Please!  Someone "steal" this from me and let me know what you do with it! 

I hope you have the perfect spot for this stitch! Enjoy!

Surprisingly Small

Truth be told, I don't consider today's stitch a true small space stitch*.  However, as I was examining my needlepoint pieces for #smallspacesunday inspiration, I found this stitch in a small space on one of my (ahem, many) fruit pillows.  And, much to my surprise, I haven't covered this exact stitch yet (variations of, yes...this stitch, no).  So, win win!

I give you Upright Tied Crosses in its purest form.

Click on image to see on whimsicalstitch.com's Pinterest account.  Visit pinterest.com/whimsicalstitch/whimsicalwednesday for a library of all #whimsicalwednesday and #smallspacesunday stitch diagrams.

Click on image to see on whimsicalstitch.com's Pinterest account.  Visit pinterest.com/whimsicalstitch/whimsicalwednesday for a library of all #whimsicalwednesday and #smallspacesunday stitch diagrams.

Click on image to see on whimsicalstitch.com's Instagram account.  Visit instagram.com/whimsicalstitch to see a library of stitched samples for select #whimsicalwednesday and #smallspacesunday stitch diagrams.

Click on image to see on whimsicalstitch.com's Instagram account.  Visit instagram.com/whimsicalstitch to see a library of stitched samples for select #whimsicalwednesday and #smallspacesunday stitch diagrams.

The stitched sample is a raspberry from a retired Melissa Shirley fruit pillow.  It used DMC Perle Cotton with Frosty Rays as the X on top.  The use of two threads was a perfect way to make this stitch pop in a small space.

This stitch diagram, along with all other #whimsicalwednesday and #smallspacesunday stitch diagrams, can also be found on a Pinterest board here.

Be sure to follow whimsicalstitch.com on FacebookPinterestInstagram, and Twitter.

If you like what you see on this blog, want to learn some very creative decorative stitches, and how to put them all together, whimsicalstitch.com sells stitch guides and stitch concepts for Melissa Shirley Designs, Zecca Designs, and Patience Brewster. 41 guides are currently available and more are in the pipeline.

I hope you have the perfect spot for this stitch! Enjoy!

* I acknowledge this is not what I consider a pattern stitch.  I consider #smallspacesunday a theme unto itself.  :)

Orange You Glad I Didn't Say Banana?

One of the WORST knock-knock jokes ever.  But, it was the first thing that came into my head as I plotted this post.  Because, um, today's stitch comes from an orange on one of my Melissa Shirley fruit pillows.  

For those of you whom open work makes you itch, this may be a stitch for you.  It is very, very close to full coverage.  The choice of lighter weight threads reinforce the open look.  Here's the stitch.

It's a 3X3 diamond with a Smyrna Cross in the diamond intersections and a Tied Upright Cross in the diamond centers.  

Thread weights are critical for the open effect of this stitch.  The stitched sample on Instagram drives home my point.

In the Instagram sample, the dark gray lines are a size 5 Pearl Cotton, the aqua lines are a size 8 Kreinik Metallics, and the turquoise lines are Frosty Rays.  If you are #teamfullcoverage, consider a heavier Pearl Cotton or even a single strand silk such as Vineyard Silk or Pepper Pot for the dark gray lines.  Increase the weight of the Kreinik Metallic to a size 12 or size 16 and I think you might be just as happy with this stitch.

This stitch diagram, along with all other #whimsicalwednesday and #smallspacesunday stitch diagrams, can also be found on a Pinterest board here.

Be sure to follow whimsicalstitch.com on FacebookPinterestInstagram, and Twitter.

If you like what you see on this blog, want to learn some very creative decorative stitches, and how to put them all together, whimsicalstitch.com sells stitch guides for Melissa Shirley Designs, Zecca Designs, and Patience Brewster.  31 guides are currently available and more are in the pipeline.

I hope you have the perfect spot for this stitch.  Enjoy!

Magical Milanese

I've never chatted about Milanese before, so why not start with a large, dramatic Milanese stitch?

Milanese stitches are diagonal stitches, typically in groups of four with each stitch one row wider than the previous.  The resulting element looks like a triangle or an arrowhead.  Today's stitch idea blows this up into a group of six stitches for each triangle.

Let's start with the diagram.

The triangles are in diagonal columns.  Every row of an individual triangle aligns with a specific row in the triangle on either side (going in the opposite direction).  I use the "total" to determine which stitch (of the triangle) is in the next diagonal column of triangles.  In the above example, the total is seven (7).  The sixes match to the ones; the fives match to the twos; the fours match to the threes.  The "total" counting method helps me easily add subsequent columns and is a real help when adding compensation stitches.  Honestly, it keeps me sane.  I recommend stitching the triangles first and return to add the accent stitches (the aqua lines).

The stitched sample on Instagram takes this concept one step further by alternating finishes for the diagonal columns of triangles.

The diagram below is the exact same as above, but I changed the color of alternating columns to align it with the stitched sample for clarity.


Since Milanese is a dramatic stitch that stands out, I think it calls for substantial, full coverage threads.  The stitched sample uses Very Velvet and Frosty Rays.  Both of those threads add a certain puff to the stitched sample.  Confetti or Rachelette would be a fun alternative for the Frosty Rays.  Right now, I am pondering how fun it could be to use Gloriana's Chenille for the triangles (on 13-mesh). 

Other substantial threads, albeit with less puff, are Silk & Ivory, Planet Earth Wool, Planet Earth Silk, or Kreinik Metallics (size 12 or 16).  Fyre Werks and Flair are great metallic threads to consider as well.  While they may appear lighter weight, they are great threads as they lie flat and wide.  They make great accent threads.

These stitch diagrams, along with all other #whimsicalwednesday and #smallspacesunday stitch diagrams, can also be found on a Pinterest board here.

Be sure to follow whimsicalstitch.com on FacebookPinterestInstagram, and Twitter.

If you like what you see on this blog, want to learn some very creative decorative stitches, and how to put them all together, whimsicalstitch.com sells stitch guides for Melissa Shirley Designs and Zecca Designs.  28 guides are currently available, including the newest Tea by the Sea, and more are in the pipeline.

I hope you enjoy this stitch and have the perfect spot for it!  Enjoy!

More Beads!

Snow stitches beg for beads.  Today's stitch finds its inspiration in earlier posts.  While I wholeheartedly recommend the Baby Bling stitch or Chopsticks (with beads) for snow, let's change the shape of the stitch in between the beads this week.

I present Beads with Diamonds.  

This is an open stitch that is perfect for the wonderful snow shading.  The light blue or gray shading will show through beautifully with this stitch.  Consider using a clear bead, such as Sundance Beads color 131, for the accent.  Frankly, I would use a light sheen Metallic, such as Flair, Frosty Rays, or Crystal Braid, for the diamond itself.

I'm including a couple of variations to (hopefully) inspire you.  The first adds an Upright Cross stitch to the center of the diamond.  I strongly recommend using two different metallics, one for the Upright Cross and one for the Diamond.  

The last variation leaves the center clear but fills in the diagonal stitch between the diamonds.

Beads with Diamonds Variation 2.jpg

It's all a matter of taste.  And your taste is perfect.  

These stitch diagrams, along with all other #whimsicalwednesday and #smallspacesunday stitch diagrams, can also be found on a Pinterest board here.

Be sure to follow whimsicalstitch.com on FacebookPinterestInstagram, and Twitter.

If you like what you see on this blog, want to learn some very creative decorative stitches, and how to put them all together, whimsicalstitch.com sells stitch guides for seasonal Melissa Shirley designs.  27 guides are currently available and more are in the pipeline.

Enjoy!

Horizontal Brick

Not the most clever of blog post titles, but it's early here.  :)

Today's stitch is one of those universal solutions.  Depending on the thread combination, it can be clothing, a background, a tabletop, a piece of fruit (as illustrated on Instagram), or foliage.

It's really simple.

As I mentioned earlier, the thread combination defines its use.  For an area you'd like to recede a little, I recommend a lightweight pearl silk or cotton, such as Elegance, Thread Gatherer Silken Pearl, DMC (or Anchor) Pearl #8 for the gray lines and a lightweight metallic for the yellow lines, such as Neon Rays, Shimmer, or Kreinik Metallics #4 or #8. 

For a more intense area, such as a coat, Very Velvet, Pepper Pot Silk, Vineyard Silk, or a multi-ply wool are great alternatives.  Flair, Frosty Rays, Kreinik Metallics #12 or #16 balance these threads well.  

On a separate but related subject, I would love to receive feedback on whimsicalstitch.com.  Please visit this link to fill out a short survey.  Thank you!

This stitch diagram, along with other #whimsicalwednesday and #smallspacesunday stitch diagrams, can also be found on www.pinterest.com/whimsicalstitch/whimsicalwednesday.  

Be sure to follow whimsicalstitch.com on FacebookPinterestInstagram, and Twitter.

If you like what you see on this blog, want to learn some very creative decorative stitches, and how to put them all together, whimsicalstitch.com sells stitch guides for seasonal Melissa Shirley designs.  22 guides are currently available and more are in the pipeline.

Enjoy!

Turning a Corner

Today's border concept is Padding.  This post elaborates on the earlier #whimsicalwednesday post on padding and takes it one step further by illustrating how to get around corners.

With all padding, the base rows (turquoise lines) can be added with efficiency.  It is not critical to have crisp edges or coverage for the border rows on the back.  They will be covered and no one will be able to tell that you took varying short cuts in between rows.  However, it is important the path(s) you follow are contained within the border area so there are no base threads dragged across the non-border area of the canvas.   Step 1 illustrates a potential path.  This ensures the base threads will be covered by the top threads (gray lines) on both sides of the canvas, enclosing the entire border.

In Step 2, navigating the wide corners (upper left and lower right) requires focus.  To get a crisp and clean inside corner, split the stitch where the inside corners meet for the first time.  In this example, the border is over three rows.  Corners will meet when the border will be over six rows (double the width).  Don't do over six rows with one stitch!  Split it into two stitches, over three rows each, for a crisp corner.  The lime green and aqua stitched sample on Instagram illustrates a padded corner over three rows

There are a few things worth repeating from the first post about padding.  Most padding requires only one layer of base thread.  If you want to create more pronounced padding, add 1-2 additional layers of base thread.  One of the stitched samples on Instagram illustrates a very thick padding.  Kelly wasn't sure how many layers of padding he added to that border...but it might have been double digit.  It's a dramatic and beautiful example of padding.  

Very Velvet and Pearl Cotton #3 make excellent base rows.  I prefer wider threads for the top thread, such as Flair, Fyre Werks, Treasure Ribbon, Frosty Rays, or plied floss (with a laying tool to maximize its width and coverage).

This stitch diagram, along with other #whimsicalwednesday and #smallspacesunday stitch diagrams, can also be found on www.pinterest.com/whimsicalstitch/whimsicalwednesday.  

Be sure to follow whimsicalstitch.com on FacebookPinterestInstagram, and Twitter.

If you like what you see on this blog, want to learn some very creative decorative stitches, and how to put them all together, whimsicalstitch.com sells stitch guides for seasonal Melissa Shirley designs.  20 guides are currently available and more are in the pipeline.

Enjoy!