Boo!

For those who feel it is too early for Halloween and/or don’t like open stitches, today’s post may not be for you. For the rest of us, rejoice! Halloween season is upon us!

Click image to see the whimsicalstitch Stitch Library on pinterest.com. Includes all #whimsicalwednesday and #smallspacesunday stitch diagrams.

Click image to see the whimsicalstitch Stitch Library on pinterest.com. Includes all #whimsicalwednesday and #smallspacesunday stitch diagrams.

Click image to see #whimsicalwednesday and #smallspacesunday Stitched Sample Gallery on Instagram.

Click image to see #whimsicalwednesday and #smallspacesunday Stitched Sample Gallery on Instagram.

Click image to see #whimsicalwednesday and #smallspacesunday Stitched Sample Gallery on Instagram.

Click image to see #whimsicalwednesday and #smallspacesunday Stitched Sample Gallery on Instagram.

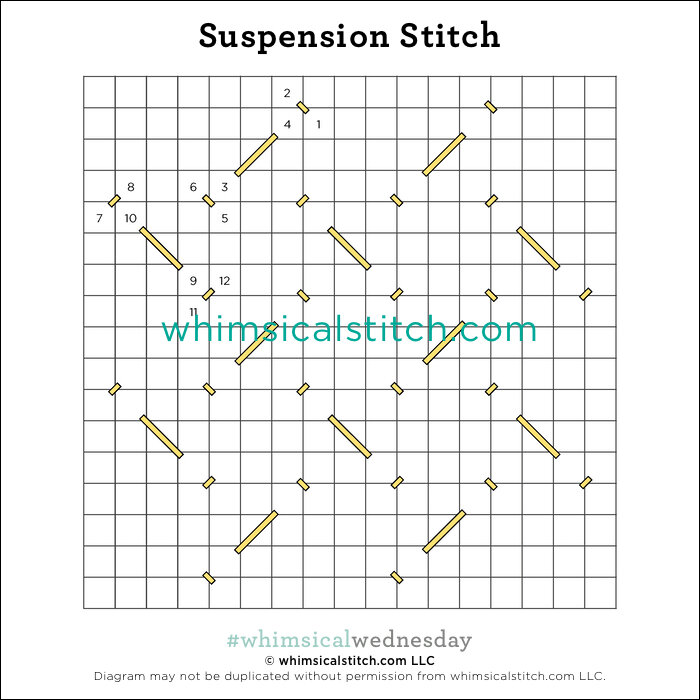
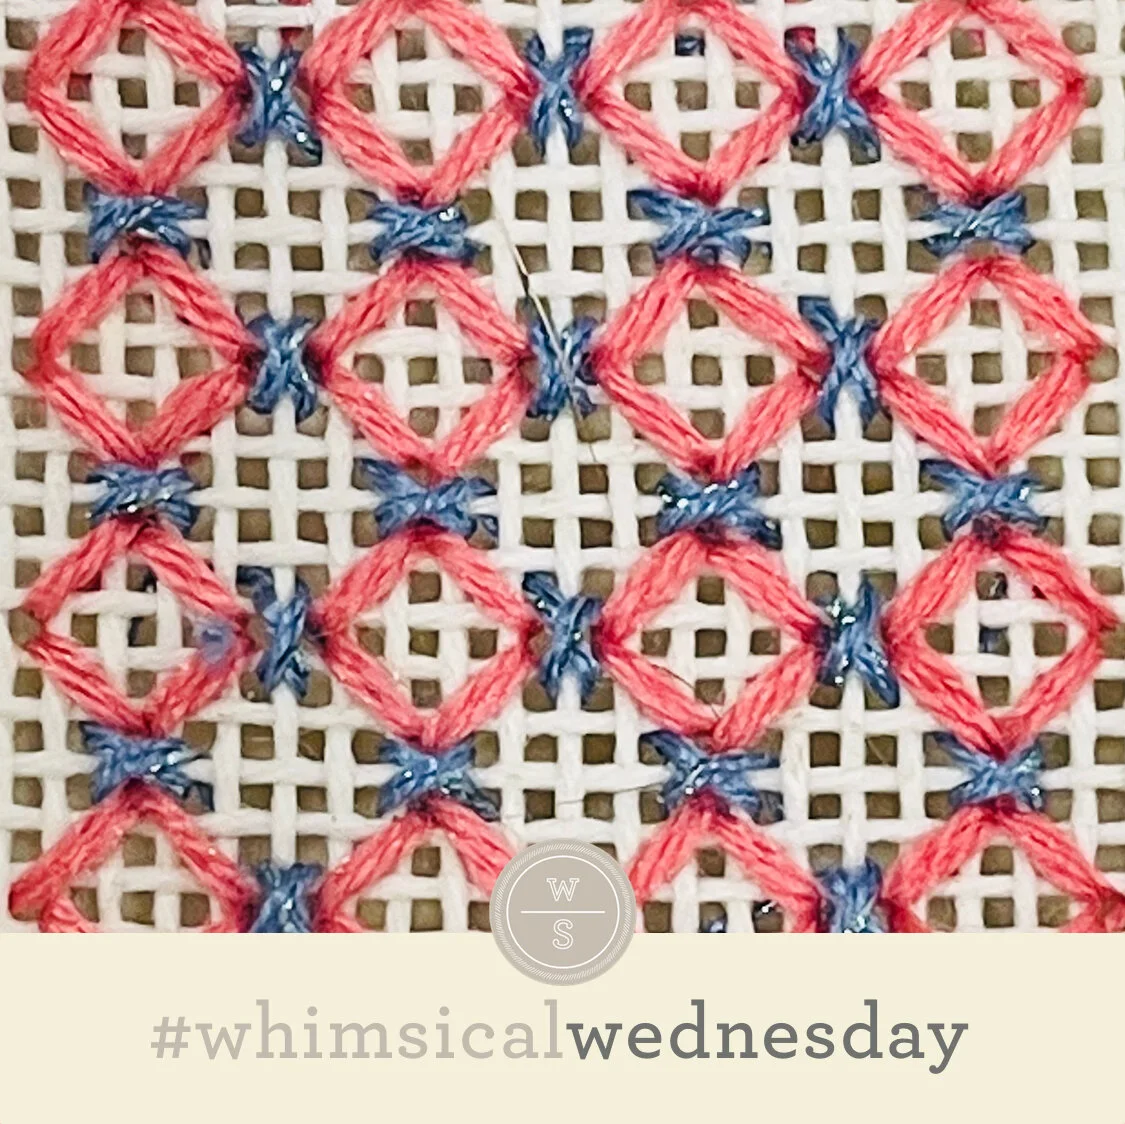
Today’s stitch is from Never More from Melissa Shirley Designs, a project I worked on at this weekend’s embellishment class at Bedecked and Beadazzled. It’s a variation of a favorite layered stitch using Soie d’Alger (aqua lines) with sequin and bead accents. Sequins are always welcome, but I consider them essential for Halloween. I included two photos so you could see the pretty layering and sequins as well as the overall stitch in context.

The shading on this pumpkin is one of the reasons I love open stitches. I consider open stitches the best of both worlds. You can see the beautiful painting but still add sparkle and charm.

I’m looking forward to using this stitch for a beautifully painted dress, especially one with a poofy skirt, using an overdyed silk floss with a single bead or pearl in the corners (instead of the sequins). It will also make a fun floor or roof with Mandarin Floss. I suggest replacing the sequins with four tent stitches in a lightweight metallic, such as Petite Silk Lame.

This stitch diagram, along with all other #whimsicalwednesday and #smallspacesunday stitch diagrams, can also be found on a Pinterest board here. Be sure to follow whimsicalstitch.com on FacebookPinterestInstagram, and Twitter.

IIf you like what you see on this blog, there's more: Mary’s Whimsical Stitches Volume 1 is a contemporary how-to collection of more than 250 stitches for stitchers regardless of skill level. The book includes updated and sequenced diagrams from this blog, all-new stitches, and a chapter on the basics of needlepoint; Mary’s Whimsical Stitches Volume 2 features chapters on Balanced, Beading, Diagonal, Layered, Oblique, Small, and Straight stitches.

Also, you can download for free the first chapter from my first book which covers basic needlepoint stitches and stitch compensation techniques along with new top-line information on needlepoint materials and tools, how to handle threads, and other helpful needlepoint resources.

whimsicalstitch.com also sells Stitch Guides and Stitch Concepts for Melissa Shirley Designs, Zecca DesignsSandra Gilmore, Purple Palm, Maggie, and Penny MacLeod, and many more. Click here to see the newest guides and click here to see the entire collection.

I hope you have the perfect spot for this stitch! Please enjoy! Have a wonderful #whimsicalwednesday!

A Note about Diagrams
I use color in diagrams to make them as clear as possible.  The primary function of different colored lines is to illustrate a stitch sequence.  For example, layering of colors demonstrates you add them in that order.  They can also provide ideas on how to integrate additional threads (one line for each color).  Or, you can use the same thread for all color lines.  That's where I encourage you to use your imagination for the space you are stitching!

Takes a Fresh Eye

As you should know by now, whether through this blog or through one of my stitch guides, I love layered stitches (that I often call Tramme). I also love it when stitchers share Tramme variations they are using that I would not have thought of…and that’s where today’s stitch comes from.

Click image to see the whimsicalstitch Stitch Library on pinterest.com. Includes all #whimsicalwednesday and #smallspacesunday stitch diagrams.

Click image to see the whimsicalstitch Stitch Library on pinterest.com. Includes all #whimsicalwednesday and #smallspacesunday stitch diagrams.

Click image to see #whimsicalwednesday and #smallspacesunday Stitched Sample Gallery on Instagram.

Click image to see #whimsicalwednesday and #smallspacesunday Stitched Sample Gallery on Instagram.

The stitched sample is a very cute Terry Runyan cat and used Splendor (black lines) and Petite Silk Lame (yellow lines). My layering is typically one repeated pattern, as illustrated here. I love the integration of the two patterns in today’s stitch.

With its woven look and long, lean look, this still will make fantastic clothing, such as pants or a coat. In either of those scenarios, I would use a matte thread on top. I recommend using a metallic that lies flat for the black lines, such as Flair, Fyre Werks, or Neon Rays. Cover it with silk, such as silk floss or a single strand silk (such as Vineyard Silk or Pepper Pot Silk) for a look with more texture.

For some reason, as I look at this stitch while writing, chimneys keep popping into my head. I would use two related hues of the same matte thread for that area.

When I use this stitch (and oh, I will), I will stitch a complete layer combo before moving on to the next one. Since the layers are so close together, this will help me avoid snagging threads. Specifically, I’ll start with the column on the right. Add the one long row of Splendor (black lines), park the thread to the side, and then add the pairs of horizontal straight stitches over two rows with the Petite Silk Lame and park the thread to the side. I’ll add two more rows of Splendor, park the Splendor, and follow up with the pairs of horizontal stitches over three rows. And then repeat.

This stitch diagram, along with all other #whimsicalwednesday and #smallspacesunday stitch diagrams, can also be found on a Pinterest board here. Be sure to follow whimsicalstitch.com on FacebookPinterestInstagram, and Twitter.

IIf you like what you see on this blog, there's more: Mary’s Whimsical Stitches Volume 1 is a contemporary how-to collection of more than 250 stitches for stitchers regardless of skill level. The book includes updated and sequenced diagrams from this blog, all-new stitches, and a chapter on the basics of needlepoint; Mary’s Whimsical Stitches Volume 2 features chapters on Balanced, Beading, Diagonal, Layered, Oblique, Small, and Straight stitches.

Also, you can download for free the first chapter from my first book which covers basic needlepoint stitches and stitch compensation techniques along with new top-line information on needlepoint materials and tools, how to handle threads, and other helpful needlepoint resources.

whimsicalstitch.com also sells Stitch Guides and Stitch Concepts for Melissa Shirley Designs, Zecca DesignsSandra Gilmore, Purple Palm, Maggie, and Penny MacLeod, and many more. Click here to see the newest guides and click here to see the entire collection.

I hope you have the perfect spot for this stitch! Please enjoy! Have a wonderful #whimsicalwednesday!

A Note about Diagrams
I use color in diagrams to make them as clear as possible.  The primary function of different colored lines is to illustrate a stitch sequence.  For example, layering of colors demonstrates you add them in that order.  They can also provide ideas on how to integrate additional threads (one line for each color).  Or, you can use the same thread for all color lines.  That's where I encourage you to use your imagination for the space you are stitching!

My First Needlepoint Love was Santa

Searching for a stitched sample for a now rescheduled topic led to the discovery of today’s gems. And proof that I have full coverage stitches in my repertoire.

Click image to see the whimsicalstitch Stitch Library on pinterest.com. Includes all #whimsicalwednesday and #smallspacesunday stitch diagrams.

Click image to see the whimsicalstitch Stitch Library on pinterest.com. Includes all #whimsicalwednesday and #smallspacesunday stitch diagrams.

Click image to see #whimsicalwednesday and #smallspacesunday Stitched Sample Gallery on Instagram.

Click image to see #whimsicalwednesday and #smallspacesunday Stitched Sample Gallery on Instagram.

Click image to see #whimsicalwednesday and #smallspacesunday Stitched Sample Gallery on Instagram.

Click image to see #whimsicalwednesday and #smallspacesunday Stitched Sample Gallery on Instagram.

The background on a vintage Melissa Shirley Santa is Pepper Pot Silk (black and yellow lines) with a touch of Kreinik sparkle (gray lines). The entire background on the cat mini stocking is, most likely, Pepper Pot Silk or Vineyard Silk. Full disclosure(s): These were stitched in the mid to late 90’s, so thread ID may not be perfect. Also, the background on the cat swapped the order of the yellow and gray lines, but that is a minor detail. It is virtually the same stitch. Be sure to jump over to Instagram to see the adorable Santa from head to toe.

This stitch is perfect for clothing, especially pants or a long jacket. I’m all for using three threads if there are three unique elements in a stitch. That said, finding these samples is a nice reminder that the character still comes through with fewer threads. That said, I think it would be fun to stitch pants with two adjacent hues of single-strand silk or silk floss (black and yellow lines) and a metallic for the gray lines.

My first love of Christmas was usurped by Halloween needlepoint. This stitch would be darling on a small to medium pumpkin with two metallics for the black and yellow lines, such as Silk Lame and Fyre Werks, and a pretty silk floss for the gray lines. (Sidebar: when using two metallics in a stitch, be sure they have distinctly different finishes. For example, size 4 and size 8 Kreinik are not overtly distinguishable from Petite Silk Lame. They work together well if they are distinctly different colors but not if they are close to the same color.)

These stitch diagrams, along with all other #whimsicalwednesday and #smallspacesunday stitch diagrams, can also be found on a Pinterest board here. Be sure to follow whimsicalstitch.com on FacebookPinterestInstagram, and Twitter.

IIf you like what you see on this blog, there's more: Mary’s Whimsical Stitches Volume 1 is a contemporary how-to collection of more than 250 stitches for stitchers regardless of skill level. The book includes updated and sequenced diagrams from this blog, all-new stitches, and a chapter on the basics of needlepoint; Mary’s Whimsical Stitches Volume 2 features chapters on Balanced, Beading, Diagonal, Layered, Oblique, Small, and Straight stitches.

Also, you can download for free the first chapter from my first book which covers basic needlepoint stitches and stitch compensation techniques along with new top-line information on needlepoint materials and tools, how to handle threads, and other helpful needlepoint resources.

whimsicalstitch.com also sells Stitch Guides and Stitch Concepts for Melissa Shirley Designs, Zecca DesignsSandra Gilmore, Purple Palm, Maggie, and Penny MacLeod, and many more. Click here to see the newest guides and click here to see the entire collection.

I hope you have the perfect spot for this stitch! Please enjoy! Have a wonderful #whimsicalwednesday!

A Note about Diagrams
I use color in diagrams to make them as clear as possible. The primary function of different colored lines is to illustrate a stitch sequence. For example, layering of colors demonstrates you add them in that order. They can also provide ideas on how to integrate additional threads (one line for each color). Or, you can use the same thread for all color lines. That's where I encourage you to use your imagination for the space you are stitching!

How It Started is How It Ended

I’m about thisclose to finishing the sky on my current project and, of course, I had to take a break and stare at it. (It’s what needlepointers do.) And then I started stitch doodling in the corner. Uh oh.

As the title of the blog says, the sky ended as it started BUT I recorded what I would have done if I thought of it sooner and what I will do the next time a sky presents itself to be stitched. (Full disclosure: I love both stitches.)

How it started and ended:

Click image to see the whimsicalstitch Stitch Library on pinterest.com. Includes all #whimsicalwednesday and #smallspacesunday stitch diagrams.

Click image to see the whimsicalstitch Stitch Library on pinterest.com. Includes all #whimsicalwednesday and #smallspacesunday stitch diagrams.

Click image to see #whimsicalwednesday and #smallspacesunday Stitched Sample Gallery on Instagram.

Click image to see #whimsicalwednesday and #smallspacesunday Stitched Sample Gallery on Instagram.

The sky is stitched with two plies of Soie d’Alger on 18M. I’ve shared darning stitches before. What makes darning stitches unique is that they are essentially a running stitch from edge to edge, with smooth edges. Your typical needlepoint stitch has smooth, wrapped corners. For today’s stitch, I stitched all of the diagonal stitches in one direction together (numbered steps) and followed up with the opposite direction (lettered steps).

And then I had to go and stitch doodle.

Click image to see the whimsicalstitch Stitch Library on pinterest.com. Includes all #whimsicalwednesday and #smallspacesunday stitch diagrams.

Click image to see the whimsicalstitch Stitch Library on pinterest.com. Includes all #whimsicalwednesday and #smallspacesunday stitch diagrams.

Click image to see #whimsicalwednesday and #smallspacesunday Stitched Sample Gallery on Instagram.

Click image to see #whimsicalwednesday and #smallspacesunday Stitched Sample Gallery on Instagram.

The doodle…I mean the Suspension Stitch also uses two plies of the same Soie. The repeated element is a diagonal stitch over two with two tent stitches on either side. It reminded me of a car suspension, hence the name. (Full disclosure: I worked in automotive marketing in my past life. An automotive friend observed about the stitch, “it’s suspension at the little red wagon level!”)

I think both of these stitches will work well in any number of areas, beginning with water, sand, or sky. Consider either for a larger piece of glass you want to draw some attention to. I’m also toying with changing the color or finish of the tent stitches for a little added surprise.

These stitch diagrams, along with all other #whimsicalwednesday and #smallspacesunday stitch diagrams, can also be found on a Pinterest board here. Be sure to follow whimsicalstitch.com on FacebookPinterestInstagram, and Twitter.

IIf you like what you see on this blog, there's more: Mary’s Whimsical Stitches Volume 1 is a contemporary how-to collection of more than 250 stitches for stitchers regardless of skill level. The book includes updated and sequenced diagrams from this blog, all-new stitches, and a chapter on the basics of needlepoint; Mary’s Whimsical Stitches Volume 2 features chapters on Balanced, Beading, Diagonal, Layered, Oblique, Small, and Straight stitches.

Also, you can download for free the first chapter from my first book which covers basic needlepoint stitches and stitch compensation techniques along with new top-line information on needlepoint materials and tools, how to handle threads, and other helpful needlepoint resources.

whimsicalstitch.com also sells Stitch Guides and Stitch Concepts for Melissa Shirley Designs, Zecca DesignsSandra Gilmore, Purple Palm, Maggie, and Penny MacLeod, and many more. Click here to see the newest guides and click here to see the entire collection.

I hope you have the perfect spot for this stitch! Please enjoy! Have a wonderful #whimsicalwednesday!

A Note about Diagrams
I use color in diagrams to make them as clear as possible.  The primary function of different colored lines is to illustrate a stitch sequence.  For example, layering of colors demonstrates you add them in that order.  They can also provide ideas on how to integrate additional threads (one line for each color).  Or, you can use the same thread for all color lines.  That's where I encourage you to use your imagination for the space you are stitching!

It Could be Simple, But Noooooooo

I have a weird thing about Satin Stitches. And that’s where I make things complicated…for myself.

Click image to see the whimsicalstitch Stitch Library on pinterest.com. Includes all #whimsicalwednesday and #smallspacesunday stitch diagrams.

Click image to see the whimsicalstitch Stitch Library on pinterest.com. Includes all #whimsicalwednesday and #smallspacesunday stitch diagrams.

Click image to see #whimsicalwednesday and #smallspacesunday Stitched Sample Gallery on Instagram.

Click image to see #whimsicalwednesday and #smallspacesunday Stitched Sample Gallery on Instagram.

I knew I wanted to do vertical columns three rows wide for the house in the photo. A Satin Stitch was the obvious choice. For clarity, Satin Stitches are diagonal stitches over the width of an area. They are great for columns and I frequently use them for columns anywhere between 2-4 rows. Satin Stitches can be found on page 18 in my first book as well as the Essentials guide. An alternating Satin Stitch can be found here.

Here’s where I make things complicated. I have a weird aversion to the simplest of Satin Stitches. I feel like I should do more. As a stitcher, I don’t like to fall back on the same thing (except for basketweave) when there are cute alternatives. And, as a teacher, I like having a bigger basket of tricks to pull from. And that is how I landed on today’s stitch. It’s a scaled-down version of a stitch I’ve seen a lot of on pinterest.

The stitched sample is three plies of white Splendor (black lines) and Petite Silk Lame (aqua lines) on another adorable Plum Stitchery holiday ornament.

It’s already in an upcoming stitch plan for some Charley Harper birds. The student will be using silk floss and a still to be determined metallic. It will also work well for clothing, especially pants, with Vineyard Silk (black lines) and a Kreinik metallic (aqua lines). I think it will make a beautiful bedspread or tablecloth with silk or cotton floss (black lines) and Soie Perlee (aqua lines).

This stitch diagram, along with all other #whimsicalwednesday and #smallspacesunday stitch diagrams, can also be found on a Pinterest board here. Be sure to follow whimsicalstitch.com on FacebookPinterestInstagram, and Twitter.

IIf you like what you see on this blog, there's more: Mary’s Whimsical Stitches Volume 1 is a contemporary how-to collection of more than 250 stitches for stitchers regardless of skill level. The book includes updated and sequenced diagrams from this blog, all-new stitches, and a chapter on the basics of needlepoint; Mary’s Whimsical Stitches Volume 2 features chapters on Balanced, Beading, Diagonal, Layered, Oblique, Small, and Straight stitches.

Also, you can download for free the first chapter from my first book which covers basic needlepoint stitches and stitch compensation techniques along with new top-line information on needlepoint materials and tools, how to handle threads, and other helpful needlepoint resources.

whimsicalstitch.com also sells Stitch Guides and Stitch Concepts for Melissa Shirley Designs, Zecca DesignsSandra Gilmore, Purple Palm, Maggie, and Penny MacLeod, and many more. Click here to see the newest guides and click here to see the entire collection.

I hope you have the perfect spot for this stitch! Please enjoy! Have a wonderful #whimsicalwednesday!

A Note about Diagrams
I use color in diagrams to make them as clear as possible.  The primary function of different colored lines is to illustrate a stitch sequence.  For example, layering of colors demonstrates you add them in that order.  They can also provide ideas on how to integrate additional threads (one line for each color).  Or, you can use the same thread for all color lines.  That's where I encourage you to use your imagination for the space you are stitching!

Shoot for the Moon

I’ve been playing with oblique diamonds a lot lately. Vertical or horizontal columns of oblique diamonds make a great background or wall stitch. Combine them and you have an adorable flower grid!

Click image to see the whimsicalstitch Stitch Library on pinterest.com. Includes all #whimsicalwednesday and #smallspacesunday stitch diagrams.

Click image to see the whimsicalstitch Stitch Library on pinterest.com. Includes all #whimsicalwednesday and #smallspacesunday stitch diagrams.

Click image to see #whimsicalwednesday and #smallspacesunday Stitched Sample Gallery on Instagram.

Click image to see #whimsicalwednesday and #smallspacesunday Stitched Sample Gallery on Instagram.

The stitched sample is a moon from Plum Stitchery’s Silent ornament stitched in size 8 Kreinik on 18M. To minimize visible threads, I stitched the columns one side at a time from top to bottom (or left to right) and returned up (or across the canvas) to complete the diamonds.

This stitch will be great for water with the same Kreinik or Petite Silk Lame. It will also work well for clothing, especially an elegant dress, with silk floss (black lines) and the addition of a seed bead over two rows in the center of the empty 2X2 squares. Consider filling that 2X2 square with four beads for a really glamorous look for one of Alice Peterson’s art deco ladies!

This stitch diagram, along with all other #whimsicalwednesday and #smallspacesunday stitch diagrams, can also be found on a Pinterest board here. Be sure to follow whimsicalstitch.com on FacebookPinterestInstagram, and Twitter.

IIf you like what you see on this blog, there's more: Mary’s Whimsical Stitches Volume 1 is a contemporary how-to collection of more than 250 stitches for stitchers regardless of skill level. The book includes updated and sequenced diagrams from this blog, all-new stitches, and a chapter on the basics of needlepoint; Mary’s Whimsical Stitches Volume 2 features chapters on Balanced, Beading, Diagonal, Layered, Oblique, Small, and Straight stitches.

Also, you can download for free the first chapter from my first book which covers basic needlepoint stitches and stitch compensation techniques along with new top-line information on needlepoint materials and tools, how to handle threads, and other helpful needlepoint resources.

whimsicalstitch.com also sells Stitch Guides and Stitch Concepts for Melissa Shirley Designs, Zecca DesignsSandra Gilmore, Purple Palm, Maggie, and Penny MacLeod, and many more. Click here to see the newest guides and click here to see the entire collection.

I hope you have the perfect spot for this stitch! Please enjoy! Have a wonderful #whimsicalwednesday!

A Note about Diagrams
I use color in diagrams to make them as clear as possible.  The primary function of different colored lines is to illustrate a stitch sequence.  For example, layering of colors demonstrates you add them in that order.  They can also provide ideas on how to integrate additional threads (one line for each color).  Or, you can use the same thread for all color lines.  That's where I encourage you to use your imagination for the space you are stitching!

Oops. I Did It Again

Remember my epiphany about skipping rows? Well, skipping a row helped me fit a stitch into a short space without the need to compensate at the top or bottom. The fact a cute stitch emerged is simply icing on the cake!

Click image to see the whimsicalstitch Stitch Library on pinterest.com. Includes all #whimsicalwednesday and #smallspacesunday stitch diagrams.

Click image to see #whimsicalwednesday and #smallspacesunday Stitched Sample Gallery on Instagram.

The stitched sample is me playing with three plies of Splendor (black lines) and Petite Silk Lame (yellow lines), along with the requisite cat hair on a stitched sample less than 30 seconds old, on 18M.

The openness of this stitch will lend itself very well to a larger window with Petite Silk Lame, a size 4 Kreinik (for 18M), or a size 8 Kreinik (for 13M). I’m looking forward to using it on a cute dress or skirt with Soie Perlee (black lines) and Petite Silk Lame (yellow lines). This still will also work well for a number of household items, such as a tablecloth or wingback chair.

If you want to add a burst of elegance to the stitch for a dress, consider replacing the Oblique Cross Stitches (yellow lines) with two seed beads.

This stitch diagram, along with all other #whimsicalwednesday and #smallspacesunday stitch diagrams, can also be found on a Pinterest board here. Be sure to follow whimsicalstitch.com on FacebookPinterestInstagram, and Twitter.

IIf you like what you see on this blog, there's more: Mary’s Whimsical Stitches Volume 1 is a contemporary how-to collection of more than 250 stitches for stitchers regardless of skill level. The book includes updated and sequenced diagrams from this blog, all-new stitches, and a chapter on the basics of needlepoint; Mary’s Whimsical Stitches Volume 2 features chapters on Balanced, Beading, Diagonal, Layered, Oblique, Small, and Straight stitches.

Also, you can download for free the first chapter from my first book which covers basic needlepoint stitches and stitch compensation techniques along with new top-line information on needlepoint materials and tools, how to handle threads, and other helpful needlepoint resources.

whimsicalstitch.com also sells Stitch Guides and Stitch Concepts for Melissa Shirley Designs, Zecca DesignsSandra Gilmore, Purple Palm, Maggie, and Penny MacLeod, and many more. Click here to see the newest guides and click here to see the entire collection.

I hope you have the perfect spot for this stitch! Please enjoy! Have a wonderful #whimsicalwednesday!

A Note about Diagrams
I use color in diagrams to make them as clear as possible.  The primary function of different colored lines is to illustrate a stitch sequence.  For example, layering of colors demonstrates you add them in that order.  They can also provide ideas on how to integrate additional threads (one line for each color).  Or, you can use the same thread for all color lines.  That's where I encourage you to use your imagination for the space you are stitching!

Making a Go-To Different

I remember stitching this blanket from two years ago like it was yesterday. I recall this because I was disappointed in myself for returning, again, to a go-to stitch for a tall narrow area. There’s nothing wrong with tried and true, but I wanted something more. It was kinda fun (and enlightening) to see what the simple addition of two stitches to the pattern makes. Or should I say fun, enlightening, and a relief?

Click image to see the whimsicalstitch Stitch Library on pinterest.com. Includes all #whimsicalwednesday and #smallspacesunday stitch diagrams.

Click image to see the whimsicalstitch Stitch Library on pinterest.com. Includes all #whimsicalwednesday and #smallspacesunday stitch diagrams.

Click image to see the whimsicalstitch Stitch Library on pinterest.com. Includes all #whimsicalwednesday and #smallspacesunday stitch diagrams.

Click image to see the whimsicalstitch Stitch Library on pinterest.com. Includes all #whimsicalwednesday and #smallspacesunday stitch diagrams.

Click on image to see #whimsicalwednesday and #smallspacesunday Stitched Sample Gallery on Instagram.

Click on image to see #whimsicalwednesday and #smallspacesunday Stitched Sample Gallery on Instagram.

The go-to stitch is what I consider classic Tramme (far right), a layered stitch with a base thread (black lines) and trios of accent stitches (aqua lines). The original plan was to do that with pairs of accent stitches (instead of trios). It was working as the scale fit the space but *something* was missing. I was bummed and not sure what to do in its place. Disappointment can sometimes turn into great inspiration. On a whim, I added the vertical lines on either side of select pairs of accent stitches and was immediately smitten…and very relieved.

Today’s stitch has more texture than its cousins. While most tramme lends itself to clothing, this one has a little extra texture that will work well for coats, pants, blankets, or scarves. The stitched sample is a border on a blanket from Walking in the Rain by Zecca. I used Trebizond Silk for the base threads (black lines) and Petite Silk Lame for the accent threads (aqua lines). Imagine what fun you could have with color combinations. For example, I would stitch pants with Petite Very Velvet (black lines), a contrasting silk floss for the horizontal accent threads, and a matching metallic for the vertical accent threads.

This stitch diagram, along with all other #whimsicalwednesday and #smallspacesunday stitch diagrams, can also be found on a Pinterest board here. Be sure to follow whimsicalstitch.com on FacebookPinterestInstagram, and Twitter.

IIf you like what you see on this blog, there's more: Mary’s Whimsical Stitches Volume 1 is a contemporary how-to collection of more than 250 stitches for stitchers regardless of skill level. The book includes updated and sequenced diagrams from this blog, all-new stitches, and a chapter on the basics of needlepoint; Mary’s Whimsical Stitches Volume 2 features chapters on Balanced, Beading, Diagonal, Layered, Oblique, Small, and Straight stitches.

Also, you can download for free the first chapter from my first book which covers basic needlepoint stitches and stitch compensation techniques along with new top-line information on needlepoint materials and tools, how to handle threads, and other helpful needlepoint resources.

whimsicalstitch.com also sells Stitch Guides and Stitch Concepts for Melissa Shirley Designs, Zecca DesignsSandra Gilmore, Purple Palm, Maggie, and Penny MacLeod, and many more. Click here to see the newest guides and click here to see the entire collection.

I hope you have the perfect spot for this stitch! Please enjoy! Have a wonderful #whimsicalwednesday!

A Note about Diagrams
I use color in diagrams to make them as clear as possible.  The primary function of different colored lines is to illustrate a stitch sequence.  For example, layering of colors demonstrates you add them in that order.  They can also provide ideas on how to integrate additional threads (one line for each color).  Or, you can use the same thread for all color lines.  That's where I encourage you to use your imagination for the space you are stitching!

Our First Pun Stitch

It took me at least 24 hours to realize the true punnery of today’s stitch magic from one of my favorite East Coast stitchers. She created carrots in diamonds. (Get it?)

Click image to see the whimsicalstitch Stitch Library on pinterest.com. Includes all #whimsicalwednesday and #smallspacesunday stitch diagrams.

Click image to see the whimsicalstitch Stitch Library on pinterest.com. Includes all #whimsicalwednesday and #smallspacesunday stitch diagrams.

Click image to see the whimsicalstitch Stitch Library on pinterest.com. Includes all #whimsicalwednesday and #smallspacesunday stitch diagrams.

Click image to see the whimsicalstitch Stitch Library on pinterest.com. Includes all #whimsicalwednesday and #smallspacesunday stitch diagrams.

Click on image to see the gallery of #whimsicalwednesday and #smallspacesunday stitched samples on Instagram.

Click on image to see the gallery of #whimsicalwednesday and #smallspacesunday stitched samples on Instagram.

It all started with a background for an adorable Christmas bunny. We worked together and landed on carrots! I created an easy red and white gingham border for the piece and she hopped off to the races. (Photo of the completed piece is on Instagram.) We connected a few weeks ago and I thought I was going to see cute carrots with Petite Silk Lame (black lines) and Straw Silk (aqua lines). And, I did. But look at what else she did! She surrounded them with the diamond stitch from May and created this wonderful background! It is too cute for words. I love this.

This is the part of the blog where I share other ideas for the stitch. Carrots may be a smidge limiting (adorable but limiting), but there are so many things you could put in the centers that aren’t carrots. Little hearts, more diamonds, or stars. I hope you get the idea. I can’t wait to see the fabricated pillow!

This stitch diagram, along with all other #whimsicalwednesday and #smallspacesunday stitch diagrams, can also be found on a Pinterest board here. Be sure to follow whimsicalstitch.com on FacebookPinterestInstagram, and Twitter.

IIf you like what you see on this blog, there's more: Mary’s Whimsical Stitches Volume 1 is a contemporary how-to collection of more than 250 stitches for stitchers regardless of skill level. The book includes updated and sequenced diagrams from this blog, all-new stitches, and a chapter on the basics of needlepoint; Mary’s Whimsical Stitches Volume 2 features chapters on Balanced, Beading, Diagonal, Layered, Oblique, Small, and Straight stitches.

Also, you can download for free the first chapter from my first book which covers basic needlepoint stitches and stitch compensation techniques along with new top-line information on needlepoint materials and tools, how to handle threads, and other helpful needlepoint resources.

whimsicalstitch.com also sells Stitch Guides and Stitch Concepts for Melissa Shirley Designs, Zecca DesignsSandra Gilmore, Purple Palm, Maggie, and Penny MacLeod, and many more. Click here to see the newest guides and click here to see the entire collection.

I hope you have the perfect spot for this stitch! Please enjoy! Have a wonderful #whimsicalwednesday!

A Note about Diagrams
I use color in diagrams to make them as clear as possible.  The primary function of different colored lines is to illustrate a stitch sequence.  For example, layering of colors demonstrates you add them in that order.  They can also provide ideas on how to integrate additional threads (one line for each color).  Or, you can use the same thread for all color lines.  That's where I encourage you to use your imagination for the space you are stitching!

Let Me Count the Ways

Today’s post reflects current stitching and some work I’m doing with a customer. And they all involve larger squares.

I like to add borders to squares to have a finished edge, especially if they are surrounded by other squares. My most common border is a Satin Stitch over two rows around the outer edges. Depending on the size of the square, it could be three (or maybe more) rows wide. So that’s the easy part as far as I’m concerned. The challenge is how to fill the square center. An easy solution is a Scotch Stitch, but that isn’t always satisfying. (The Scotch Stitch is represented by the black lines in that link.)

Today’s post offers three different ideas for you. All of the stitches are from the Small Stitches chapter in my first book.

Click on image to see on whimsicalstitch.com's Pinterest account. Visit pinterest.com/whimsicalstitch/whimsicalwednesday for a library of all #whimsicalwednesday and #smallspacesunday stitch diagrams.

Click on image to see on whimsicalstitch.com's Pinterest account. Visit pinterest.com/whimsicalstitch/whimsicalwednesday for a library of all #whimsicalwednesday and #smallspacesunday stitch diagrams.

Click on image to see on whimsicalstitch.com's Instagram account. Visit instagram.com/whimsicalstitch to see a library of stitched samples for select #whimsicalwednesday and #smallspacesunday stitch diagrams.

Click on image to see on whimsicalstitch.com's Instagram account. Visit instagram.com/whimsicalstitch to see a library of stitched samples for select #whimsicalwednesday and #smallspacesunday stitch diagrams.

The stitched sample is one of Alice Peterson’s adorable gingham ornaments. Reverse Basketweave fills the center, offering a smooth and elegant touch to the squares. The pink squares are stitched with Petite Silk Lame (turquoise lines) and three plies of Splendor (black lines). The white squares are stitched with two plies of Mandarin Floss (turquoise lines) and Petite Silk Lame (black lines).

Click on image to see on whimsicalstitch.com's Pinterest account. Visit pinterest.com/whimsicalstitch/whimsicalwednesday for a library of all #whimsicalwednesday and #smallspacesunday stitch diagrams.

Click on image to see on whimsicalstitch.com's Pinterest account. Visit pinterest.com/whimsicalstitch/whimsicalwednesday for a library of all #whimsicalwednesday and #smallspacesunday stitch diagrams.

Click on image to see on whimsicalstitch.com's Instagram account. Visit instagram.com/whimsicalstitch to see a library of stitched samples for select #whimsicalwednesday and #smallspacesunday stitch diagrams.

Click on image to see on whimsicalstitch.com's Instagram account. Visit instagram.com/whimsicalstitch to see a library of stitched samples for select #whimsicalwednesday and #smallspacesunday stitch diagrams.

These squares are filled with Oblique Crosses and the fun comes in with the two thread colors for the Cross Stitches (yellow lines). The insides of these squares are stitched with Shimmer Ribbon (turquoise lines) and green and white Vineyard Silk (yellow lines). As you can see, the border is over three rows and I used Jessicas for the corners.

Click on image to see on whimsicalstitch.com's Pinterest account. Visit pinterest.com/whimsicalstitch/whimsicalwednesday for a library of all #whimsicalwednesday and #smallspacesunday stitch diagrams.

Click on image to see on whimsicalstitch.com's Pinterest account. Visit pinterest.com/whimsicalstitch/whimsicalwednesday for a library of all #whimsicalwednesday and #smallspacesunday stitch diagrams.

Click on image to see on whimsicalstitch.com's Instagram account. Visit instagram.com/whimsicalstitch to see a library of stitched samples for select #whimsicalwednesday and #smallspacesunday stitch diagrams.

Click on image to see on whimsicalstitch.com's Instagram account. Visit instagram.com/whimsicalstitch to see a library of stitched samples for select #whimsicalwednesday and #smallspacesunday stitch diagrams.

One of my long-time go-to stitches (Woven Hungarian) fills the squares above. It uses Shimmer Ribbon (turquoise lines) and Vineyard Silk (gray lines).

These stitch diagrams, along with all other #whimsicalwednesday and #smallspacesunday stitch diagrams, can also be found on a Pinterest board here. Be sure to follow whimsicalstitch.com on FacebookPinterestInstagram, and Twitter.

IIf you like what you see on this blog, there's more: Mary’s Whimsical Stitches Volume 1 is a contemporary how-to collection of more than 250 stitches for stitchers regardless of skill level. The book includes updated and sequenced diagrams from this blog, all-new stitches, and a chapter on the basics of needlepoint; Mary’s Whimsical Stitches Volume 2 features chapters on Balanced, Beading, Diagonal, Layered, Oblique, Small, and Straight stitches.

Also, you can download for free the first chapter from my first book which covers basic needlepoint stitches and stitch compensation techniques along with new top-line information on needlepoint materials and tools, how to handle threads, and other helpful needlepoint resources.

whimsicalstitch.com also sells Stitch Guides and Stitch Concepts for Melissa Shirley Designs, Zecca DesignsSandra Gilmore, Purple Palm, Maggie, and Penny MacLeod, and many more. Click here to see the newest guides and click here to see the entire collection.

I hope you have the perfect spot for this stitch! Please enjoy! Have a wonderful #whimsicalwednesday!

A Note about Diagrams
I use color in diagrams to make them as clear as possible.  The primary function of different colored lines is to illustrate a stitch sequence.  For example, layering of colors demonstrates you add them in that order.  They can also provide ideas on how to integrate additional threads (one line for each color).  Or, you can use the same thread for all color lines.  That's where I encourage you to use your imagination for the space you are stitching!