

I’m about thisclose to finishing the sky on my current project and, of course, I had to take a break and stare at it. (It’s what needlepointers do.) And then I started stitch doodling in the corner. Uh oh.
As the title of the blog says, the sky ended as it started BUT I recorded what I would have done if I thought of it sooner and what I will do the next time a sky presents itself to be stitched. (Full disclosure: I love both stitches.)
How it started and ended:

Click image to see the whimsicalstitch Stitch Library on pinterest.com. Includes all #whimsicalwednesday and #smallspacesunday stitch diagrams.

Click image to see #whimsicalwednesday and #smallspacesunday Stitched Sample Gallery on Instagram.
The sky is stitched with two plies of Soie d’Alger on 18M. I’ve shared darning stitches before. What makes darning stitches unique is that they are essentially a running stitch from edge to edge, with smooth edges. Your typical needlepoint stitch has smooth, wrapped corners. For today’s stitch, I stitched all of the diagonal stitches in one direction together (numbered steps) and followed up with the opposite direction (lettered steps).
And then I had to go and stitch doodle.
Click image to see the whimsicalstitch Stitch Library on pinterest.com. Includes all #whimsicalwednesday and #smallspacesunday stitch diagrams.

Click image to see #whimsicalwednesday and #smallspacesunday Stitched Sample Gallery on Instagram.
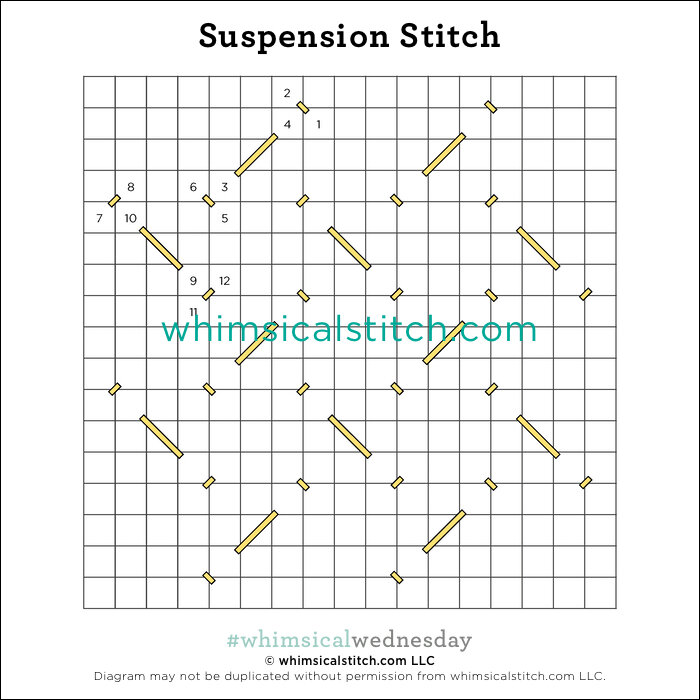
The doodle…I mean the Suspension Stitch also uses two plies of the same Soie. The repeated element is a diagonal stitch over two with two tent stitches on either side. It reminded me of a car suspension, hence the name. (Full disclosure: I worked in automotive marketing in my past life. An automotive friend observed about the stitch, “it’s suspension at the little red wagon level!”)
I think both of these stitches will work well in any number of areas, beginning with water, sand, or sky. Consider either for a larger piece of glass you want to draw some attention to. I’m also toying with changing the color or finish of the tent stitches for a little added surprise.
These stitch diagrams, along with all other #whimsicalwednesday and #smallspacesunday stitch diagrams, can also be found on a Pinterest board here. Be sure to follow whimsicalstitch.com on Facebook, Pinterest, Instagram, and Twitter.
IIf you like what you see on this blog, there's more: Mary’s Whimsical Stitches Volume 1 is a contemporary how-to collection of more than 250 stitches for stitchers regardless of skill level. The book includes updated and sequenced diagrams from this blog, all-new stitches, and a chapter on the basics of needlepoint; Mary’s Whimsical Stitches Volume 2 features chapters on Balanced, Beading, Diagonal, Layered, Oblique, Small, and Straight stitches.
Also, you can download for free the first chapter from my first book which covers basic needlepoint stitches and stitch compensation techniques along with new top-line information on needlepoint materials and tools, how to handle threads, and other helpful needlepoint resources.
whimsicalstitch.com also sells Stitch Guides and Stitch Concepts for Melissa Shirley Designs, Zecca Designs, Sandra Gilmore, Purple Palm, Maggie, and Penny MacLeod, and many more. Click here to see the newest guides and click here to see the entire collection.
I hope you have the perfect spot for this stitch! Please enjoy! Have a wonderful #whimsicalwednesday!
A Note about Diagrams
I use color in diagrams to make them as clear as possible. The primary function of different colored lines is to illustrate a stitch sequence. For example, layering of colors demonstrates you add them in that order. They can also provide ideas on how to integrate additional threads (one line for each color). Or, you can use the same thread for all color lines. That's where I encourage you to use your imagination for the space you are stitching!