It's a (Small) Brick House

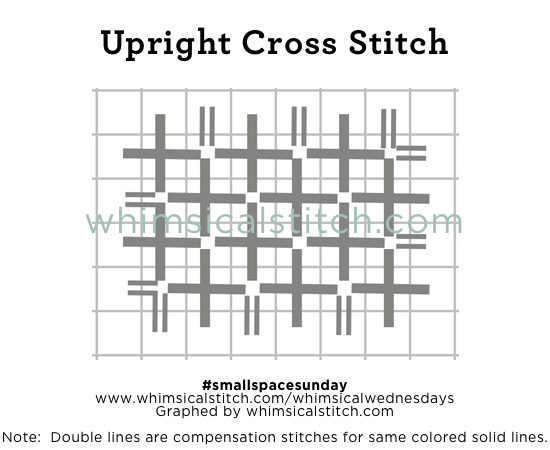
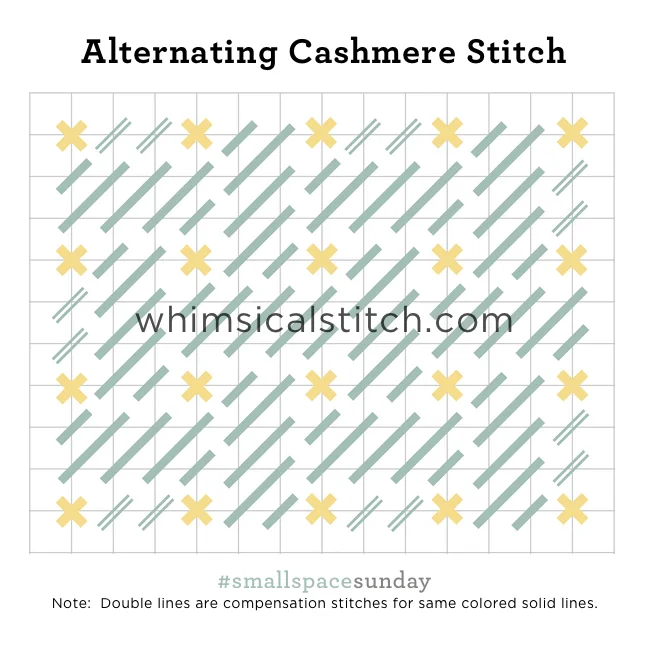
Today's stitch is a small version of the Cashmere stitch.  The Alternating Cashmere stitch simply alternates 4X2 rectangles, leaving one intersection available for an accent.

It's great for small houses, as illustrated by the stitched sample on Instagram.  Other ideas for areas include backgrounds for small pieces (ornaments, box inserts, eyeglass cases, etc), clothing in smaller areas (especially pants), boots (for any size boots), rooftops, or ground cover.    

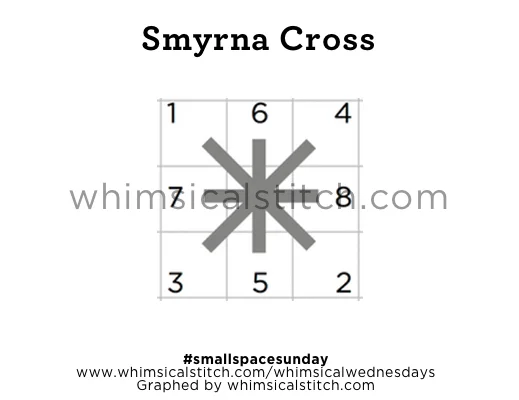
So, a funny thing happened on the way to the accent stitch (the yellow lines).  While I charted it to be distinctly different, whether through contrasting color or contrasting thread type, when I stitch, I've been using the same thread as the remainder of the area for a really subtle end result. 

This stitch diagram, along with other #whimsicalwednesday and #smallspacesunday stitch diagrams, can also be found on www.pinterest.com/whimsicalstitch/whimsicalwednesday.  

Be sure to follow whimsicalstitch.com on FacebookPinterestInstagram, and Twitter.

If you like what you see on this blog, want to learn some very creative decorative stitches, and how to put them all together, whimsicalstitch.com sells stitch guides for seasonal Melissa Shirley designs.  22 guides are currently available and more are in the pipeline.

Enjoy! 

Small Skies Part 2

We wrap up the month of sky stitches with a #smallspacesunday.  I've named today's stitch "Small Trellis" because it reminds me of a trellis, I can't find a real name for it, and you may know by now that names aren't essential to me.  Seriously.  When we chat about stitches at my local needlepoint store, it goes like this:

Needlepoint Friend*:  "Does anyone have an idea for how I can stitch this area?"

Me:  "Oh, sure.  Do 1-2-1-2-1 with the thing in the center.  So and so did it on the flower center in the Zecca piece."

Needlepoint Friend:  "Oh!  I know exactly what you're talking about.  Sounds great.  Thanks."

*  Clearly, we've been doing this together for a while and have that shorthand.

This stitch would probably be called the "2-1-2 Diamond and don't worry about the centers."

This stitch is adaptable to so many spaces.  What makes it work for a sky is leaving the centers, both the square and the diamond shaped centers, empty.  For most other spaces, I would fill in one or both, but the simplicity of this makes it perfect for a sky.

I prefer this stitch with a lightweight matte thread.  Elegance or Grandeur are my go to threads here.  The stitched sample on Instagram uses Elegance on 18-mesh.

On a separate but related subject, I would love to receive feedback on whimsicalstitch.com.  Please visit this link to fill out a short survey.  Thank you!

This stitch diagram, along with other #whimsicalwednesday and #smallspacesunday stitch diagrams, can also be found on www.pinterest.com/whimsicalstitch/whimsicalwednesday.  

Be sure to follow whimsicalstitch.com on FacebookPinterestInstagram, and Twitter.

If you like what you see on this blog, want to learn some very creative decorative stitches, and how to put them all together, whimsicalstitch.com sells stitch guides for seasonal Melissa Shirley designs.  22 guides are currently available and more are in the pipeline.

Enjoy! 

Sweet Sky

Welcome to the month of skies!  We kick off the month with a #smallspacesunday.

Today's stitch is the Step Stitch.  The openness allows the beautiful shading of most skies to show through the thread.  What I like most about it is its scalability.  You can do the stitches as small as two, or larger depending on your space.   

The diagram is over three, as is the stitched sample on Instagram.  The stitched sample also illustrates that it doesn't matter which direction you go on the diagonal.  The diagram is up to the left and the sample is up to the right.

As with most open stitches, I like to use a slightly lighter weight thread than a canvas typically calls for.  As an example, a dark night sky on a Christmas stocking (on 18 mesh) looks fantastic with a single strand of Petite Silk Lame.  Petite Silk Lame is the perfect combination of matte and metallic in one thread.  If you want your night sky to shimmer, consider Kreinik Metallics Very Fine Braid (#4) on 18 mesh.  For a daytime sky, my go to thread is Elegance, regardless of mesh size.   DMC and Anchor Pearl #8 and #12 are two more to consider, and they have a wider color selection.

This stitch diagram, along with other #whimsicalwednesday and #smallspacesunday stitch diagrams, can also be found on www.pinterest.com/whimsicalstitch/whimsicalwednesday.  

Be sure to follow whimsicalstitch.com on FacebookPinterestInstagram, and Twitter.

If you like what you see on this blog, want to learn some very creative decorative stitches, and how to put them all together, whimsicalstitch.com sells stitch guides for seasonal Melissa Shirley designs.  20 guides are currently available and more are in the pipeline.

Enjoy!

Smaller than Small

Another often overlooked small space stitch is the Cross Stitch.  Because, really, what's more fun than plain needlepoint than plain needlepoint twice over the same intersection?

Click on image to see on whimsicalstitch.com's Pinterest account. Visit pinterest.com/whimsicalstitch/whimsicalwednesday for a library of all #whimsicalwednesday and #smallspacesunday stitch diagrams.

Click on image to see on whimsicalstitch.com's Pinterest account. Visit pinterest.com/whimsicalstitch/whimsicalwednesday for a library of all #whimsicalwednesday and #smallspacesunday stitch diagrams.

What sets the Cross Stitch apart is its unique ability to be a single stand-alone stitch.  Steps 1-4 illustrate the sequence for the individual stitch.  You can use it for an eye, a button, an earring, a flower center, or a star.  Use it for any single stitch that needs to stand apart, however delicately, from the area around it.  For use as a single stitch, it works best if the area surrounding it is a different color.  It also makes a great accent stitch in a larger pattern, illustrated by the stitched sample on Instagram.

The entire diagram shows a cluster of Cross Stitches. Consider covering an entire small area that needs texture yet needs to recede a little bit.  Consider it for groundcover in the distance on a landscape.  It also makes a great tree trunk, allowing the (more enjoyable to stitch*) leaves to stand out.

Be sure to follow whimsicalstitch.com on FacebookPinterestInstagram, and Twitter.

If you like what you see on this blog, want to learn some very creative decorative stitches, and how to put them all together, whimsicalstitch.com has a book for you! Mary’s Whimsical Stitches is a contemporary how-to collection of more than 250 stitches for stitchers regardless of skill level. The book includes updated and sequenced diagrams from this blog, all-new stitches, and a chapter on the basics of needlepoint. For more information, visit here.

whimsicalstitch.com also sells Stitch Guides and Stitch Concepts for Melissa Shirley Designs, Zecca DesignsSandra Gilmore, Purple Palm, Maggie, and Penny MacLeod, and many more. Click here to see the newest guides and click here to see the entire collection.

I hope you have the perfect spot for this stitch! Please enjoy! Have a wonderful #smallspacesunday!

A Note about Diagrams
I use color in diagrams to make them as clear as possible.  The primary function of different colored lines is to illustrate a stitch sequence.  For example, layering of colors demonstrates you add them in that order.  They can also provide ideas on how to integrate additional threads (one line for each color).  Or, you can use the same thread for all color lines.  That's where I encourage you to use your imagination for the space you are stitching!

#swisssunday

Today's #smallspacesunday stitch is a quiet and easy stitch.  It utilizes the easiest and smallest stitch of all, Plain Needlepoint.  You can also use a Cross Stitch to add effect.  (I discussed the Cross Stitch a couple weeks ago.)

Dotted Swiss is really lovely and classy.  I've used versions of it for backgrounds, small spaces, and clothing.  It brings a tiny little pop to a traditional stitch. The diagram below includes a Cross Stitch variant.

Needless to say, the pop is defined by the color contrast between the two threads.  There are two stitched samples for this stitch on whimsicalstitch.com's Instagram account.  The first is a sail on a sailboat where I used a blue metallic as the base thread and a white floss as the accent.  The second example is a tone on tone background, using all Plain Needlepoint (and a slightly different Dotted Swiss pattern).  Another idea is to use a lightweight matte thread like Elegance or Pearl #8 with a Very Velvet as the cross stitch accent.  That would add a surprising pop of texture.

The fact that this stitch can be used for a background or the smallest of items on a canvas demonstrates its uniqueness.

This stitch diagram, along with other #whimsicalwednesday and #smallspacesunday stitch diagrams, can also be found on www.pinterest.com/whimsicalstitch/whimsicalwednesday.  

Be sure to follow whimsicalstitch.com on FacebookPinterestInstagram, and Twitter.

If you like what you see on this blog, want to learn some very creative decorative stitches, and how to put them all together, whimsicalstitch.com sells stitch guides for seasonal Melissa Shirley designs.  20 guides are currently available and more are in the pipeline.

Enjoy!

3X3

3X3 squares can be frustrating because they are just on the cusp of being something significant.  If you could just do one or two more rows, there are lots of fun options.

Alas, you are so wrong!  (Okay, I'm wrong, but work with me on this.)  Since it is still a small space (and this is #smallspacesunday) don't forget that combining threads (whether color or finish) is always a great start.  Here are four straightforward 3X3 stitches.  The first is the classic Scotch square.  The remaining three all have a little extra something due to the addition of a second thread.

As I was playing with 3X3 stitches for this post, I wanted to add a tied stitch, but realized I covered that in the 4X4 post with the Tied 4X4 Square.  (You could also "tie" 3X3 Alternating Scotch Squares.)  I started to play with this idea and ended up with what I call Whimsy Squares. 

This is a version of a Rice Stitch with the top stitches going over two rows instead of one.  (If there is a formal name for this stitch, I would love to hear it!  I could not find a name anywhere.)  The gray lines are added first, followed by the yellow or aqua lines.  Play with thread choices and have fun!  

The sequence of the yellow and aqua lines can be tricky.

The sequence is numbers followed by letters.  The only step to be mindful of is the last step of the diamond on the top.  Take a look at the "g-h" step.  You slide the final thread ("g-h") under the pre-existing thread ("a-b") to complete the stitch.

I consider the next stitch the classic 3X3 square, the Rhodes stitch.  

The Rhodes Stitch is an elegant, clean stitch.  It's great for borders or corners as its height gives it some stature.  It also makes a fantastic Christmas ornament or button, as it is a scalable stitch.  It is also adjustable to the space, whether it be a larger square or even a rectangle, as illustrated by the stitched sample on Instagram.  It is the same concept.  Starting in a corner, go to opposite corner, and continue to rotate around shape until it is full.

The last stitch for today is a stitch I call a Layered Diamond.  This is a beautiful accent, whether in a larger space, a border, or even as individual accent.   

I call it a Layered Diamond because the sequence of the four stitches creating the central diamond are all layered above and beneath each other.  The sequence for the diamond is the same as the sequence for the diamond in the Whimsy Square.  You insert it under the previously stitched thread, as illustrated in the "Whimsy Square Sequence" diagram above.

These stitch diagrams, along with other #whimsicalwednesday and #smallspacesunday stitch diagrams, can also be found on www.pinterest.com/whimsicalstitch/whimsicalwednesday.  

Be sure to follow whimsicalstitch.com on FacebookPinterestInstagram, and Twitter.

If you like what you see on this blog, want to learn some very creative decorative stitches, and how to put them all together, whimsicalstitch.com sells stitch guides for seasonal Melissa Shirley designs.  20 guides are currently available and more are in the pipeline.

Enjoy! 

It Takes Two

Today's #smallspacesunday focuses on the 2X2 square.  

The standard for a 2X2 square is the Mosaic Stitch, the smallest Satin Stitch there is.  

I diagrammed it in two colors to expand your thinking on small spaces.  The two colors represent two colors, thread types or both.  

The next is the Cross Stitch or, as I like to elegantly call it, an X.

You will notice the diagram is in same colors and in the same size.  But the color pattern is different.  Just another way to look at a space.

The next 2X2 is the Upright Cross.  

The Upright Cross is featured as the stitched sample on whimsicalstitch.com's Instagram page this week.

The Smyrna Cross is often overlooked because it adds a lovely pop of texture and most people think of it for only texture.  This begs the question...why not add the surprise of texture in a small space?  It's a lovely and unexpected touch.  And that's why I love it so.  

You will be surprised at how fun this stitch can be.  I've used it in "larger" small spaces such as a two-row high border, boots on a Santa, and as small bushes in the background in addition to the traditional small spaces such as a snowflake, a holiday ornament, or a button.  The Smyrna Cross adds a pop of contrasting color and texture in a larger stitch combo.

The possibilities are endless.  The only thing I obsess about is the application of a consistent stitch sequence.  My recommended sequence is above.  If you do a different sequence, I strongly encourage you to do the same sequence in all of the crosses.  

These stitch diagrams, along with other #whimsicalwednesday and #smallspacesunday stitch diagrams, can also be found on www.pinterest.com/whimsicalstitch/whimsicalwednesday.  

Be sure to follow whimsicalstitch.com on FacebookPinterestInstagram, and Twitter.

If you like what you see on this blog, want to learn some very creative decorative stitches, and how to put them all together, whimsicalstitch.com sells stitch guides for seasonal Melissa Shirley designs.  20 guides are currently available and more are in the pipeline.

Enjoy!

It's a Small Stitch. Seriously.

This stitch doesn't look small, but it is a perfect small stitch.  I discovered it while auditioning stitches for a soon to be released Melissa Shirley piece.  (The piece and the stitch guide will debut at the TNNA San Diego Show in early January, so stay tuned.)

Okay, self-promotion aside, this is a great stitch for small and large spaces.  I'm not aware of a proper name for it.  So, I'm calling it the Small Surprise Stitch.

The only real trick to this stitch is to do it one row at a time in a specific order.  As an explanation, the single stitch accent covering the larger base stitch is added in the opposite direction, so it is much easier to add that accent while there is less thread surrounding it.  

Specifically, starting in the upper left corner, do one row of the base stitch (the gray lines) traveling down the canvas on the diagonal, skipping a row in between.  Follow up with the first accent thread (the green line).  Add the next row of the base thread, going up the canvas on the diagonal, followed by the second contrasting thread (the yellow line).  Repeat that sequence to fill the area.  The stitched sample on Instagram helps you see how the compensation works.

The compensation looks intimidating, but it's quite easy once you realize the base thread is the only thread requiring compensation.    

This stitch diagram, along with other #whimsicalwednesday and #smallspacesunday stitch diagrams, can also be found on www.pinterest.com/whimsicalstitch/whimsicalwednesday.  

Be sure to follow whimsicalstitch.com on FacebookPinterestInstagram, and Twitter.

If you like what you see on this blog, want to learn some very creative decorative stitches, and how to put them all together, whimsicalstitch.com sells stitch guides for seasonal Melissa Shirley designs.  18 guides are currently available and more are in the pipeline.

I hope you have the perfect space for this stitch and enjoy it!

Baby Bling

As you may have noticed, I use very fancy, technical terms for stitch concepts.  Darling (for sweet stitches), Bling (fun dressy stitches with at least one metallic thread or bead), Trifecta (classy stitch with an element of three of some kind).  Today's #smallspacesunday features a Baby Bling stitch.  It's the clever combo of an upright cross stitch and a bead.

This stitch is great for any small space requiring more than a splash of excitement.  The beads are a nice surprise in this stitch, adding elegance and glamour.  What I also really like about this stitch is its inherent openness, allowing shading to show through.

Baby Bling Stitch.jpg

Since this is a bling stitch, I wholeheartedly encourage using a metallic for the Upright Cross.  If you want the beads to pop more, do the Upright Cross in a matte thread.  I've seen this stitch used as a flower petal, a lemon (as seen on the stitched sample on Instagram), and a roof.  It's truly versatile...yet the common denominator is a small space.

Speaking of the stitched sample, it uses a Kreinik Metallics Fine Braid (#8) and a #11 Sundance Bead.  It is a very light application of this stitch.  Consider a heavier metallic and larger bead if you would like the area to pop even more.  

This stitch diagram, along with other #whimsicalwednesday and #smallspacesunday stitch diagrams, can also be found on www.pinterest.com/whimsicalstitch/whimsicalwednesday.  

Be sure to follow whimsicalstitch.com on FacebookPinterestInstagram, and Twitter.

If you like what you see on this blog, want to learn some very creative decorative stitches, and how to put them all together, whimsicalstitch.com sells stitch guides for seasonal Melissa Shirley designs.  18 guides are currently available and more are in the pipeline.

Enjoy!

A Girl's Best Friend

The Diamond Stitch may not be the first stitch you think of for a small space, but it's a fun and versatile solution.

More often than not, the simplest of Diamond Stitches is the best for a small space.

Diamond Stitch.jpg

Don't freak out at the openness of the diagram.  Imagine the gray lines as a Frosty Rays, Fyre Werks, or Vineyard Silk.  The coverage is far better than the diagram illustrates.  With a lighter thread, such as Soy Lustre, Elegance, or Kreinik Metallics Very Fine Braid (#4), it works as a fantastic open stitch that highlights shading.

If you are using the Diamond Stitch as a small space stitch, filling the center of the diamond requires discretion.  You don't want to make it too busy and overpower the area.  Two quick ideas are an Upright Cross or a single bead.

As a small space stitch, I like to mix matte and metallic threads (my favorite combo) with similar color values.  I've also used two different colors...one as the diamond and one as the Upright Cross...to add color to an area or to relate the area to another section of the canvas. 

If you choose to add a single bead, remember the size of the bead will define the stitch.  A larger bead will draw attention to the area.  

These stitch diagrams, along with other #whimsicalwednesday and #smallspacesunday stitch diagrams, can also be found on www.pinterest.com/whimsicalstitch/whimsicalwednesday.  

Be sure to follow whimsicalstitch.com on FacebookPinterestInstagram, and Twitter.

If you like what you see on this blog, want to learn some very creative decorative stitches, and how to put them all together, whimsicalstitch.com sells stitch guides for seasonal Melissa Shirley designs.  17 guides are currently available and more are in the pipeline.

Enjoy!