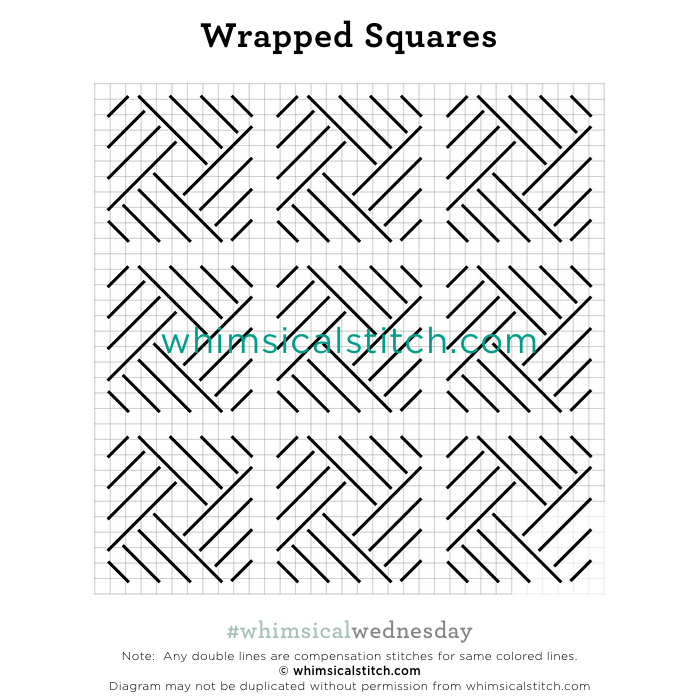
Today’s stitch came from a recent foray into the internet rabbit hole. For once, I reappeared from said rabbit hole a. after a reasonable amount of time, b. with a darling new stitch idea, and c. no new and unusable knowledge about contemporary pop culture. Take that, internet rabbit hole!
The stitched sample is me playing on 18-mesh with a size 12 red Kreinik and a green Fyre Werks. (More on that below.)
These squares are really rounded squares as the corners are over two rows (on the diagonal). I put an empty row between the squares because the sides don’t line up perfectly and I was afraid you would lose the distinct pattern of each square.
In all honesty, the first thing I thought of when I pulled this stitch together was how cute these would be in a random placement. Yes, I know random anything gives some stitchers hives, but hear me out. The size of these begs for random placement. They would be wonderful sprinkled on a solid background, like one of the new tall Zecca birds or a Mary Lake Thompson still life white background. Or, put them in columns, alternating color or finishes or both between columns. You may add as much open space between columns as you need.
These would make a great addition to a sampler. I like the idea of alternating them with another 10X10 square stitch, creating a checkerboard. As I mentioned earlier, I think they would make a wonderful background stitch. Using a Mary Lake Thompson still life as an example, I would stitch these in columns, leaving 3-4 empty rows between columns with a lightweight silk perle. Returning to the stitched sample for a moment, you see the distinct difference the Kreinik makes in defining the individual stitches. That is important since the empty rows between the stitches is an important part of the design.
BUT! Consider filling those empty rows in between the metallic stitches with a contrasting color for some real drama. That could make a fantastic Santa Coat on a tall stand up Santa, such as Amanda Lawford’s line. You could also add a single Upright Cross in the center of each square or a single bead over two rows on the vertical.
This stitch diagram, along with all other #whimsicalwednesday and #smallspacesunday stitch diagrams, can also be found on a Pinterest board here.
Be sure to follow whimsicalstitch.com on Facebook, Pinterest, Instagram, and Twitter.
If you like what you see on this blog, want to learn some very creative decorative stitches, and how to put them all together, whimsicalstitch.com sells Stitch Guides and Stitch Concepts for Melissa Shirley Designs, Zecca Designs, Sandra Gilmore, Purple Palm, Maggie, and Patience Brewster, and many more. Click here to see the newest guides and click here to see the entire collection.
I hope you have the perfect spot for this stitch! Please enjoy!
A Note about Diagrams
I use color in diagrams to make them as clear as possible. The primary function of different colored lines is to illustrate a stitch sequence. For example, layering of colors demonstrates you add them in that order. They can also provide ideas on how to integrate additional threads (one line for each color). Or, you can use the same thread for all color lines. That's where I encourage you to use your imagination for the space you are stitching!


